Every week the same question surfaces on r/hasselblad, in the Facebook groups, or in my inbox: what does a sensible Hasselblad workflow actually look like, start to finish? The answers people get are usually fragments. Someone explains their culling setup, someone else defends Phocus, a third person says they dropped Phocus entirely and never looked back.
This post is the whole thing in one place: the workflow I run on every shoot with my X2D II, which apps handle which stage, and the reasoning for each handoff. The short version is three stages: cull fast before Phocus ever opens, do a small and deliberate set of adjustments in Phocus, then hand a 16-bit TIFF to Lightroom Classic for everything else. The long version, including what I deliberately try to avoid doing in each app, is below.
Key finding: My complete Hasselblad workflow: cull in Palomino, then in Phocus 4.2 apply only the RAW-dependent steps (HNNR, white balance, highlight recovery, shadow fill, lens corrections), export with the built-in TIFF-16 preset, and finish in Lightroom Classic. Global exposure, curves, crops, and masking wait for Lightroom. The boundary between the apps is the whole method.
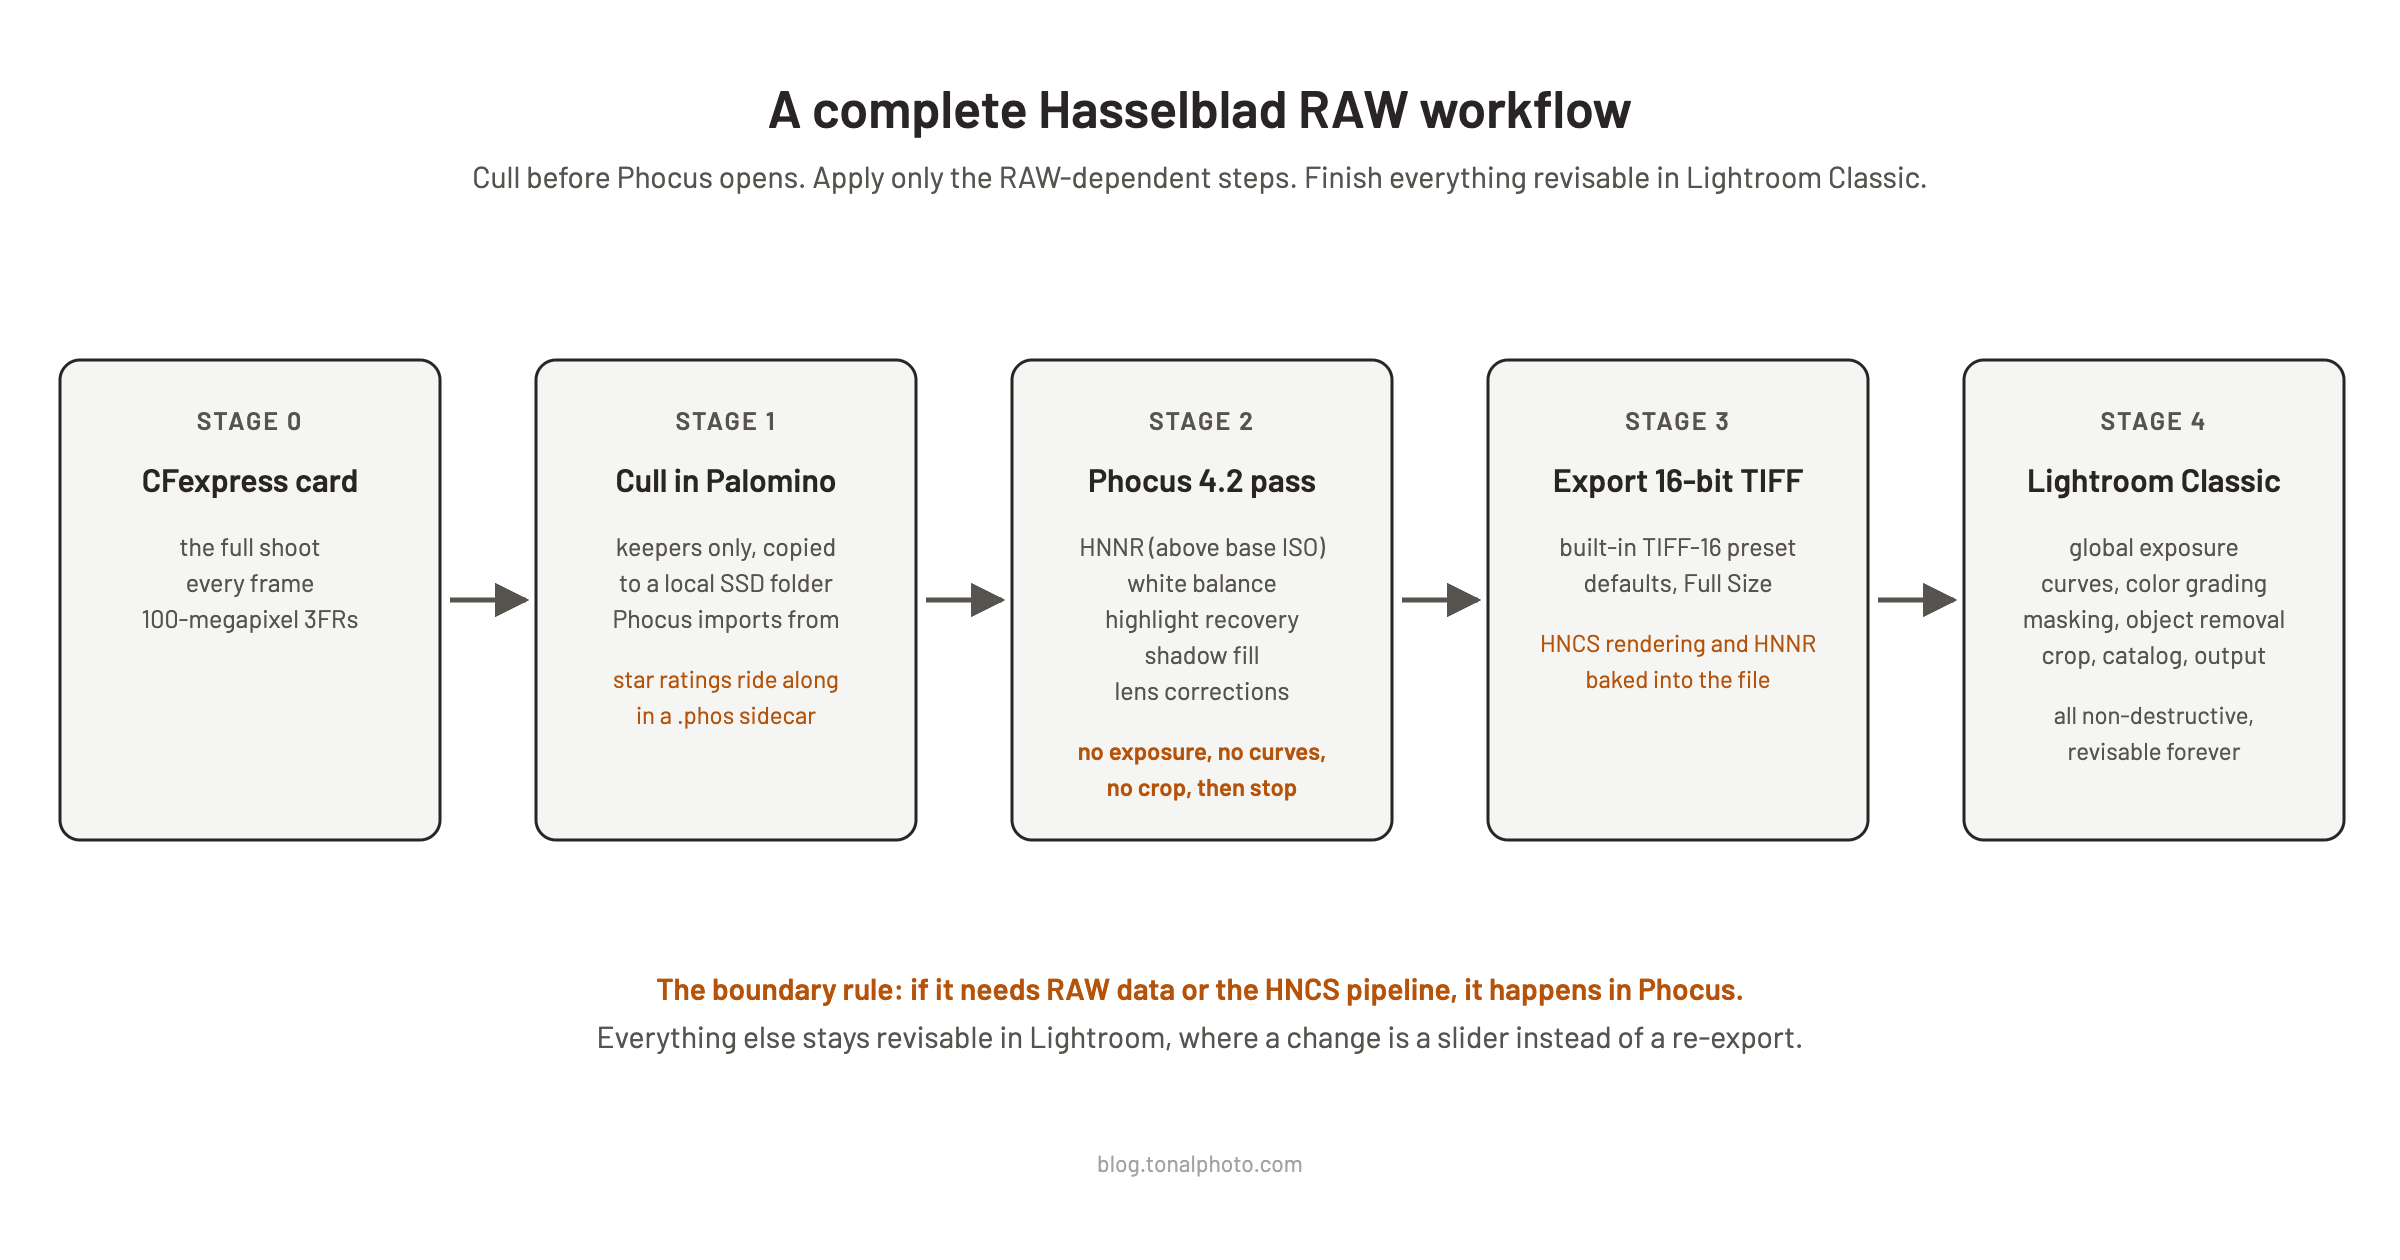
Figure 1: The five stages and the boundary rule. Each app does only what the others cannot.
Why use three apps instead of one?
Each stage of this pipeline does something the other two cannot, and the workflow works because nothing overlaps. Palomino culls at speeds Phocus cannot approach, because it reads the embedded JPEG preview instead of rendering 100-megapixel RAW data. Phocus renders with HNCS, Hasselblad's render-time color pipeline, and runs HNNR noise reduction on RAW sensor data. No other application has access to either. Lightroom Classic then does what it is genuinely best at: cataloging, masking, object removal, and final output. Pretty much all of my serious editing happens there, with an occasional handoff to Photoshop for the things Lightroom cannot do.
You can absolutely skip stages. Lightroom Classic and Capture One both open X2D II 3FR files directly now, and I have measured how the three renderers compare rather than guessing. Opening the 3FR straight in Lightroom is a legitimate choice, it is just a different one: you get Adobe's rendering of the sensor data instead of Hasselblad's, and no HNNR at all. I went through exactly what you keep and what you lose when you skip Phocus in a separate post. This workflow is for the days you want Hasselblad's rendering in the final file.
Stage 1: Cull in Palomino before Phocus opens
The single biggest speed win in this workflow happens before any editing app launches. A full card of 100-megapixel files is miserable to cull inside Phocus, so I do not. I cull in Palomino, the macOS culling app my friend Neil and I build (full disclosure: I added its Hasselblad 3FR support myself, and I wrote up how a 1,500-frame cull comes down to about fifteen minutes when it launched).
Two settings matter at export for this particular pipeline:
- XMP sidecars off. Phocus does not read Adobe-style XMP, so those files would sit next to your 3FRs as clutter. XMP is for the direct-to-Lightroom path, which this workflow is not.
.phossidecars on. Palomino writes the same bare-bones sidecar Phocus creates at import, carrying your star ratings, so the keepers arrive in Phocus already rated.
The keepers export as untouched copies of the original 3FR files into a folder Phocus imports from, and that folder will be on local storage: Palomino deliberately refuses to export to a network mount. Apple's SMB implementation gets unreliable under the sustained writes an export produces, a lesson learned building backup software before I ever owned a Hasselblad, so the app declines rather than risk a half-written export. Culling from a NAS works fine; exports land on a local SSD.
Researching and writing the blog and page posts I produce takes up a lot of my time and costs me money for software subscriptions, tooling, and other incidentals related to running a business.
Please consider a paid membership to help me keep the lights on and pay the bills - it is only a fraction of the cost of an X2D II and a lens. Click on the button to go to the membership page to see the options available.
Stage 2: The Phocus pass, in a fixed order
My Phocus stage is short and it is disciplined. The rule, which I keep in my head as a single sentence: apply only what requires RAW data or the HNCS pipeline, and export clean.
HNNR first, when the shot needs it. For me that means ISO 1600 and up: on those files I run Hasselblad Natural Noise Reduction before touching anything else. HNNR operates on the RAW data using the Neural Engine and produces a new RAW-and-sidecar pair; adjustments made to the original file before denoising may not carry across, so denoising first avoids redoing work. A denoised file also frequently shows richer color than the original, which changes every tonal decision that follows. Lower-ISO landscape work skips this step entirely.
White balance second. White balance in Phocus is not a simple slider. It selects which illuminant matrix and chroma LUT the HNCS pipeline uses, then reruns the render from sensor data, which is why the same Kelvin number set later in Lightroom produces different color relationships. I covered the mechanism in How HNCS Actually Works. My own habit makes this step quick: I shoot a fixed Daylight white balance (5000K) rather than auto, so the illuminant selection stays stable across the entire shoot and most files need no adjustment at all.
Highlight recovery and shadow fill third. These two are on the Phocus side of the boundary because they reconstruct from RAW channel data that no longer exists once the file is a TIFF. Clipped skies come back in Phocus in a way Lightroom cannot replicate from the exported file. Shadow fill lifts the low end while preserving the HNCS color rendering, and it behaves differently from the equivalent sliders downstream: Phocus raises the lower midtones and shadows as a broad band while leaving deep blacks alone, where Lightroom and Capture One dig more aggressively into the values approaching black. I compared the tools side by side in the highlight recovery and shadow fill post.
Have you seen the guide? I've published Essential Phocus 4.x for Mac - 85 topics across 8 sections and 251 pages covering everything from HNCS color science to HDR workflows. It's the reference manual Hasselblad hasn't updated since 3.8. It's $49, and updates are included.
Lens corrections fourth, though this one mostly takes care of itself: corrections are on by default in Phocus. Hasselblad holds the distance-aware optical correction data for its own lenses, so geometry and vignetting belong here, where the original data lives. The step is confirming the defaults are in place, not doing work.
The HDR detour, when an image earns it. I do not shoot much HDR, but sometimes an image begs for it. When one does, I enable HDR in the Exposure tool while still in Phocus, so the exported file carries the HDR render rather than the SDR one. Two things matter once that checkbox is on. Highlight recovery is set separately per mode: Phocus keeps independent recovery values for HDR and SDR, with a ghost marker on the slider showing where the other mode sits, so set recovery specifically for the HDR render rather than assuming your SDR value carries over. The mechanics, ghost markers included, are in the Phocus 4.x HDR workflow post.
The second is the one exception I make to my own no-levels rule. Before touching the recovery slider, I use the Phocus Histogram tool to set the white point start, and rarely the black point. If a frame is headed for black and white, note that the Grayscale tool is a genuine per-channel mixer rather than a brightness control; the measurements are in The Phocus Grayscale Panel Is a Real Channel Mixer. As much as I prefer keeping levels out of Phocus, my experience is that if those start points are not set here, no amount of work in Lightroom or Capture One gets the HDR file right afterward. The histogram adjustment feeds the SDR render too, so flick back to SDR occasionally and confirm nothing has blown out; plenty of viewers are on standard displays, and the SDR version is what they get.
Then stop. That is the entire Phocus pass. Everything else is deliberately left alone.
Where Phocus ends and Lightroom begins
The split follows one mechanical fact: every adjustment baked into the TIFF becomes the floor the next app builds on, whether it was a good decision or not.
| Apply in Phocus | Defer to Lightroom Classic |
|---|---|
| HNNR noise reduction | Global exposure |
| White balance | Curves and levels |
| Highlight recovery | Saturation and color grading |
| Shadow fill | Crop and geometry cleanup |
| Lens corrections | Local adjustments and masking |
| HDR enable, per-mode recovery, Histogram start points (HDR images only) | HDR fine-tuning on the exported file |
The one that surprises people is exposure. In my experience, a global exposure shift baked into the TIFF is exactly the kind of adjustment that fights the finishing app afterward: small slider moves downstream produce outsized, erratic tonal swings because the second application is remapping an already-remapped signal. Highlight and shadow reconstruction must happen in Phocus because they need RAW data. Exposure does not. It works cleanly on the 16-bit TIFF, so it belongs in Lightroom, where it stays revisable forever.
Cropping follows the same logic for a different reason. A crop in Phocus is locked into the export; change your mind and you are re-exporting. A crop in Lightroom is a checkbox away from being undone.
Stage 3: Export with the built-in TIFF-16 preset
The export step generates more confused reader mail than any other part of Phocus, and the current answer is short. In Phocus 4.2: File > Export, confirm the TIFF-16 Output Preset is selected, leave its defaults alone, set your destination, and export at Full Size. That is the entire procedure. The built-in preset handles format, bit depth, and color profile correctly for a Lightroom handoff; there is no need to open the preset editor, click the "+" button, or hand-pick a profile.
That preset editor is worth a look anyway, because one thing is conspicuously absent from it: Hasselblad RGB itself, the space Phocus renders into, cannot be picked by name in either Phocus or Lightroom. The reason is a single mislabeled field inside the profile: Hasselblad RGB Is Missing From Phocus for Mac and Lightroom Export Menus.
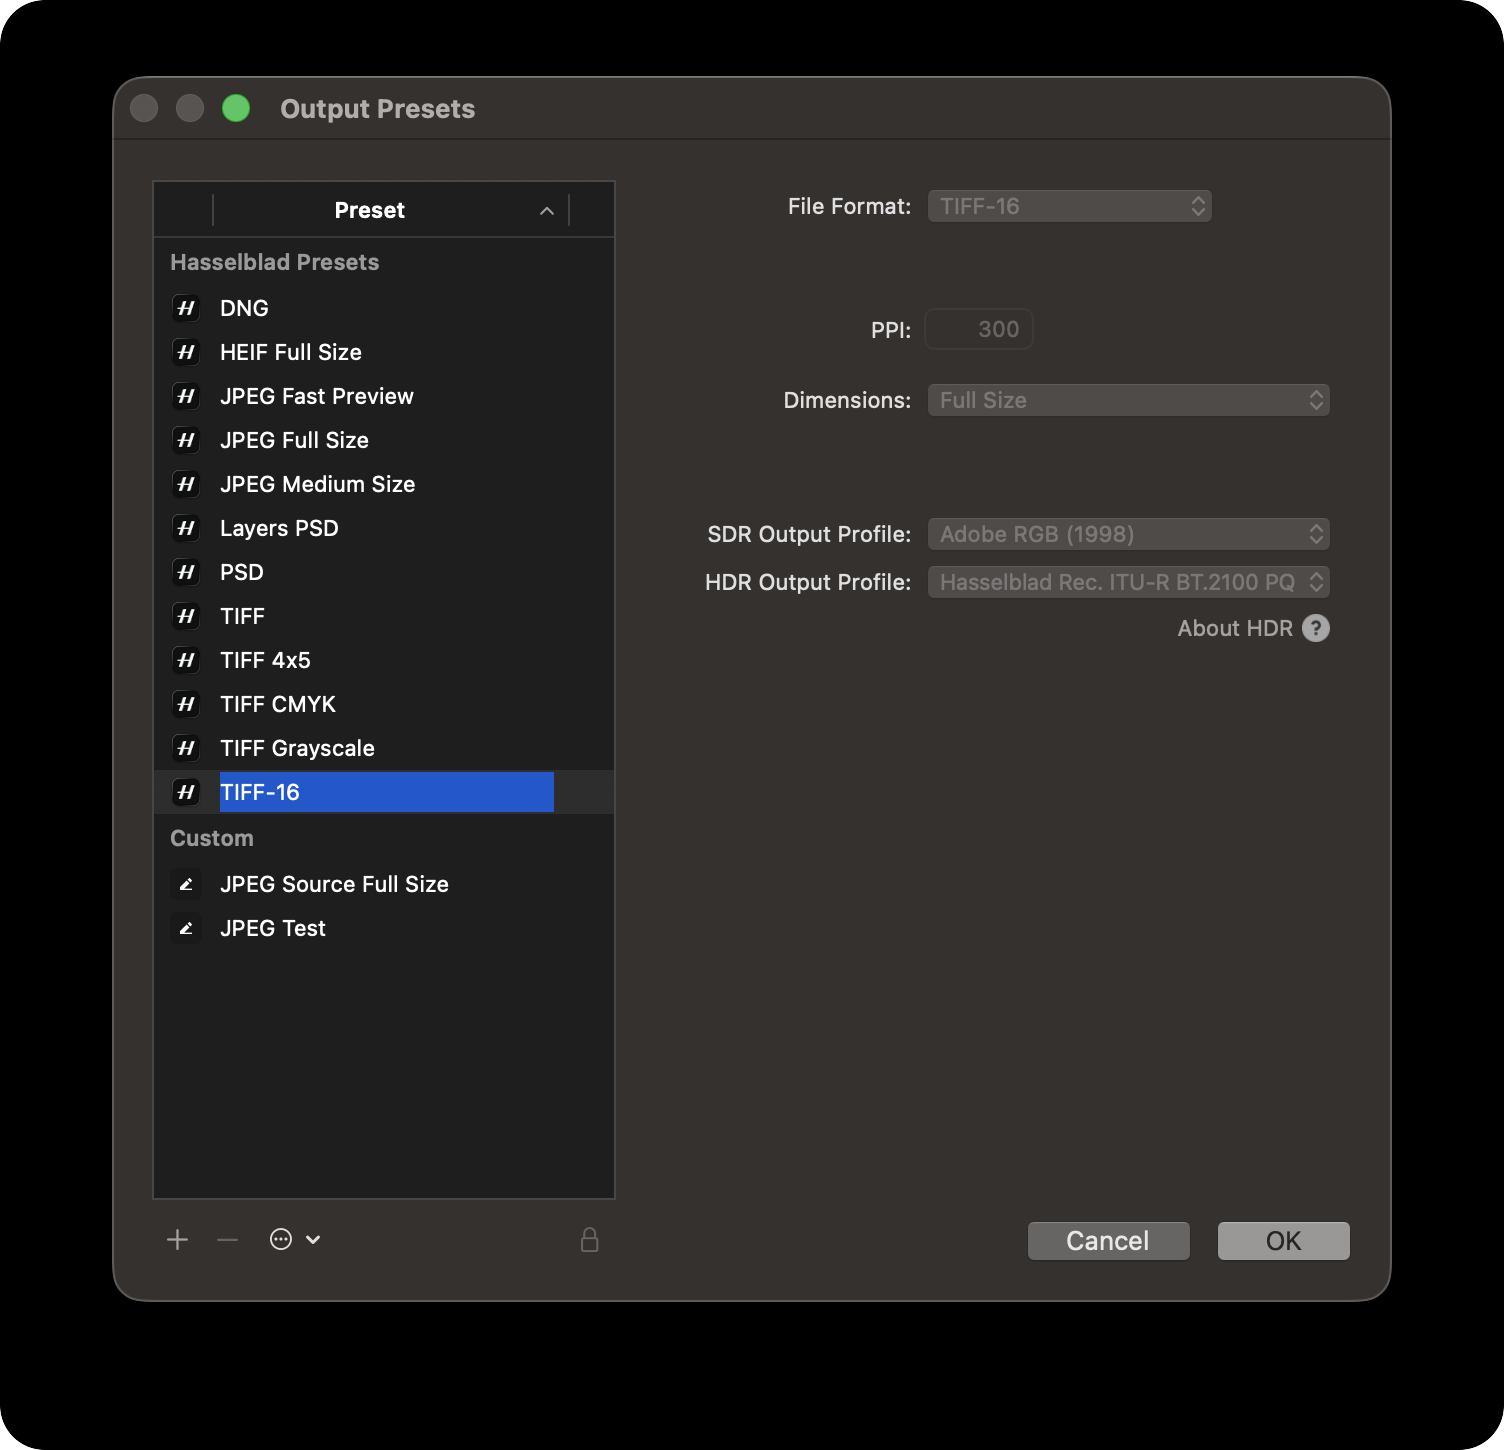
Figure 2: The built-in TIFF-16 preset in the Output Presets editor. You never need to open this dialog; it is shown here so you can see the preset's defaults are already what a Lightroom handoff wants.
Full Size matters because resolution given away at export is gone. And this workflow as described is for standard SDR output; HDR is a different pipeline with different export formats, which I covered in the complete guide to HNCS HDR in Phocus.
A 16-bit TIFF is generous, but it is not RAW. It carries less recovery headroom than the 3FR it came from, which is one more reason the Phocus pass exports clean instead of pushing tones hard and hoping Lightroom can pull them back.
To have Phocus run this export by itself for every new image dropped into a folder, the setup order that works in Phocus 4.2.2 is in Export New Images Automatically: Setting Up the Phocus Hot Folder.
Stage 4: Finish in Lightroom Classic
The TIFFs import into Lightroom Classic carrying HNCS rendering, and HNNR where it was applied, baked in. From here the work is ordinary Lightroom, with an occasional handoff to Photoshop for complex stacking work: global exposure, curves, color grading, cropping, masking, and object removal, all non-destructive on a clean file.
Why Lightroom Classic rather than Capture One for the finishing seat? For my landscape work specifically, Lightroom's masking and object removal are far ahead, and that outweighed ten years of Capture One habit when I switched in mid-2026. If your finishing app is Capture One, the workflow is identical up to the import; the Phocus guide covers that variant of the handoff in detail. The boundary rule does not change either way: RAW-dependent moves in Phocus, everything revisable in the finishing app.
What does this workflow cost?
Disk space, re-export friction, and backup diligence. Palomino exports keeper copies rather than moving originals, and the 16-bit TIFFs are large files sitting alongside your 3FRs, so a big shoot exists on disk three times by the end. A baked decision, meanwhile, is a re-export away from being changed. If I later want a different white balance or a deeper highlight recovery, I go back to Phocus and export again. In practice the disciplined, minimal Phocus pass makes that rare, which is rather the point of keeping it minimal.
The backup cost is the one nobody warns you about. Any workflow with a separate finishing app leaves you holding a RAW and its sidecar (two RAWs if HNNR ran, since it writes a new RAW-and-sidecar pair), plus a master TIFF that is the base for every finishing edit. All of it needs backing up, and losing the master TIFF means redoing the Phocus pass from the RAW. My own approach: storage is relatively cheap, so everything lands on the NAS, which pushes to Backblaze B2. The bigger pain point than storage is network speed. I have deliberately upgraded the network segments the backup pipeline crosses most, because the problem is less about holding the bits than getting them to the storage.
What I get back is a cull that takes minutes instead of an evening, Hasselblad's color science in every delivered file, and a Lightroom catalog where every remaining decision is still open. If you want the Phocus stage in full step-by-step depth, every dialog and setting in this post is documented in my Phocus 4.x guide.
References
- Palomino on the Mac App Store
- Palomino for Hasselblad shooters
- Hasselblad, "Hasselblad Natural Colour Solution", the official description of HNCS render-time color processing.