Culling a 1,500-Frame Hasselblad Shoot in Fifteen Minutes
How I sort a 1,500-frame Hasselblad card in 10 to 15 minutes with Palomino, then hand clean keepers (and ratings) to Phocus.
Muench Workshops runs small-group photography workshops, and I've traveled with them.
Request the free magazine →Fast, focused culling for Hasselblad shooters. Cull off the card, then hand the keepers to Phocus.
See it for Hasselblad →As most of you know all too well, Hasselblad cameras tend to reward a slower hand. You frame more carefully and shoot fewer frames, and most days that is exactly the point. Then you get home from a few days out, or come back from shooting a wedding or other event with 1,500 frames on the card, between the brackets, the exposure variations, and the compositions you kept circling back to, and the careful part is over.
For a long time, however, my enthusiasm for the outcome withered the moment I fired up Phocus, imported the images, and sat and watched while it ground out preview renders one 100-megapixel file at a time and then that dreaded 1-2 second render per image as you scroll through, trying to cull. I have measured what Phocus asks of a Mac before, and a big import and cull is the workload that makes you feel every megapixel.
I loved the images I got out in the end, but the shooting was the easy part. Until recently, dreading the cull was the rest of it.
Just recently, this got solved sideways for me in a most unexpected way. I was talking cameras with my friend Neil, the way we always end up doing, when he mentioned, almost as an aside, an app he had been building in his spare time called Palomino.
In a former life, a long time ago, Neil and I worked at Facebook together for years and often rode our bicycles to work together. He is still in California and I moved to Virginia, so the rides we used to share have turned into a running conversation about cameras instead. He shoots Sony, mostly airshows and BMX, and so a single event sends him home with three or four thousand near-duplicate frames, enough that he would sometimes leave a card sitting for weeks rather than face the cull. He wanted something fast to get through that volume, with an interface built this decade, and when nothing fit he built it himself.
He had been at it for a few months by the time it came up between us. He shared the repository, I dug into how it worked, realized I could add support for Hasselblad's 3FR files, and that settled it. I joined the effort, added the 3FR support myself, and then kept going, chasing more speed and features out of it. Different cameras and different pictures, Neil and me, but the same wall underneath: that first cull.
The surprise was what it did to the way I shoot. I take way more chances now. The odd angle, the exposure I am not sure of, the bracket I will probably throw away. I shoot the way the moment actually happens, because I know the reckoning once home and in front of my computer will cost me almost nothing. Neil said it way better than I do. He says using Palomino "feels like cheating".
So, to be completely up front, because you, the folks who actually read this blog, have earned it: I am now one of the people who build this thing, which makes me the worst possible person to review it. I also have a real distaste for self-promotion, which mostly reads as tacky no matter who is doing it. But getting through a full card in the time it takes to drink a coffee is the closest thing to magic I have hit in photography since getting my X2D II, and I would rather just say so than pretend I came across it as a neutral party.
Key finding: Palomino is a fast macOS culling app (free, with a one-time $29.99 Pro tier). It reads the embedded JPEG inside a 3FR file instead of decoding the RAW, so a 1,500-frame Hasselblad card sorts in 10 to 15 minutes. Keepers export to a folder Phocus imports, with your star ratings carried across in a .phos sidecar.It is live now and free to download: Palomino on the Mac App Store. There is also a page written for Hasselblad shooters, covering how it fits a 3FR workflow.
What makes Palomino fast?
The speed comes from one decision. Palomino reads the JPEG preview your camera already baked into every 3FR file instead of decoding the RAW sensor data, and showing that preview is roughly 10 to 100 times faster than rendering the raw frame. For choosing keepers, a sharp preview is all you ever needed.
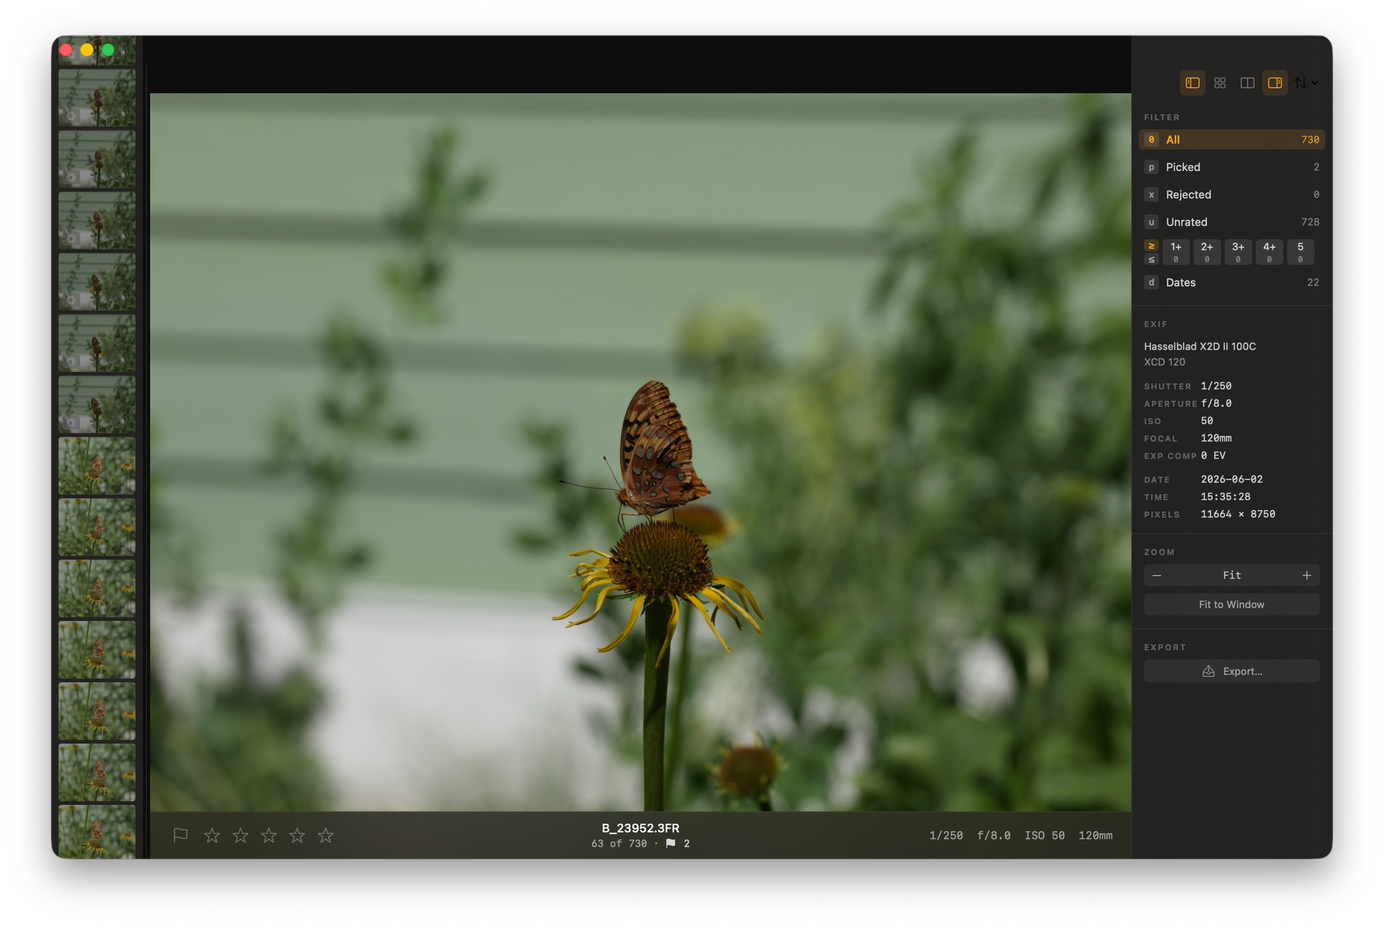
The rest is the interface. It is keyboard-first: P picks, X rejects, 1 through 5 set a rating, and it prefetches the next frames so you are never waiting on the screen to catch up. I went through that card in 10 to 15 minutes, start to finish, without the app stalling once.
The part that convinced me was when I intentionally tested the slower path. The quick way in is the CFexpress card in a Thunderbolt 5/USB 4 reader. But I also ran whole sessions straight off the camera, pulling from the X2D II's internal SSD over its USB connection, which is a good deal slower than the reader, and it barely changed anything. When the app is reading embedded previews, the speed of the storage stops being the thing you wait on.
What else is Palomino doing while you cull?
We set out to build a culling tool, not a Swiss-army knife, so Palomino does one thing: let you cull, fast, by hand. Everything clever it does runs in the background while you work. It studies your bursts, flags the soft frames and the badly exposed ones, and it does all of that without making you wait. On a big import the analysis can lag a little behind you, and that is deliberate. Nothing it computes is allowed to slow the culling down. The helpers are aids, not the main event.
That background work is also why Palomino needs macOS 15 (Sequoia) or later. Judging sharpness and flagging weak frames leans on the on-device intelligence macOS provides, and those models only got good enough to depend on from macOS 15. We dropped support for macOS 14 rather than ship sub-par analysis. The upside: as Apple improves those models in later releases, the flagging quietly gets better on its own.
One consequence worth knowing if you are on an Intel Mac: some of that analysis runs on Apple's Neural Engine, which only Apple silicon has. Palomino still runs, and the fast manual culling is identical, but the helpers that lean on the Neural Engine are not available when the app is running on an Intel Mac. On an M-series Mac you get all of it.
One of those aids is the crown. When Palomino detects a burst, it ranks the frames by sharpness and puts a small crown on the one it judges sharpest. I initially went in skeptical when we enabled this feature, because plenty of software has claimed to know which frame I want. After thousands of my own frames, the crown lands on the one I would have picked about 6-8 times in ten. The exceptions are usually a specific expression, or a bit of motion that sharpness alone does not see, so I overrule it and move on.
There is one setting worth knowing if you ever make soft images on purpose. For deliberate motion blur or defocused work, you can switch the focus detection off so the app stops flagging those frames as rejects. It has an opinion, and it lets you tell it when the opinion does not apply.
That raises a fair question for anyone shooting 100 megapixels: can you trust focus off that preview? For the most part, yes. The detection is solid, and on the odd frame I am unsure about, I just keep a couple of its neighbors from the burst and settle it on the full render later. What this is not is a TIFF-grade, AdobeRGB loupe for pixel-level focus checks at the cull stage. Neil and I tried larger previews while building it, and the honest answer was that the speed they cost never bought back enough better decisions to be worth it.
Handing the keepers to Phocus
This is the part that matters for us Hassy shooters, and the part I had to get exactly right rather than guess at.
You cull in Palomino, then export the picks to a folder Phocus imports from. Because you have already cut a card's worth of frames down to a few dozen, Phocus only ever sees the keepers, and the whole thing feels lighter for it. Your 3FR files are untouched; Palomino copies the originals into the export folder, so what you started with stays exactly where it was. Nothing is moved or deleted. The export is a fresh copy of just the keepers, so budget for the extra disk space, and every frame you passed on stays in the original folder, recoverable if you change your mind. For the background on how Phocus handles these files, I went through 3FR, FFF, and the rest of the hidden rules in an earlier post.
Which road your keepers take out of Palomino comes down to a couple of switches you set at export, and the flow below maps both:
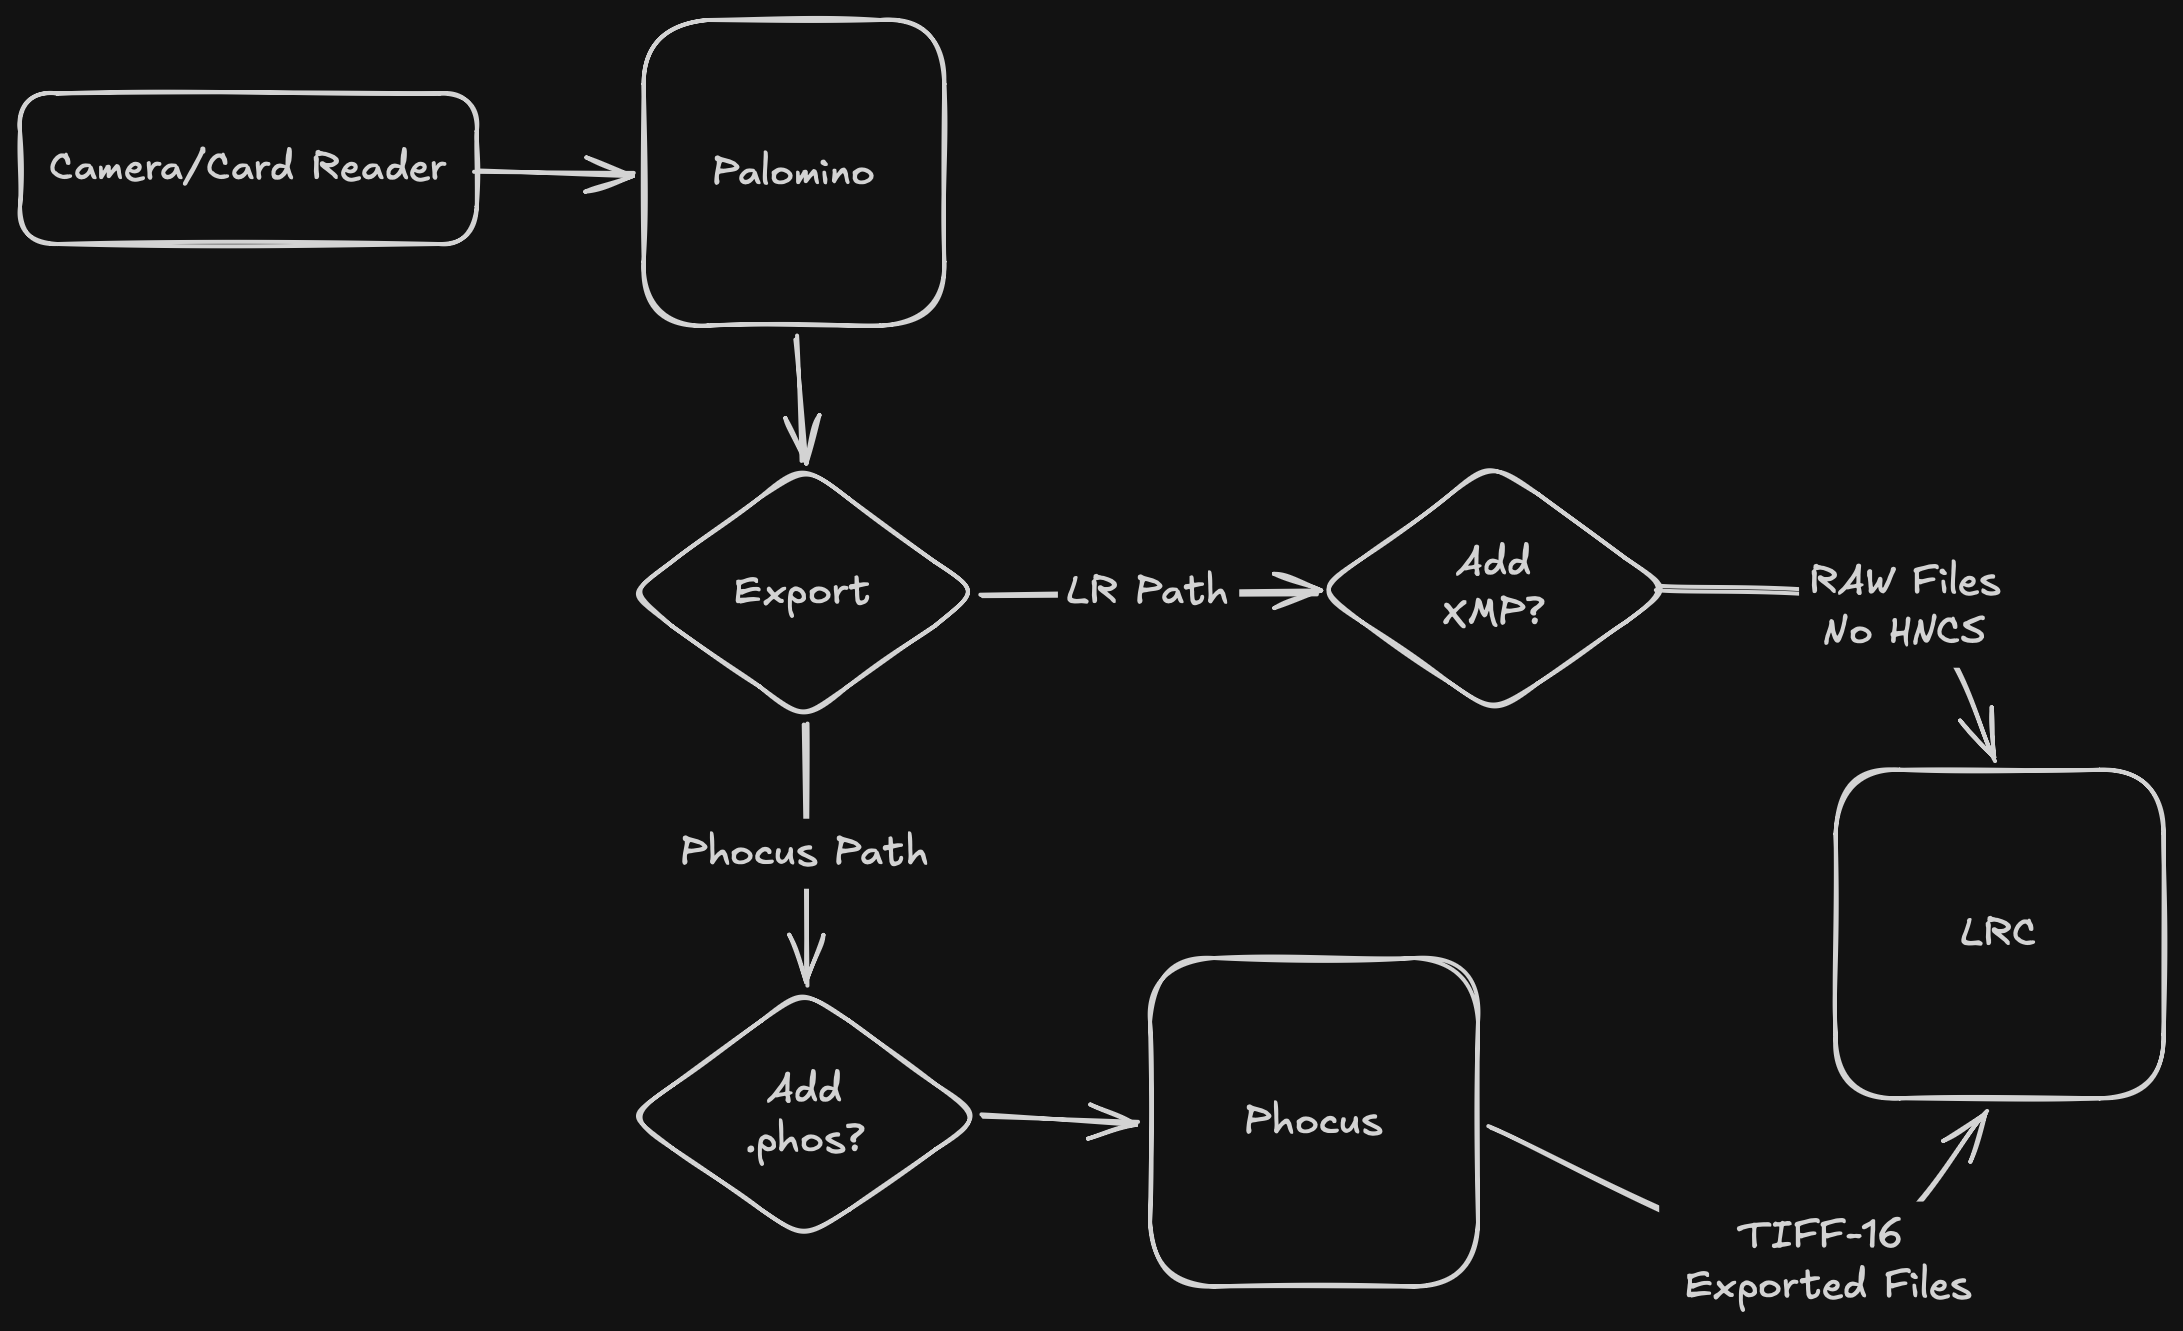
Two Hasselblad-specific things are worth calling out:
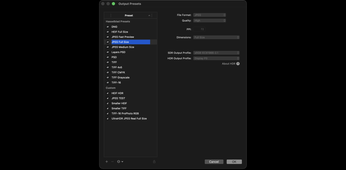
First, if you are heading into Phocus, turn XMP export off. Palomino, like most culling tools, will let you write Adobe-style XMP sidecars next to your files, which is the right thing for a Lightroom workflow. Phocus does not read XMP, so those files would just sit there as clutter next to your 3FRs. Palomino auto-detects Hasselblad 3FR at export time and lets you switch the XMP output off, so you do not end up with a folder full of sidecars Phocus ignores.
Second, your ratings can still come across. Phocus keeps its own metadata, star rating included, in a .phos sidecar it writes when it imports a file. Palomino can write that same bare-bones .phos, matching the one Phocus makes on import, carrying only the star ratings you set while culling. The keepers land in the Phocus folder already rated, and your cull doubles as the first pass of organizing the shoot. It carries the star ratings, not color labels, so if you lean on labels while culling, set those in Phocus. For the full picture of what that sidecar holds, my Phocus guide walks through it.
Have you seen the guide? I've published Essential Phocus 4.x for Mac - 85 topics across 8 sections and 238 pages covering everything from HNCS color science to HDR workflows. It's the reference manual Hasselblad hasn't updated since 3.8. It's $49, and updates are included.
Going straight to Lightroom instead
You do not have to go through Phocus at all. Lightroom Classic reads X2D II 3FR files directly, so you can cull in Palomino and hand the keepers straight to Lightroom, which is the LR path in the flow above. There you flip the switches the other way: leave XMP export on and skip the .phos. Whether your cull ratings then show up in Lightroom comes down to how it is set to read XMP sidecars, a setting on Lightroom's side rather than ours, which Adobe documents in Metadata basics and actions.
The trade is HNCS. Open a 3FR straight in Lightroom and you get Adobe's rendering of the file, not Hasselblad's color science, and HNNR is not available outside Phocus at all. Whether that is worth it depends on the shoot, and I went through exactly what you keep and lose in a separate post.
Free, and why there is a Pro version
Palomino comes in two versions. The free download is the whole app, not a crippled demo: every culling tool, every background helper, no clock running out. What it caps is export, at 50 photos per session. Palomino Pro lifts that cap for a one-time $29.99 because like you we abhor subscription models.
For the kind of shooting this post is about, you will want Pro. If you are routinely pulling more than fifty keepers off a card or the camera's internal SSD, the free cap will catch you on the first real shoot.
The honest reason a paid tier exists: Neil and I want to take this seriously and keep building it properly, and that takes time and money a free app does not generate. Twenty-nine dollars, once, is what keeps the thing getting worked on.
Who it is for
If your cards and the camera's internal SSD come home fuller than your editing time can absorb, it is worth twenty minutes of an evening to find out whether it fits. It is free to start, it runs on macOS 15 and later, and the Hasselblad walkthrough shows where it slots in ahead of Phocus before you pull it from the App Store.
References

Hasselblad X2D II & Phocus 4.x Guides | Tech Behind the Frame Newsletter
Join the newsletter to receive the latest updates in your inbox.

