The day after the ISO invariance post went out I was talking it over with Wayne Suggs, one of the Muench pros. He led the Bosque and Land of Enchantment workshops I was on this year, we have become friends, and he is as good a teacher as he is a photographer. I have done both of those workshops and would send anyone with an X2D on either; they are exceptional. I described the odd result at ISO 100, and he put it down to a dual gain sensor, which is what Jim Kasson had found on this camera too. He also pointed me at Bill Claff's Photons to Photos, which has published read-noise measurements for hundreds of cameras, the X2D II among them.¹
Claff's numbers match mine, and they are below. They also sent me back to expose to the right and shoot the histogram, the two pieces of advice every digital photographer gets sooner or later. Both are older than the sensor in this camera, and last week's measurements change how much of each I still follow.
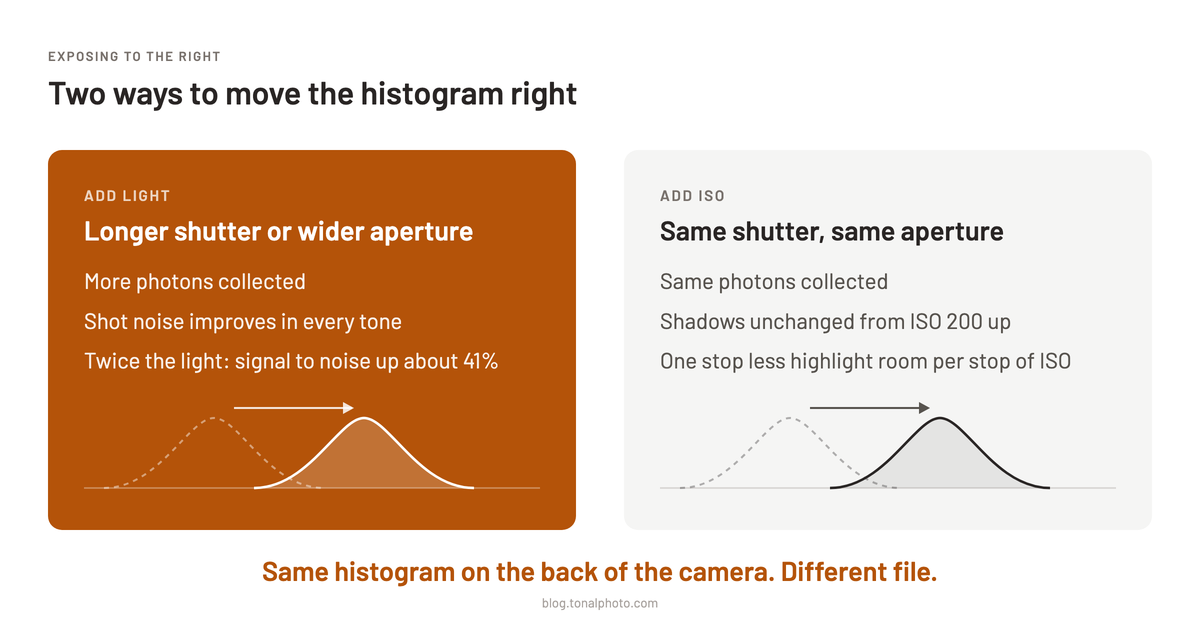
Key finding: On the X2D II, exposing to the right pays only when the extra brightness comes from light: a longer shutter or a wider aperture. Raising ISO leaves the shadows unchanged from ISO 200 up and costs a stop of highlights per stop. Use ISO 50, or ISO 200 and above, and check small highlights in Browse.
A second set of numbers for the ISO 200 step
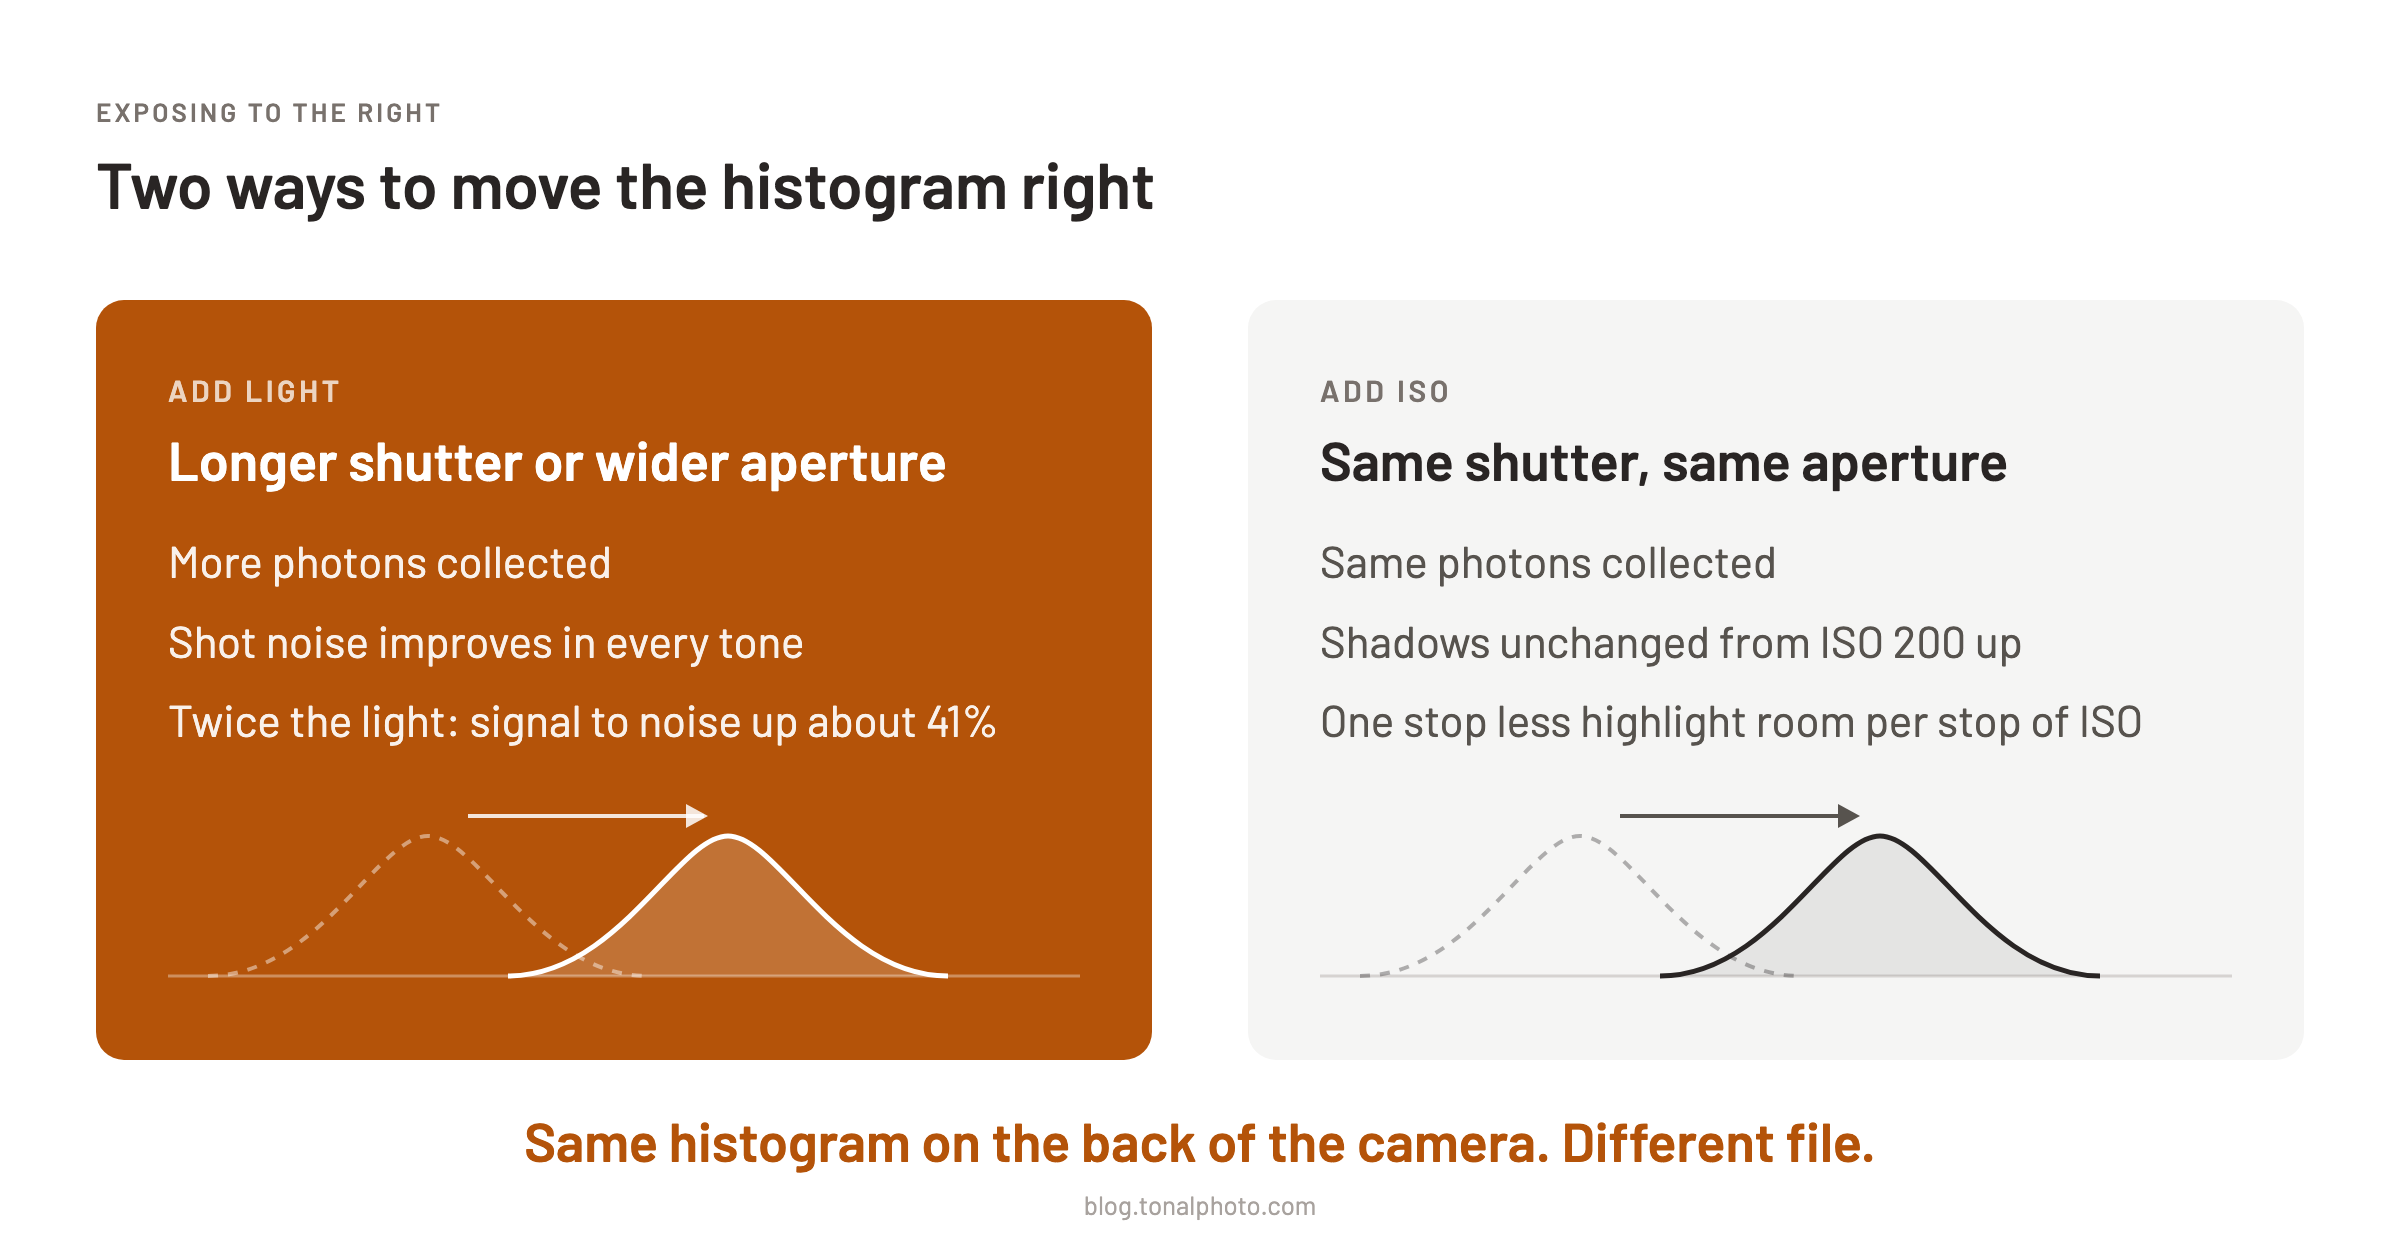
Claff reports input-referred read noise in electrons. I reported mine in raw pixel values with the gain divided out. The units differ, so the fair comparison is the shape, and the shape is the same.
| ISO | Claff, electrons¹ | Mine, raw values with gain divided out |
|---|---|---|
| 50 | 3.81 | 4.08 |
| 100 | 3.71 | 3.85 |
| 200 | 1.29 | 1.38 |
| 400 | 1.25 | 1.27 |
| 800 | 1.17 | 1.24 |
| 1600 | 1.21 | 1.21 |
| 3200 | 1.16 | 1.17 |
| 6400 | 0.99 | 1.05 |
Between ISO 100 and ISO 200 his read noise falls by a factor of 2.9 and mine by 2.8. Different bodies and different methods. Jim Kasson's Lensrentals body made a third last December.² Claff's chart also marks ISO 12,800 and 25,600 as outside the sensor's analog range, which fits Kasson's note that the camera stops applying real gain at the top.
The same site publishes a dynamic range figure for each ISO, and those fill in what ISO 100 is for. ISO 50 measures 12.46 stops, ISO 100 measures 11.61, and ISO 200 measures 11.48.³ Going from 50 to 100 gives up 0.85 of a stop. Going from 100 to 200 gives up 0.13 and buys the low-noise readout, which is why I skip ISO 100 now.
ISO 50, or ISO 200 and up. If a frame looks right at ISO 100, I set ISO 50 and leave the shutter and aperture alone. The file comes out a stop darker, the read noise is the same, and there is a stop more room above the highlights. If nothing in the frame is moving, a better answer is to stay at ISO 50 and double the shutter time.
Expose to the right still works when you do it with light
Exposing to the right means giving the sensor as much light as it can take without clipping anything you care about. The reason it works has not changed since the first digital back: most of the noise in a photograph is shot noise, the grain in the light itself, and the only cure for it is more light. Double the light and the signal-to-noise ratio in every shot-noise-limited tone improves by about 41 percent, the square root of two.
Nothing about a dual gain sensor touches that. My own Phocus guide tells readers to shoot ISO 50 and expose to the right, and that advice stands.
At ISO 50 on a tripod, with nothing moving, I lengthen the shutter until the brightest thing I care about sits just under clipping. A stop more light at ISO 50 does more for the shadows than any ISO setting can, because it improves the shot noise, which no ISO setting touches.
Researching and writing the blog and page posts I produce takes up a lot of my time and costs me money for software subscriptions, tooling, and other incidentals related to running a business.
Please consider a paid membership to help me keep the lights on and pay the bills - it is only a fraction of the cost of an X2D II and a lens. Click on the button to go to the membership page to see the options available.
What raising ISO does to the same histogram
Raising ISO moves the histogram to the right by exactly as much as adding light does, and on the back of the camera the two look identical, though the files are very different.
In last week's scene test every frame had the same shutter and aperture, so the same light, and only the ISO changed. From ISO 200 to ISO 3200 the shadows, brightened to match, were the same to within 2.5 percent. The highlights were another matter. At ISO 200 nothing in the frame clipped. At ISO 400, 2.8 percent of the green pixels were clipped, at ISO 800 it was 14.8 percent, and at ISO 3200 it was 20 percent.
So when the light is fixed (the wind sets the shutter, the depth of field sets the aperture), pushing the histogram right with the ISO dial buys nothing in the shadows and spends highlights to do it. The rule from last week still applies: ISO 200, or three stops under what the meter asks for, whichever is higher, in M mode so the camera cannot quietly lengthen the shutter to compensate.
A full-looking histogram at ISO 1600 and a thin one at ISO 200 can be the same exposure. The thin one has three more stops of room at the top.
Why does the histogram miss blown highlights?
Because a histogram counts pixels and has no idea where they are. It plots how many pixels sit at each brightness, and a small highlight is, by definition, not many pixels.
The X2D II records about 102 million pixels.⁴ A street lamp, a sunlit window in a dark interior, or the bright rim of a cloud that covers a patch 100 pixels square is 10,000 pixels, which is 0.01 percent of the frame. On a graph whose height is set by the millions of pixels in the shadows, 0.01 percent at the right-hand edge is a sliver one line tall, if it is drawn at all.
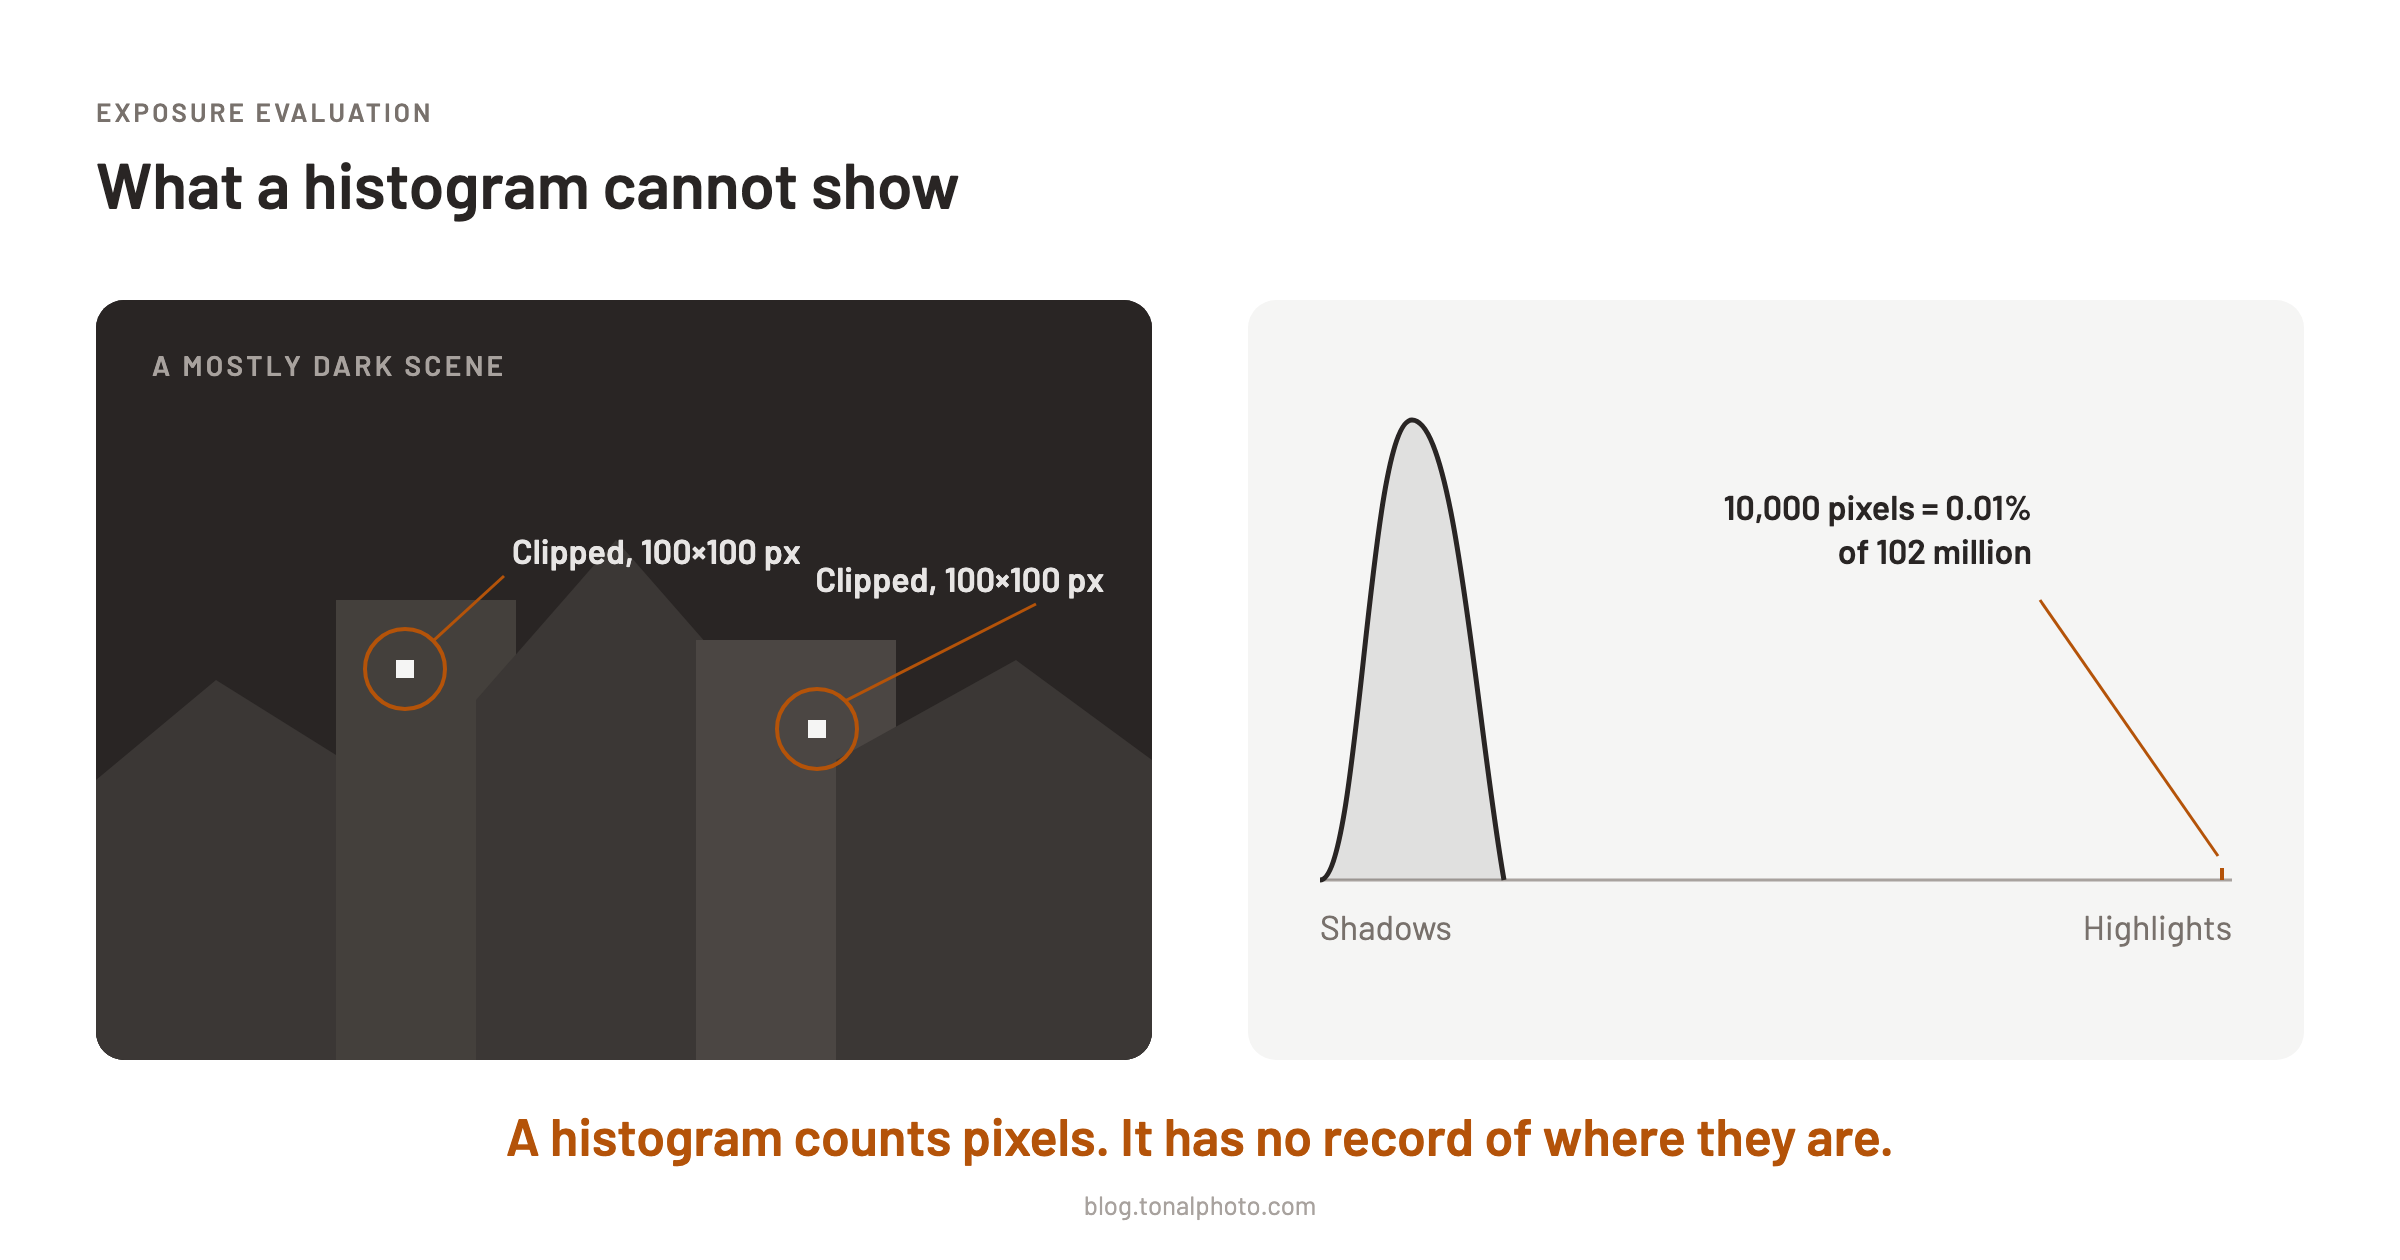
In a scene that is mostly dark with a few bright points, the graph shows a hump on the left and a long empty stretch to the right. The advice says push it right. Every bit of that push goes straight into the few bright points the graph was never showing, and they clip.
The luminance histogram has a second blind spot. It can look comfortable while a single colour channel is already against the wall, which happens most with saturated colour: a red flower, a sunset, a deep blue sky. That is standard histogram behaviour on any camera, and the X2D II's answer to it is the separate RGB histogram in Browse.
In fog, overcast, open shade or a studio set, the whole scene fits inside the sensor's range with room to spare and there are no small bright outliers. There the histogram is showing you everything in the frame, and pushing it right with light is a straight gain. The scale target further down is for contrasty scenes; in flat light like this it would waste light.
Does the X2D II have an overexposure warning in Live View?
No. In Live View the camera gives you a histogram and nothing else. The overexposure warning exists only in Browse, on a frame you have already taken, and Browse is also where the luminance and separate RGB histograms live (press the circle button to cycle to them).
So on this camera, checking small highlights is a shoot-and-review loop. I take the frame, open it in Browse, look at the warning for where the clipping is and at the RGB histogram for which channel, adjust, and shoot again. On a tripod, with a scene that holds still, that costs almost nothing.
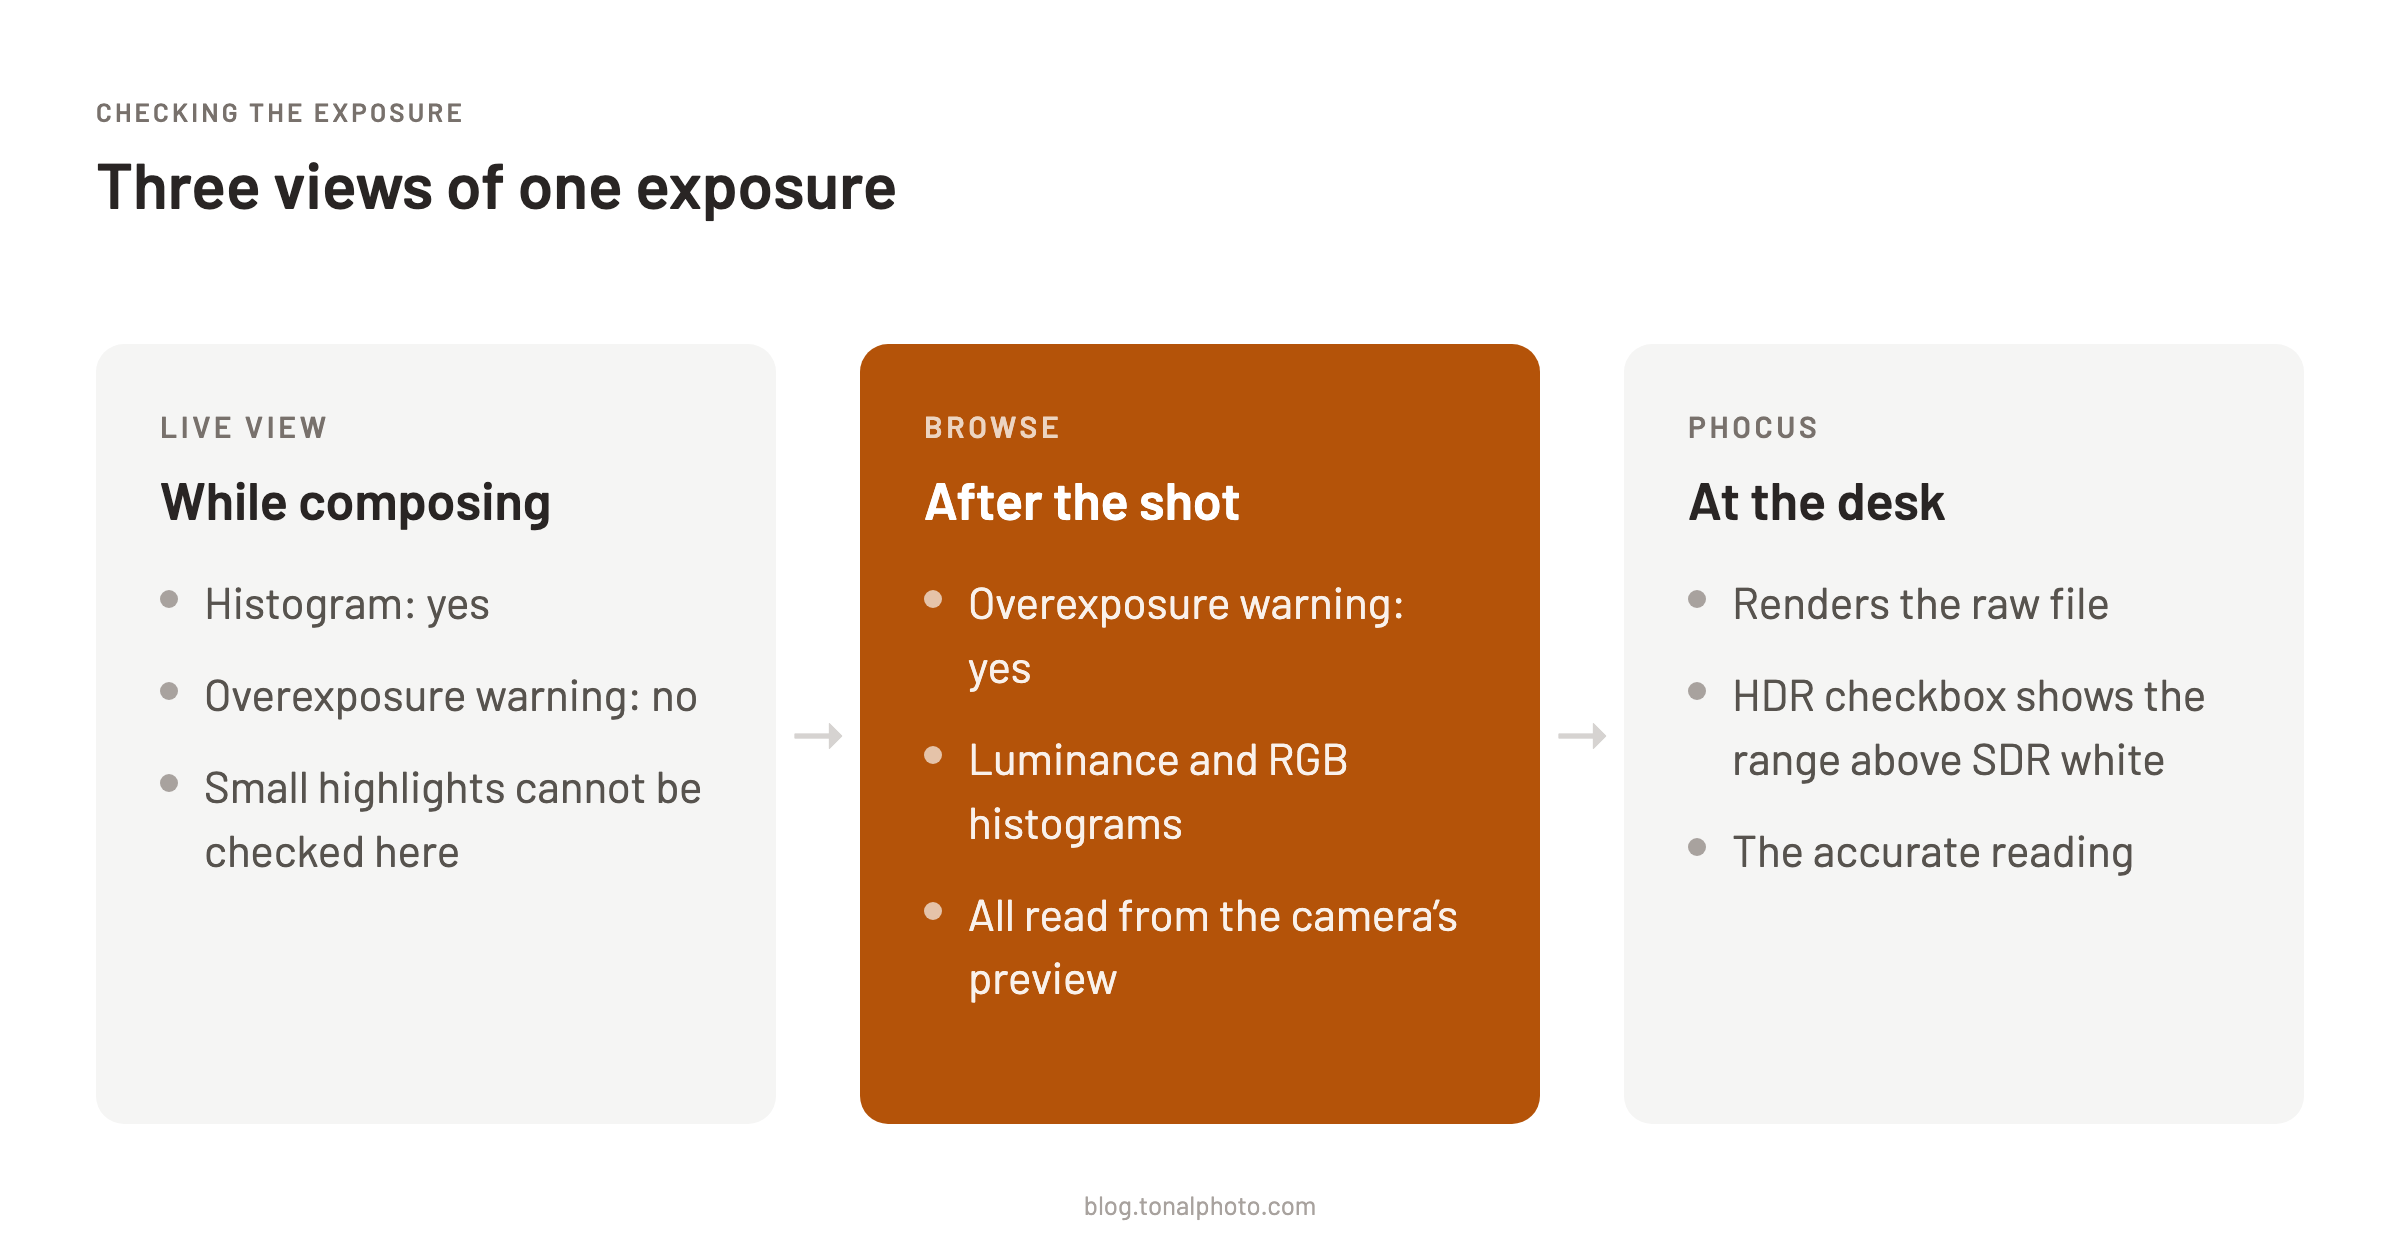
One caveat on what Browse reports. The review image is the camera's processed preview, and the warning reads from that preview. I covered the consequences in the post on why the camera and Phocus histograms disagree: the raw file usually holds highlight detail that a standard-range render shows as flat white, and ticking the HDR checkbox in Phocus spreads those tones back out. In my experience there is nearly always more at the top of the file than the review image suggests. With HDR mode off, which it always is in M, the Browse preview is a standard-range render, and with the deliberately dark frames this method produces I usually cannot tell whether the finished image will need HDR at all until it is in a raw converter. I have not measured how much room that is. Until I do, I treat the Browse warning as the conservative reading and the Phocus HDR render as the accurate one, and I do not count on headroom I have not seen.
How I set an exposure now
Everything is manual except focus.
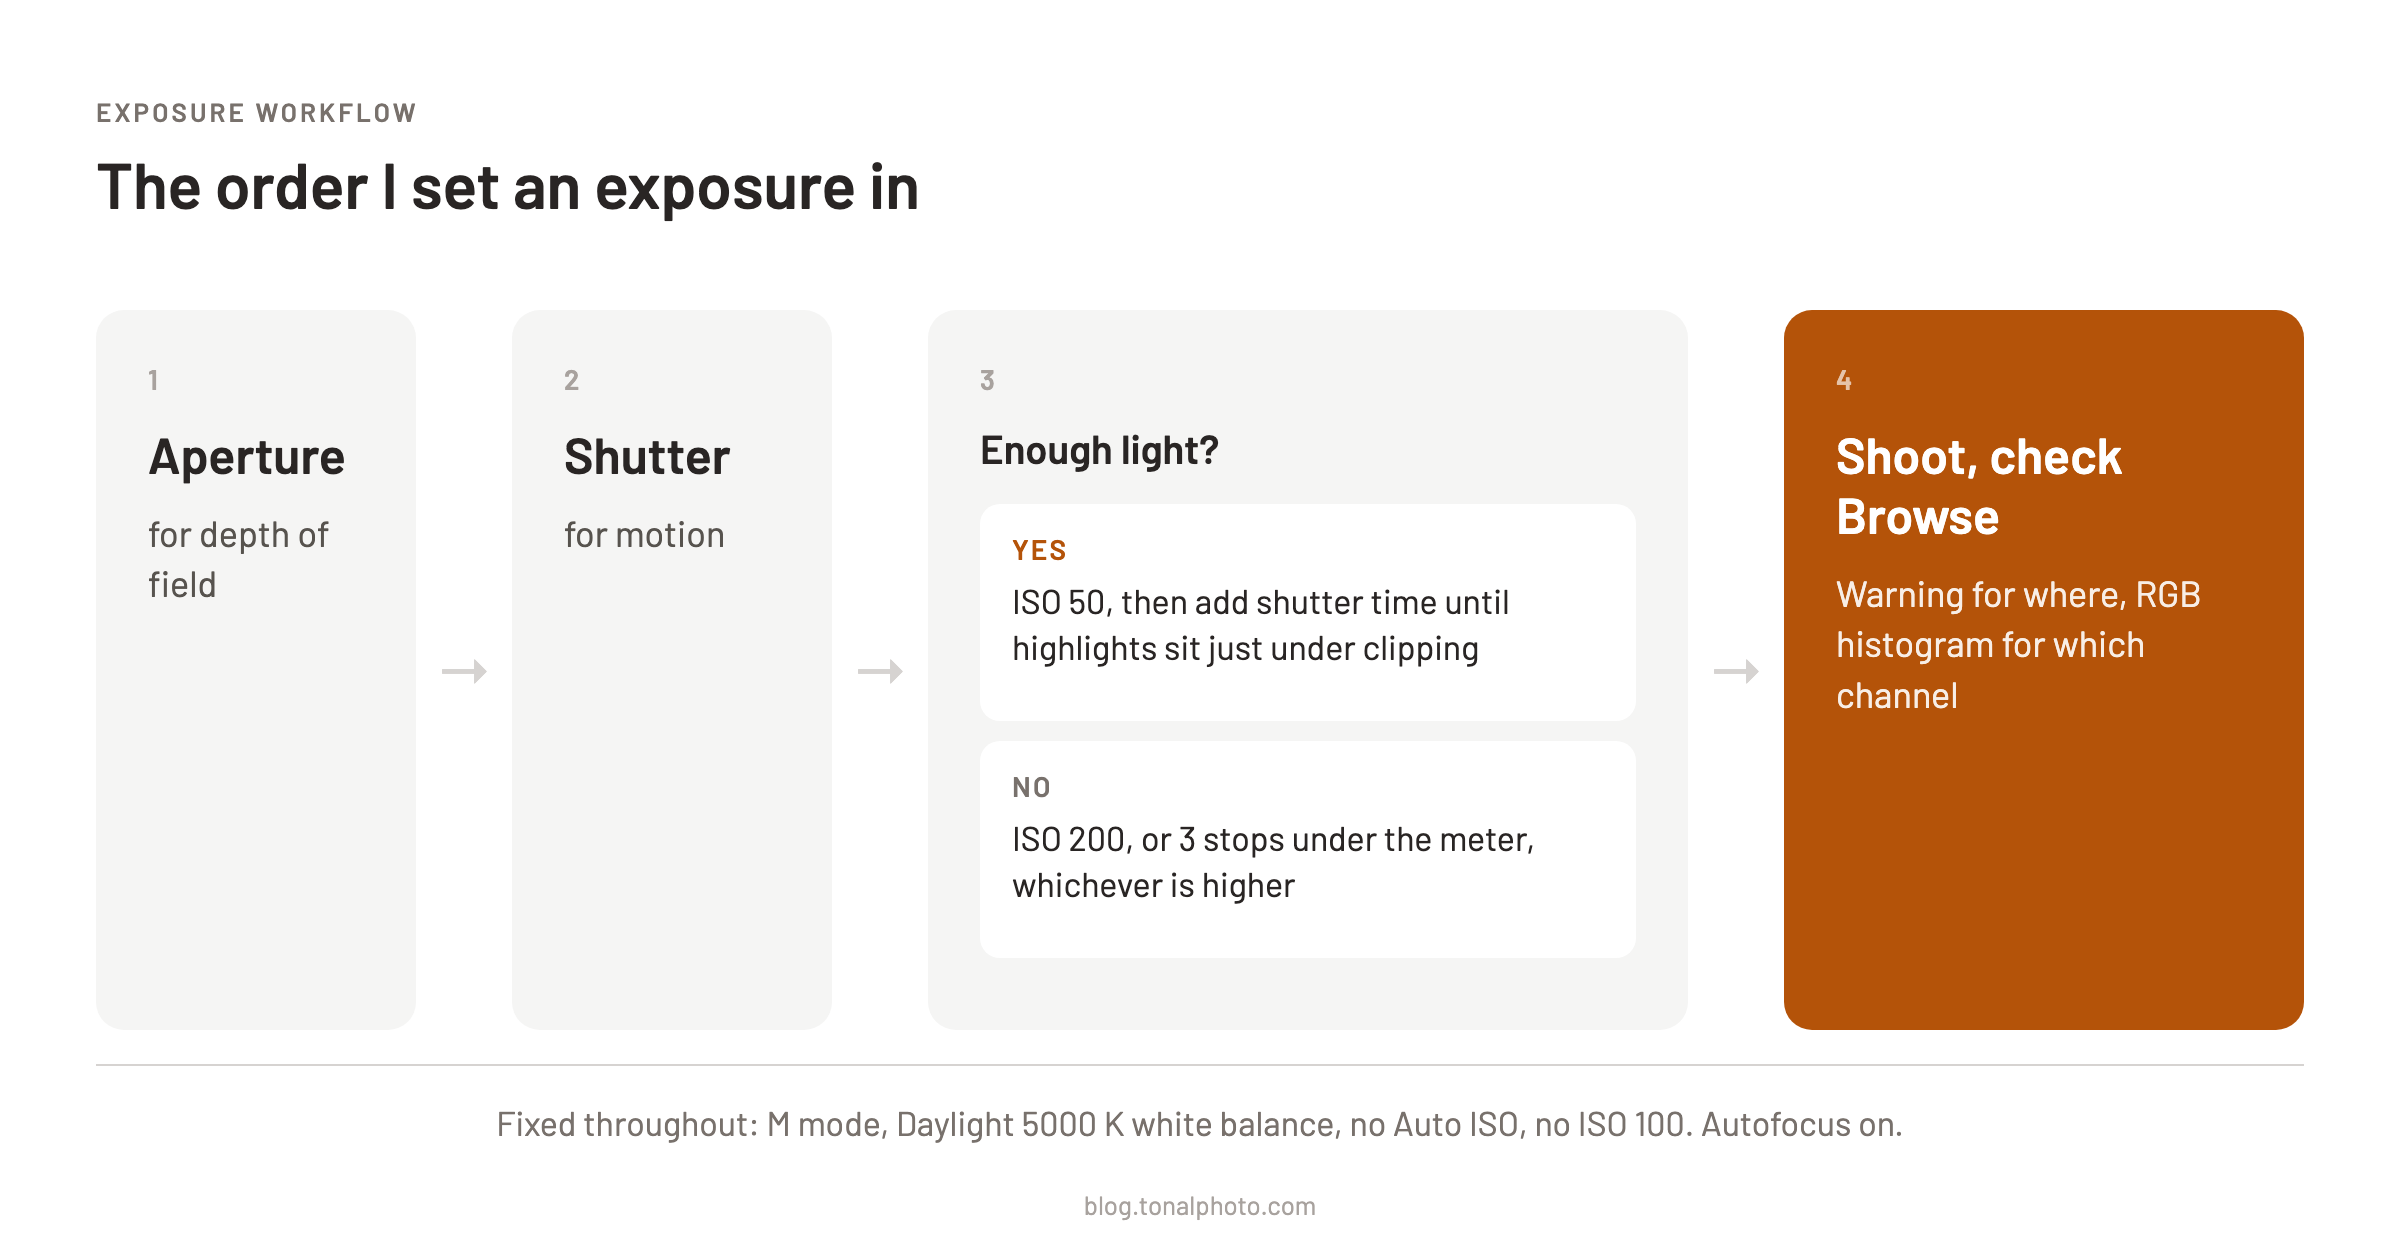
Aperture comes first, for depth of field. On the XCD 25V sharpness holds through f/8, f/11 costs 14 percent, and past that I focus bracket at f/8 before I stop down further (which f-stop I use for which scene is next week's post). Shutter speed covers motion: wind, water, my own hands. If nothing moves, it is also where the extra light comes from. ISO is whatever those two leave over. ISO 50 if there is enough light, and ISO 200, or three stops under the meter, if there is too little. I leave Auto ISO off, because the camera has no way of knowing whether a frame is worth a stop of highlights. For event or documentary work in changing light I would make that trade differently.
A file that needs a three-stop push is a low-light file whichever ISO it was shot at, and its shadows clean up only as well as the noise reduction does. Albrecht Voss ran the same ISO 200 four-stop push through Capture One, Lightroom Classic and HNNR in Phocus Mobile and found all three handled it, with Lightroom the closest to his ISO 200 reference; the file none of them could rescue was ISO 3200 pushed a further four stops.⁵ So the push has a floor as well as a cap, and sharpening and shadow recovery on a pushed file want a lighter hand than on one shot with enough light.
Have you seen the guide? I've published Essential Phocus 4.x for Mac - 85 topics across 8 sections and 250 pages covering everything from HNCS color science to HDR workflows. It's the reference manual Hasselblad hasn't updated since 3.8. It's $49, and updates are included.
The highlights decide where I stop adding light, and the exposure scale at the bottom left of the display is how I find that point. I meter in Centre Weighted, and metering keeps working in M, so the scale shows how far the frame sits from what an averaging meter calls correct. My target is 2.5 to 3 stops under that reading, at ISO 50 and ISO 200 alike. In the scenes I shoot, that is where the highlights land just under clipping when I check them in Browse. With ISO pegged at 50 or 200, I set the aperture and shutter and read the scale. If it shows the target, I shoot. If it shows more than 3 stops under and I do not want to give up any more shutter or aperture, I raise the ISO until it reads 2.5 to 3 stops under, which is the three-stop cap from last week: Kasson reports colour shifts on pushes larger than that, and I would rather not find out on a frame I care about. Then I shoot and check Browse. Spot metering works from a different starting point. A spot meter tries to make whatever it reads mid-grey, so a spot reading on a bright highlight wants a plus value on the scale, not a minus one. The highlight metering post has the spot metering mechanics.
White balance stays at Daylight, 5000 K. HNCS does its work at render time, and a fixed white balance keeps a whole day's frames consistent in Phocus.
Autofocus stays on whenever there is enough light for it to work. For the night sky I switch the camera to manual focus (from the menu, not by sliding the focus ring on a V lens forward: that disengages the motor like a clutch, and then the tap does nothing), bring up the distance scale overlay in Live View, and tap and hold the infinity symbol at the end of the scale. The camera drives the lens to true infinity, which the focus ring on its own can overshoot. It has been accurate in my use so far, and I still magnify the view and check that focus peaking is marking the stars before I shoot.
The exposure ramp that would put a number on the headroom between the Browse warning and real raw clipping is on the list for this week. If I get to it, the number goes in here.
References
- Bill Claff, Photons to Photos, "Input-referred Read Noise versus ISO Setting", series "Hasselblad X2D II-100c_16". Values converted from the chart's log2 scale to electrons.
- Jim Kasson, "Hasselblad X2D II EDR", the last word, 16 December 2025
- Bill Claff, Photons to Photos, "Photographic Dynamic Range versus ISO Setting", series "Hasselblad X2D II-100c".
- Hasselblad X2D II 100C datasheet, 11656 × 8742 pixels.
- Albrecht Voss, "The Secret to Ultimate Image Quality with Hasselblad", YouTube, 17 September 2026, the noise reduction comparison from 12:13.