At a recent Muench workshop, the Land of Enchantment trip through northern New Mexico (which I recommend to anyone), the pros leading it kept reminding us that most modern cameras are ISO invariant. There was no need to push the ISO high to get the shot, they said, even if the frame looked dark on the back of the camera. It would be easy to fix in post. I more or less knew what ISO invariance was. What I had not worked out was what it meant for the settings I should be dialing in to get the best file from the shots I was after.
Disclosure: Muench Workshops is a partner of this blog, and I receive workshop credit for a promotional placement on this site. I would point you their way regardless.
Most of us learned ISO as the third side of an exposure triangle, and learned to keep it as low as possible. So this morning I put the X2D II on a tripod to measure what the ISO setting really changes in the file, and how far that invariance holds.
Key finding: On my X2D II, shadow noise is the same at ISO 3200 as at ISO 200 brightened four stops in post, and the ISO 200 file keeps every highlight the ISO 3200 file clipped. With enough light, use ISO 50. Without it, hold shutter speed and aperture and set ISO 200, or three stops under the meter, whichever is higher.
ISO is not part of the exposure
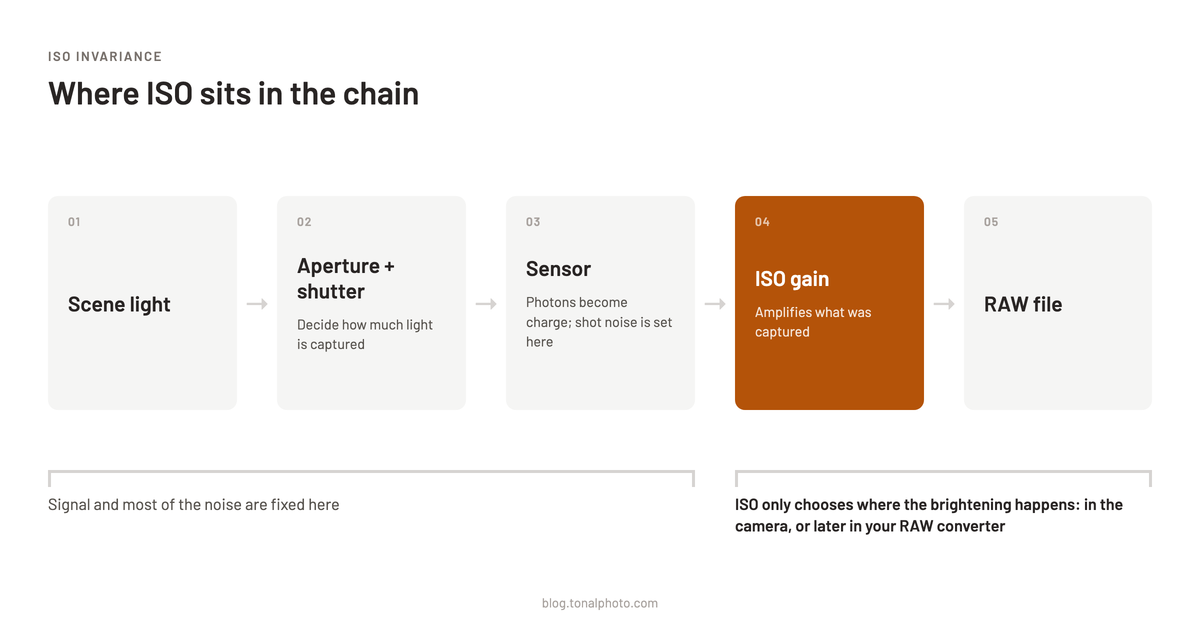
Exposure is the amount of light that reaches the sensor, and only three things set it: the scene, the aperture and the shutter speed. ISO arrives afterwards.
ISO is a gain setting, applied to a signal that has already been captured.
If you remember one sentence from this post, make it that one.
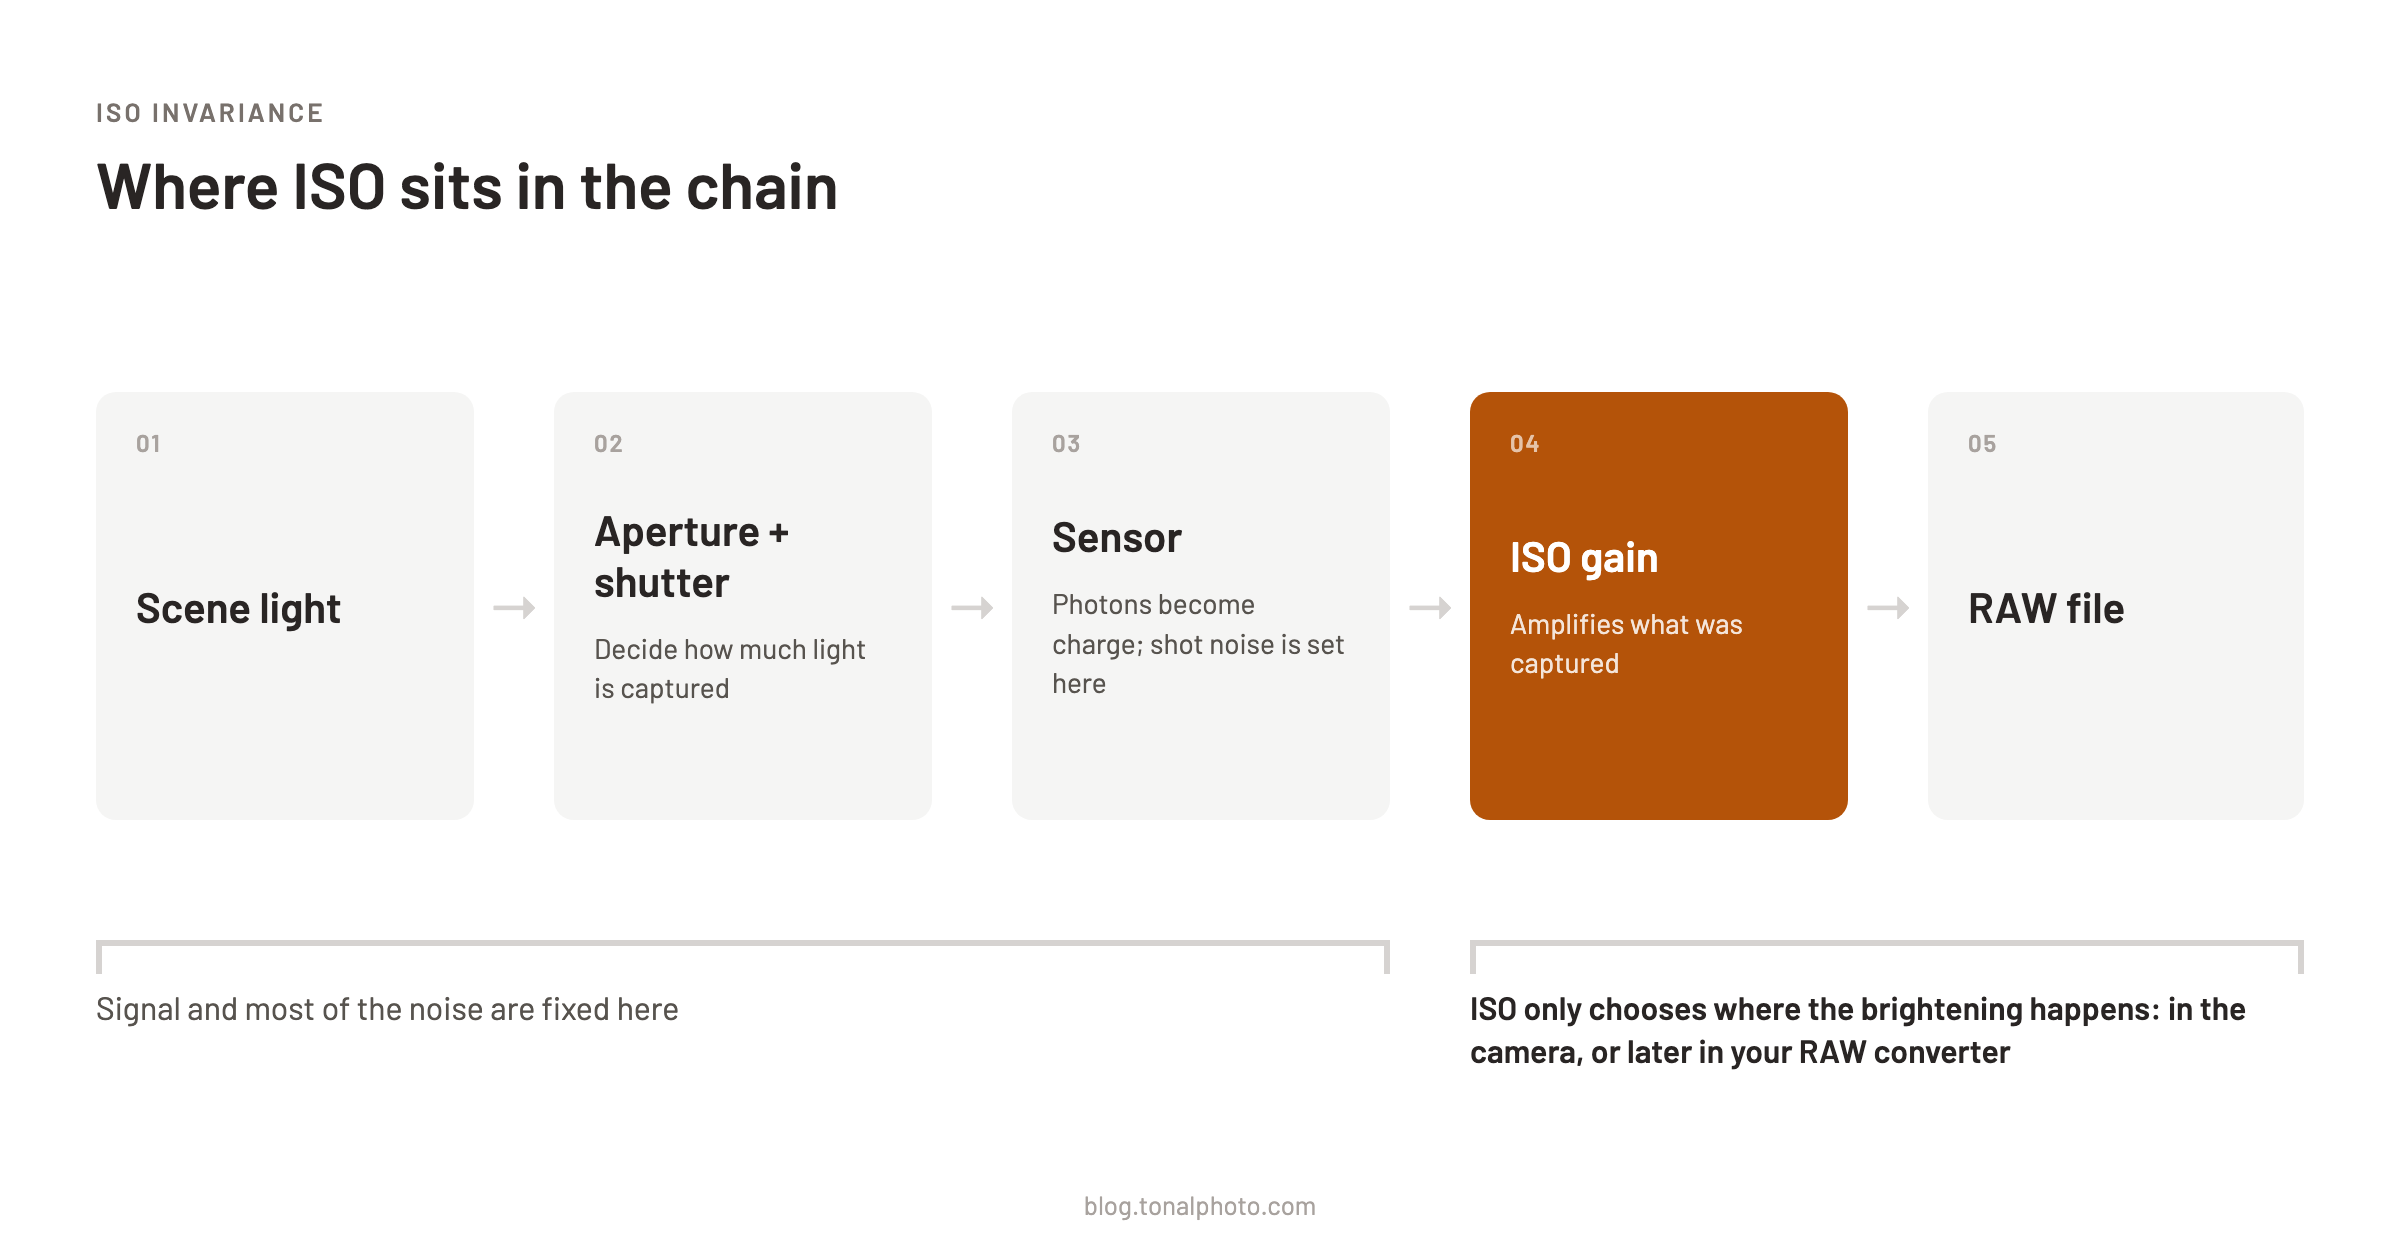
That ordering matters because of where noise comes from. The largest share in any normally lit part of a picture is shot noise, the grain in the light itself. It depends only on how many photons were collected. That is fixed the moment the shutter closes, and no ISO setting can touch it. The second source is read noise, the small electronic error added as the sensor is read out and digitised. Read noise is the only part ISO can influence, and it only shows in the deepest shadows, where there is too little light for shot noise to dominate.
High ISO does not cause the noise. A frame at ISO 3200 is noisy because it was given six stops less light than a frame at ISO 50 would have been. The ISO number just records that shortfall.
What is ISO invariance?
A camera is ISO invariant when brightening in the camera and brightening later in the RAW converter give the same noise. If the sensor's read noise, measured relative to the captured signal, is the same at every ISO, then it does not matter where the gain is applied. You could shoot everything at a low ISO, let the file look dark, and lift it afterwards at no cost.
Few cameras are invariant across the whole range. Many modern sensors, this one included, have two readout modes: a low-gain mode that holds the most charge per pixel, for the largest dynamic range, and a high-gain mode with lower read noise for when light is scarce. Jim Kasson measured a Lensrentals X2D II in December 2025 and found exactly that: a dual conversion gain sensor with the switch at ISO 200, "essentially ISOless from ISO 200 on up."¹ His earlier work on the original X2D found the same shape.² Albrecht Voss, a Hasselblad Master, built a recent (Hasselblad-sponsored) video around Kasson's result, and that video is what sent me to the tripod.³
I wanted to see it on my own retail body, with a method anyone can repeat.
Researching and writing the blog and page posts I produce takes up a lot of my time and costs me money for software subscriptions, tooling, and other incidentals related to running a business.
Please consider a paid membership to help me keep the lights on and pay the bills - it is only a fraction of the cost of an X2D II and a lens. Click on the button to go to the membership page to see the options available.
Measuring the ISO 200 step on the X2D II
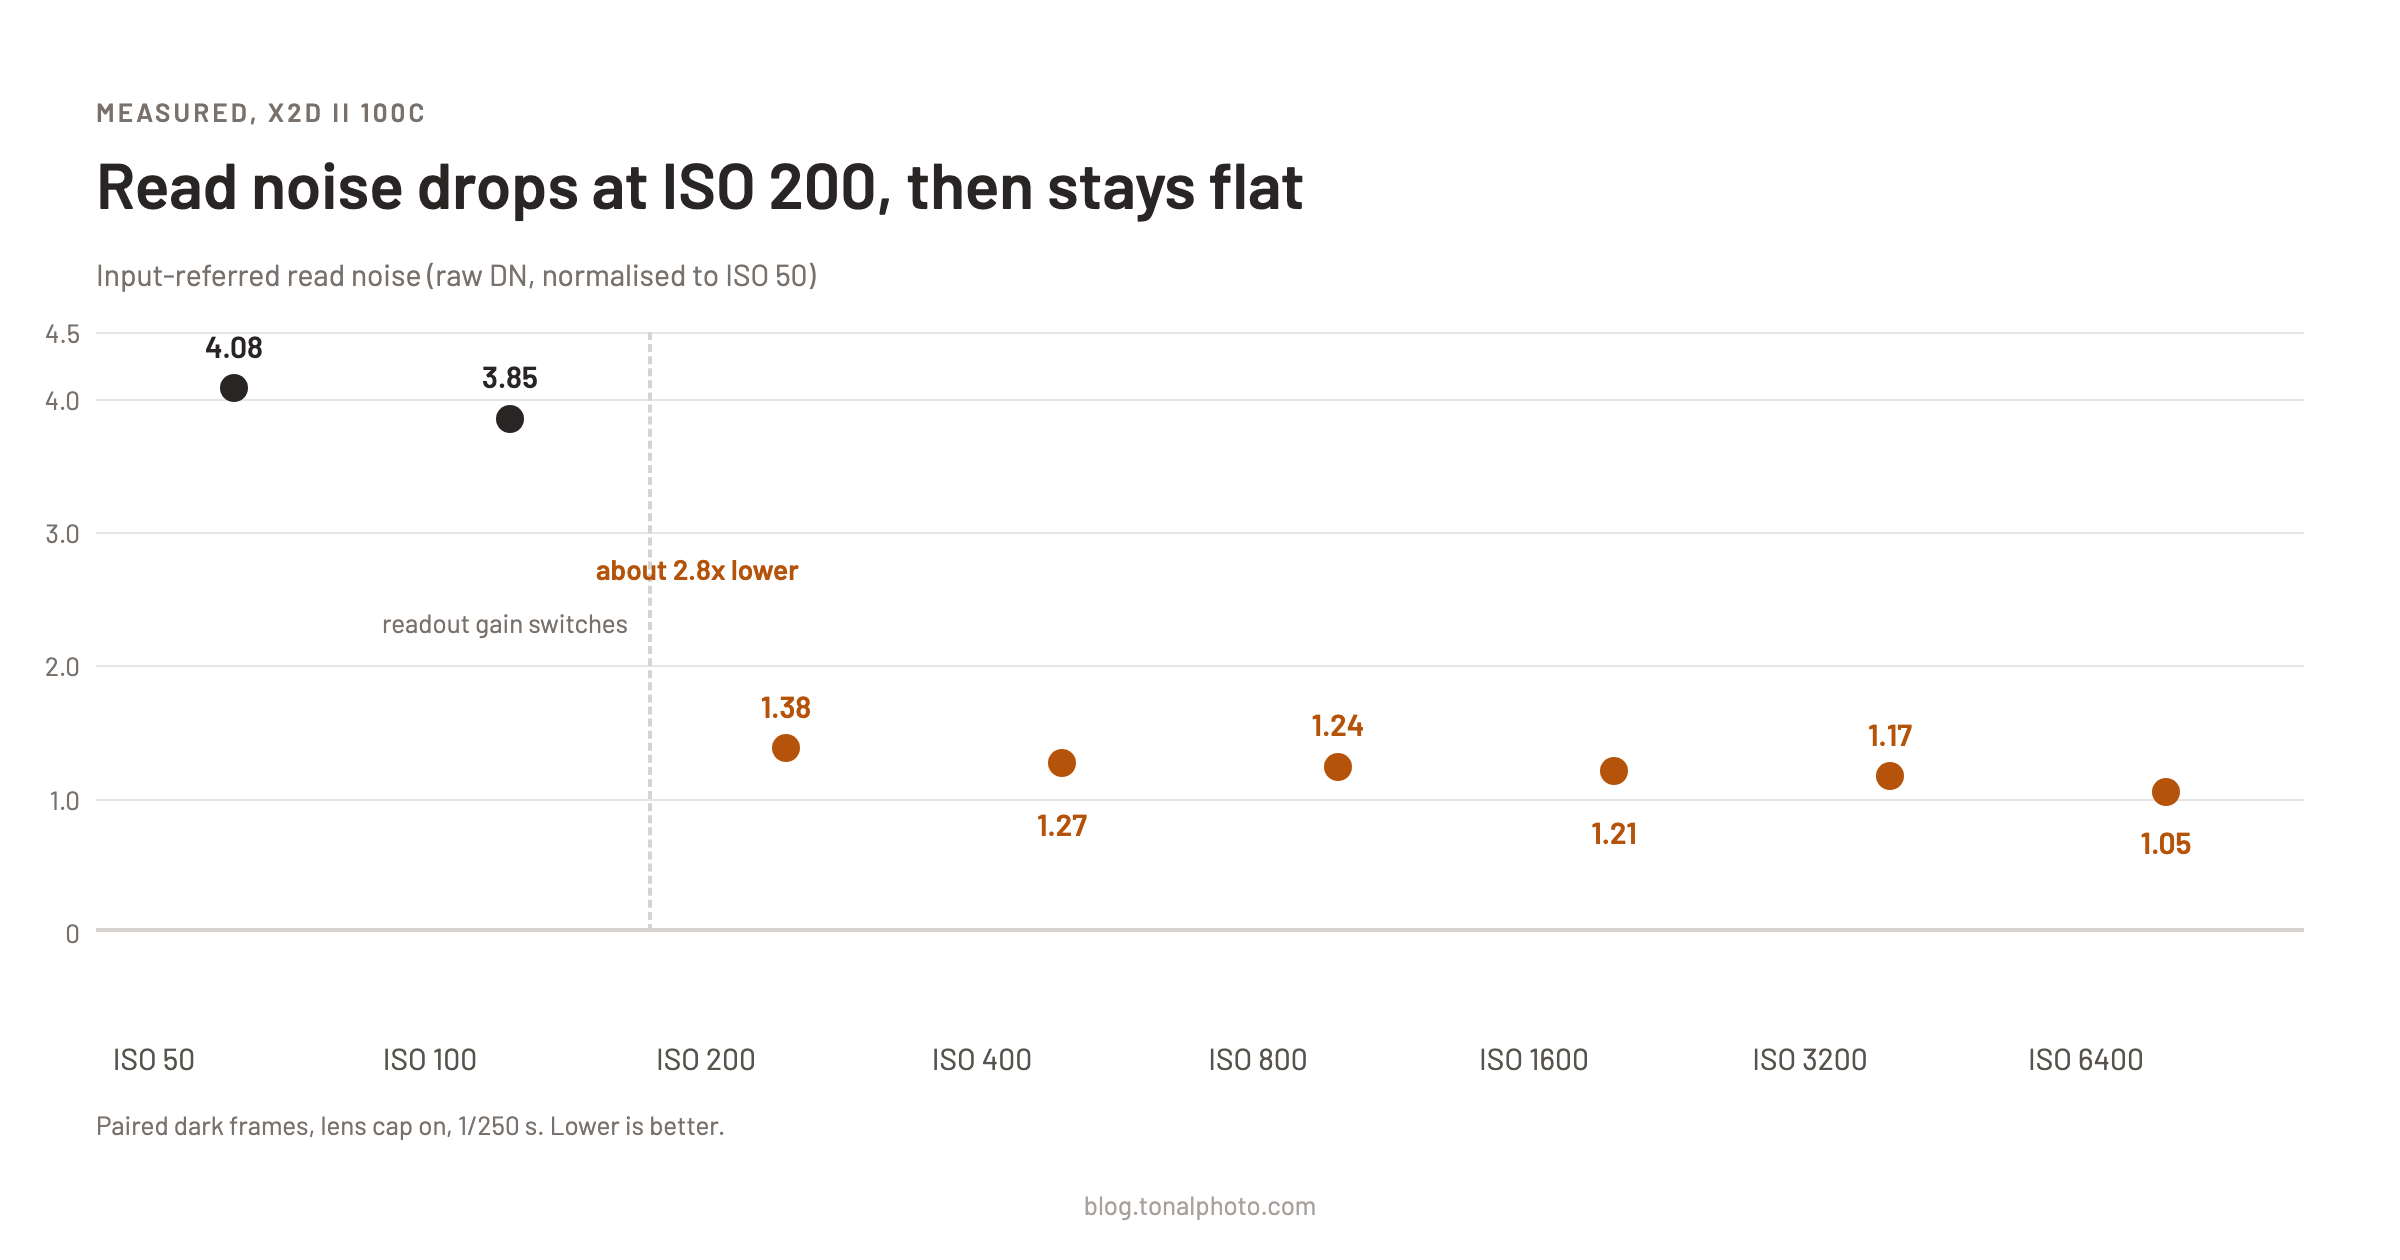
Read noise drops by a factor of about 2.8 between ISO 100 and ISO 200 on my camera, then stays almost flat through ISO 6400.
The test is simple. Lens cap on, 1/250 s, single-shot drive so the files stay 16-bit (the X2D II drops to 14-bit in continuous mode), and two frames at each full-stop ISO from 50 to 6400. Subtracting one frame of a pair from the other cancels hot pixels and any fixed pattern, and what remains is pure random read noise. I read the raw values straight from the 3FR files with LibRaw, never through Phocus import.
| ISO | Read noise (raw pixel values) | Same, with the gain divided out |
|---|---|---|
| 50 | 4.08 | 4.08 |
| 100 | 7.70 | 3.85 |
| 200 | 5.51 | 1.38 |
| 400 | 10.20 | 1.27 |
| 800 | 19.80 | 1.24 |
| 1600 | 38.69 | 1.21 |
| 3200 | 75.09 | 1.17 |
| 6400 | 134.52 | 1.05 |
Look at the middle column first. From ISO 50 to 100 the noise doubles, as it should when gain doubles. Then at ISO 200 it goes down, to less than the ISO 100 figure, before resuming its doubling. A single amplifier cannot do that. Something in the readout changes between 100 and 200. The right-hand column divides out the gain, which expresses the noise relative to the captured signal so the settings can be compared directly. It shows the two tiers plainly: about 4 below the switch, about 1.2 to 1.4 above it.
The X2D II only offers manual ISO in full stops, so I can only place the switch somewhere between 100 and 200; Kasson's finer series puts it at 200. He also notes that the small further improvement at the highest ISOs is not real, because the camera stops applying full gain up there.¹ My ISO 6400 figure fits that reading.
The same light at seven ISO settings
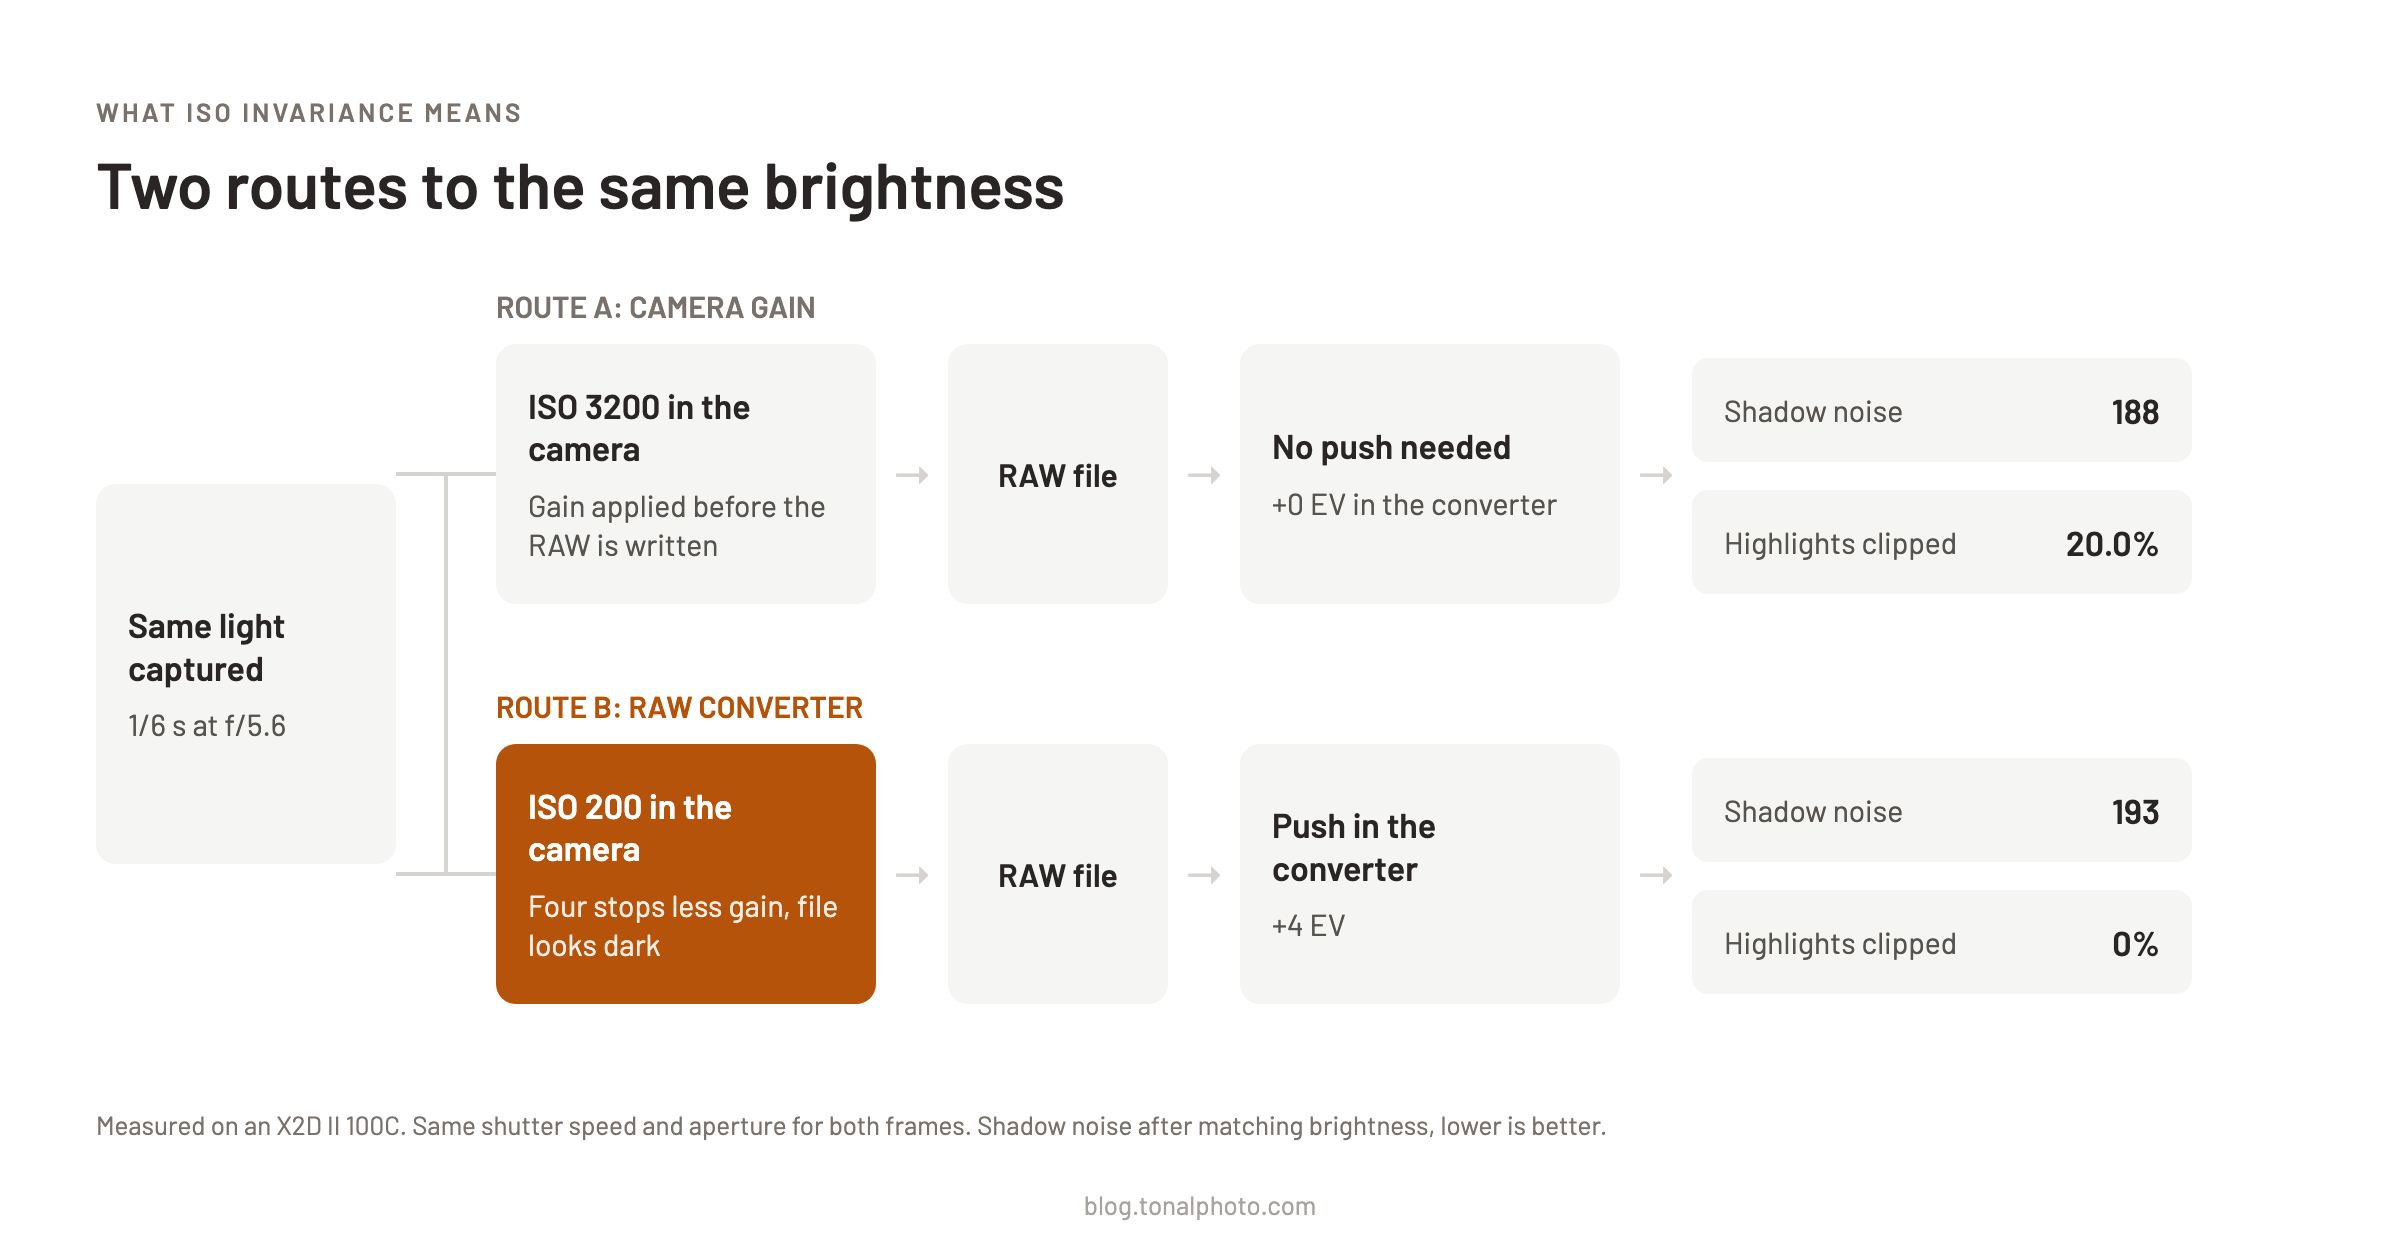
Dark frames are tidy, but nobody photographs a lens cap. The second test was a real scene, my office desk and bookshelf in deep shadow beside a bright window: tripod, stabilisation off, 1/6 s at f/5.6, and seven frames from ISO 3200 down to ISO 50. Same aperture, same shutter, so every frame received exactly the same light. The ISO 50 frame is six stops darker than the ISO 3200 one.
Then each file was brightened to match the ISO 3200 frame, which means two stops for ISO 800, four for ISO 200 and six for ISO 50, and I measured noise on the same smooth shadow patches in every frame.
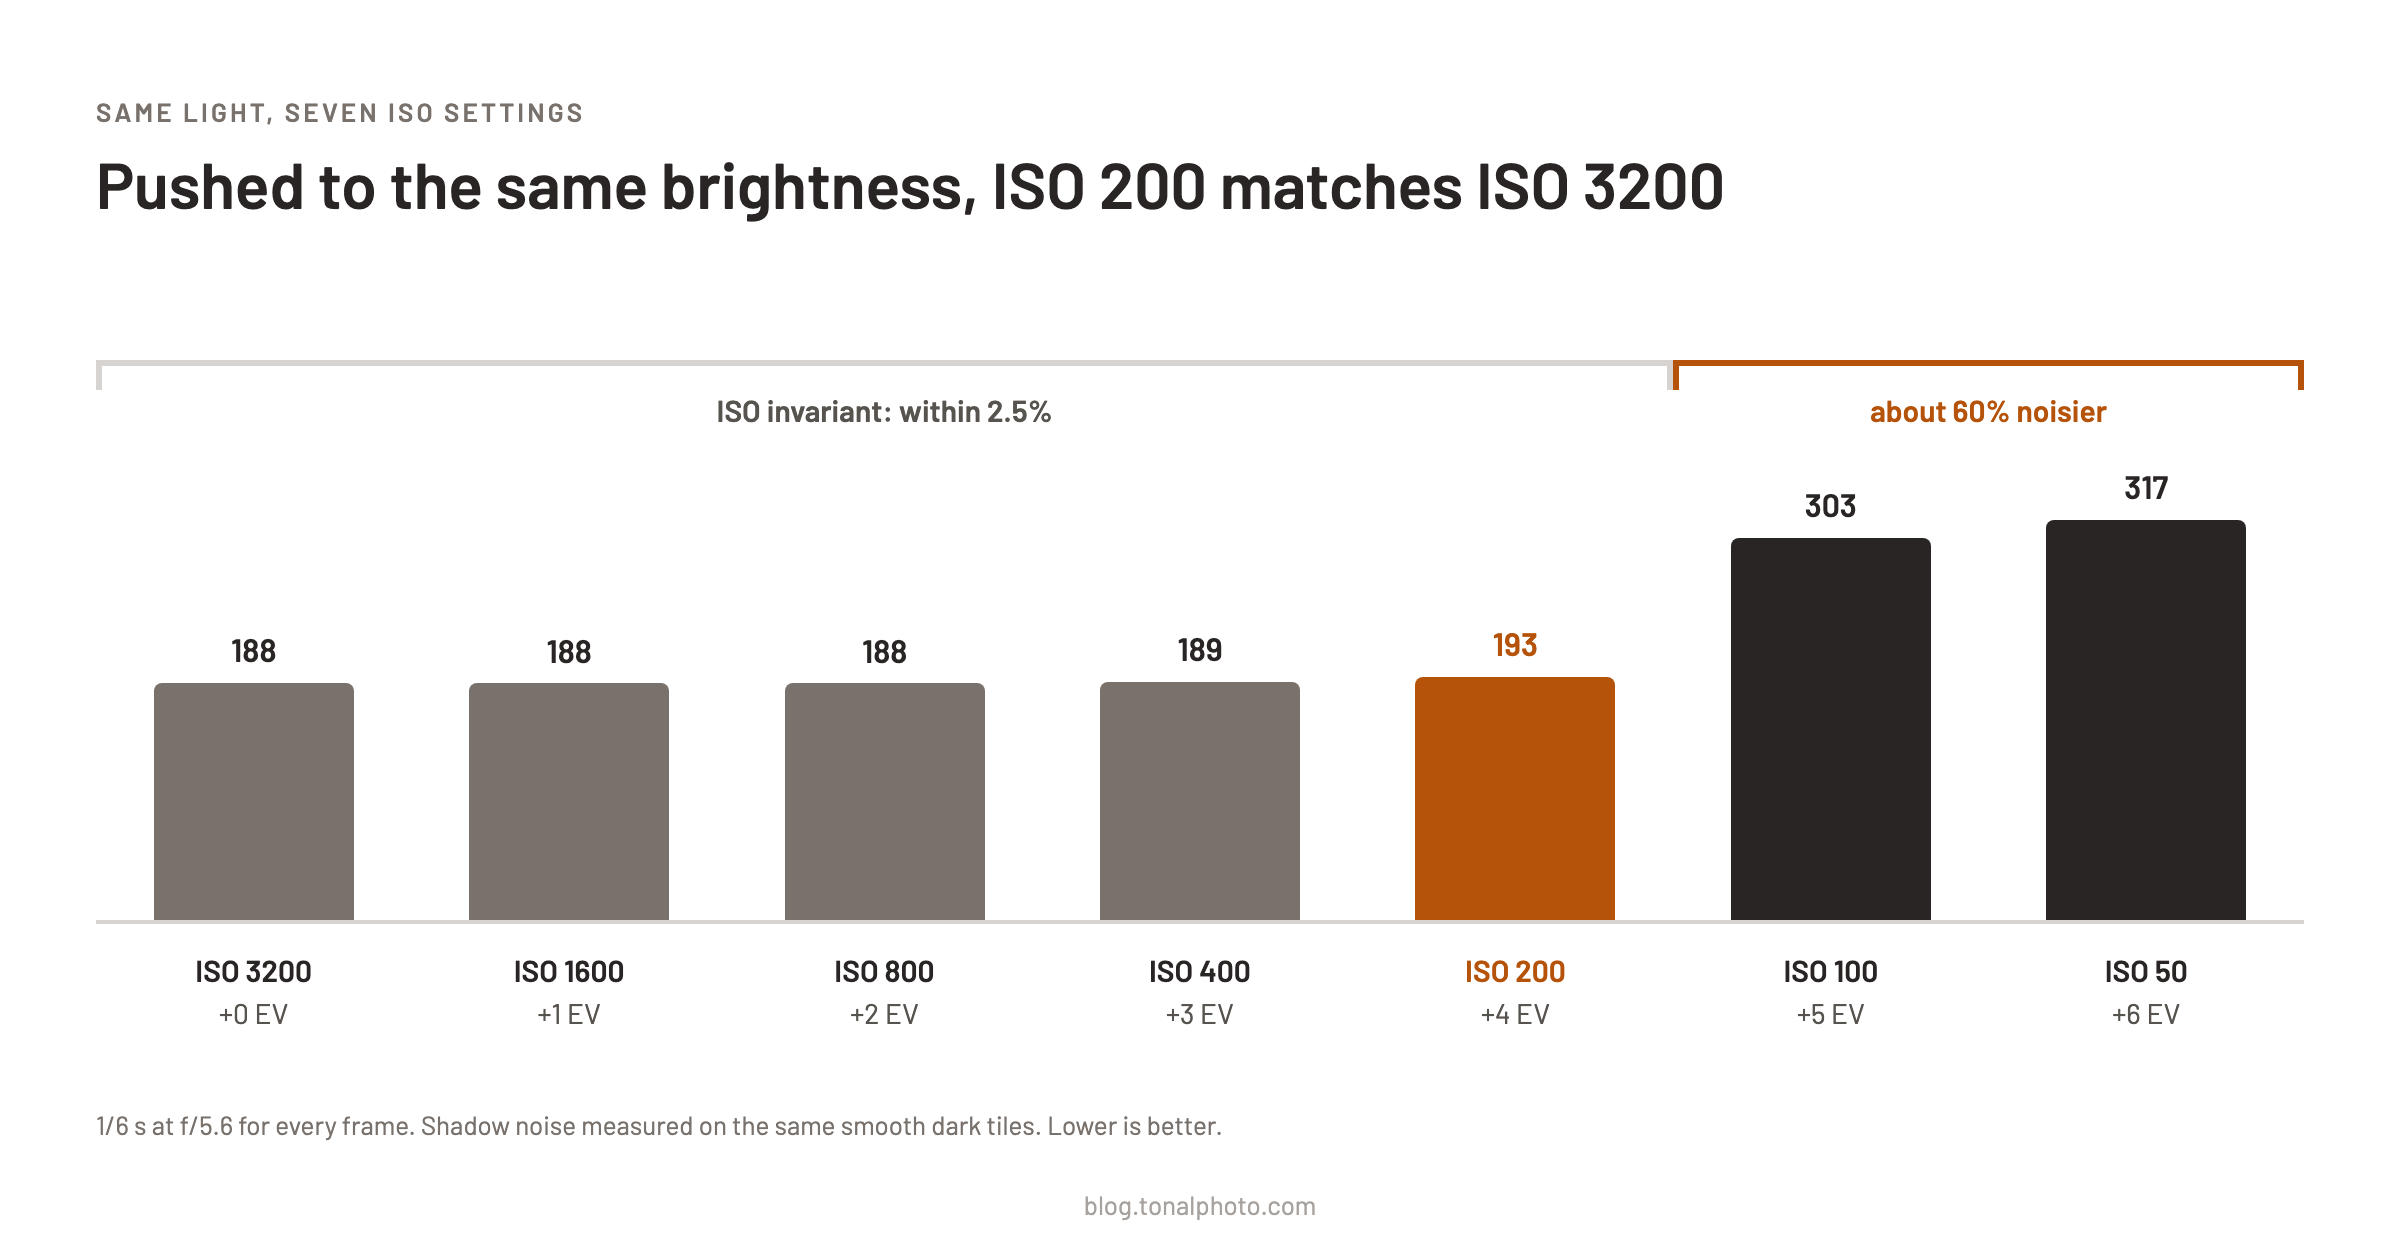
From ISO 3200 down to ISO 200 the pushed shadows are the same to within 2.5 percent. That is ISO invariance, measured. Go below the switch and it breaks: ISO 100 and ISO 50, pushed to the same brightness, come out about 60 percent noisier. The dark-frame numbers predict those scene numbers to within two percent, which is as much agreement as I could ask of two independent tests. I ran the scene series twice (I had forgotten to turn stabilisation off the first time) and the two runs match.
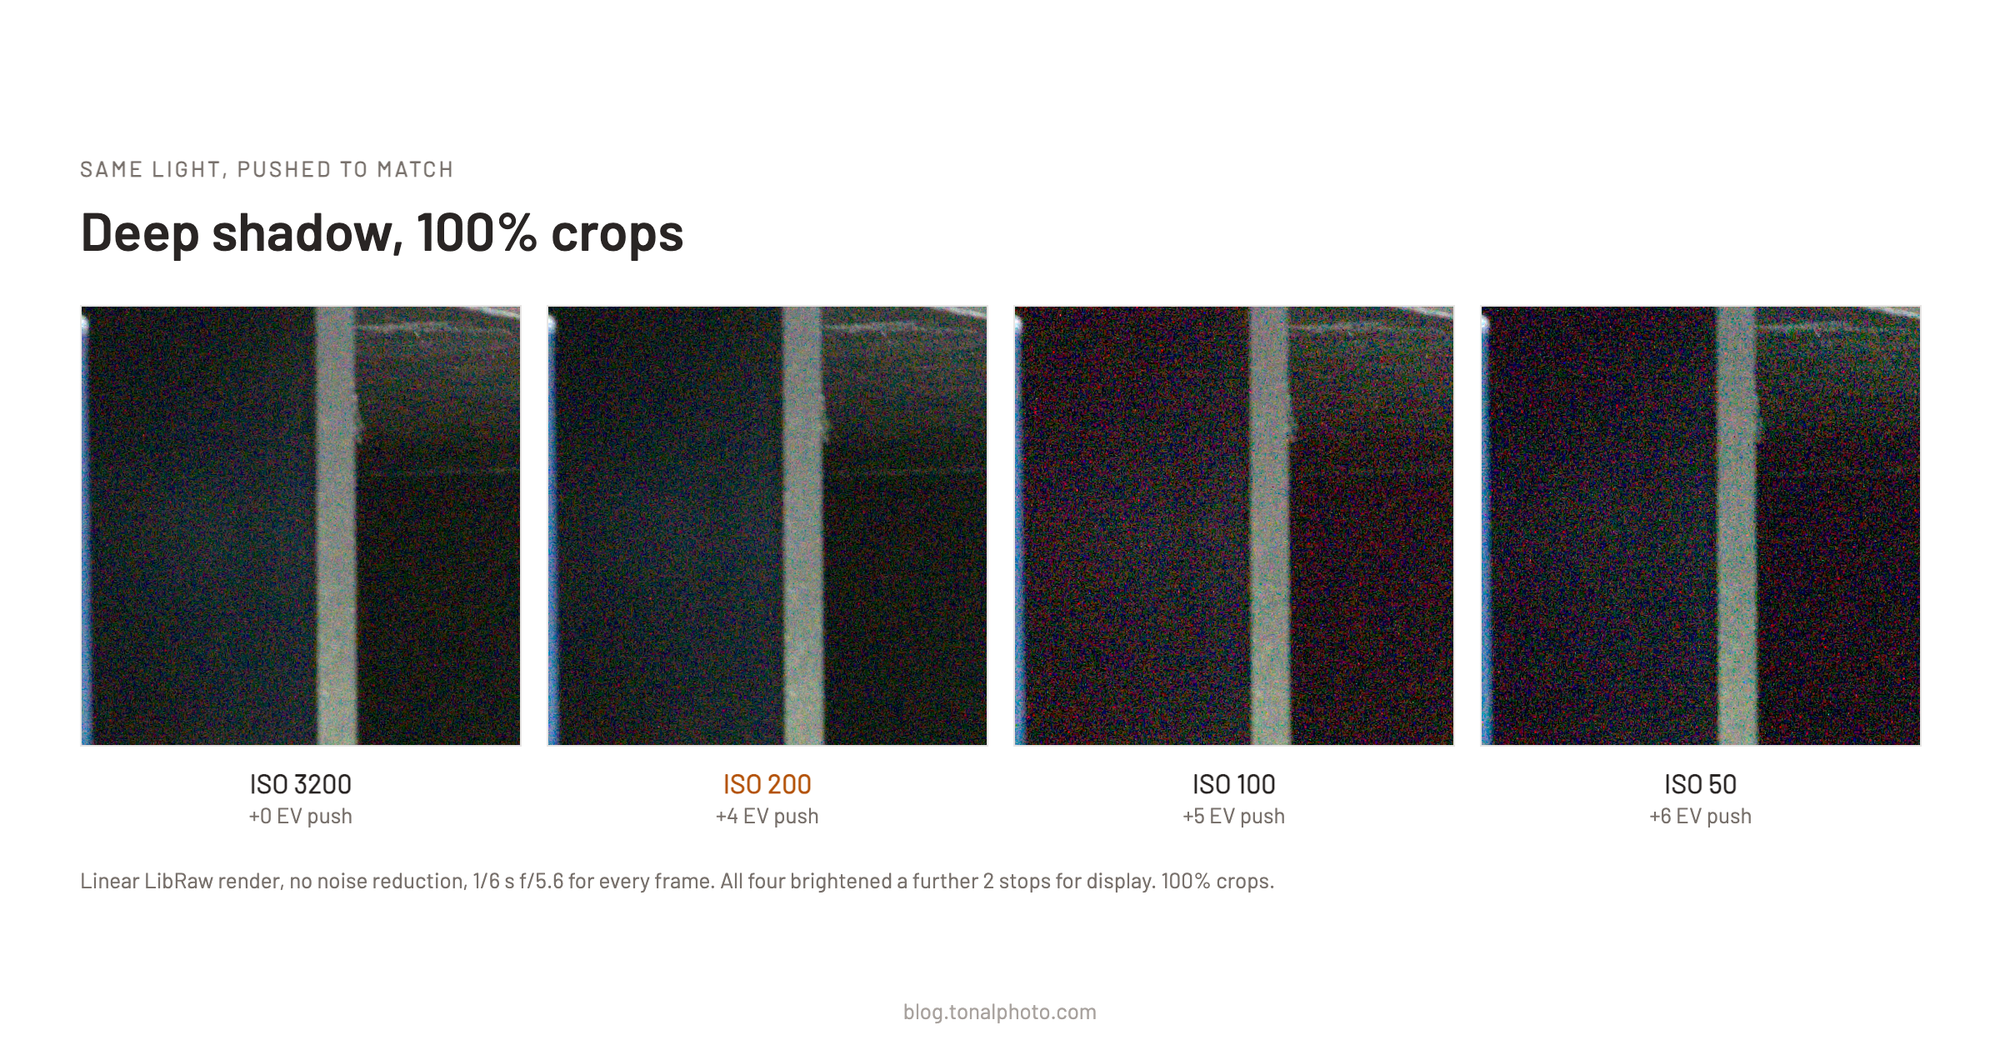
The crops above come from a shelf cubby at about one percent of full scale (the brightest value the raw file can record), brightened a further two stops so the noise is visible on a screen. ISO 200 pushed four stops is indistinguishable from ISO 3200. ISO 100 and ISO 50 are visibly grainier, and they pick up something the noise figures don't show: a red-magenta cast in the darkest tones that the ISO 200 and ISO 3200 crops do not have. I don't know its cause, and this is a plain LibRaw render, so a finished converter may handle it differently. It does line up with Kasson's warning that very large pushes can shift color.²
The 60 percent figure comes from patches sitting at around one percent of full scale, lifted five or six stops. In merely dark areas of the same frames, at two to four percent of full scale, the gap shrinks to about 15 percent, because there is enough light there for shot noise to take over again. Kasson describes the ISO 100 to 200 improvement as "material only in the deepest shadows",² and that is the regime this test deliberately lives in. In a file you lift by a stop, you will not see it.
Have you seen the guide? I've published Essential Phocus 4.x for Mac - 85 topics across 8 sections and 250 pages covering everything from HNCS color science to HDR workflows. It's the reference manual Hasselblad hasn't updated since 3.8. It's $49, and updates are included.
What the lower ISO buys: highlights
Every stop of ISO you decline is a stop of highlight room you keep, and above ISO 200 it costs nothing in the shadows.
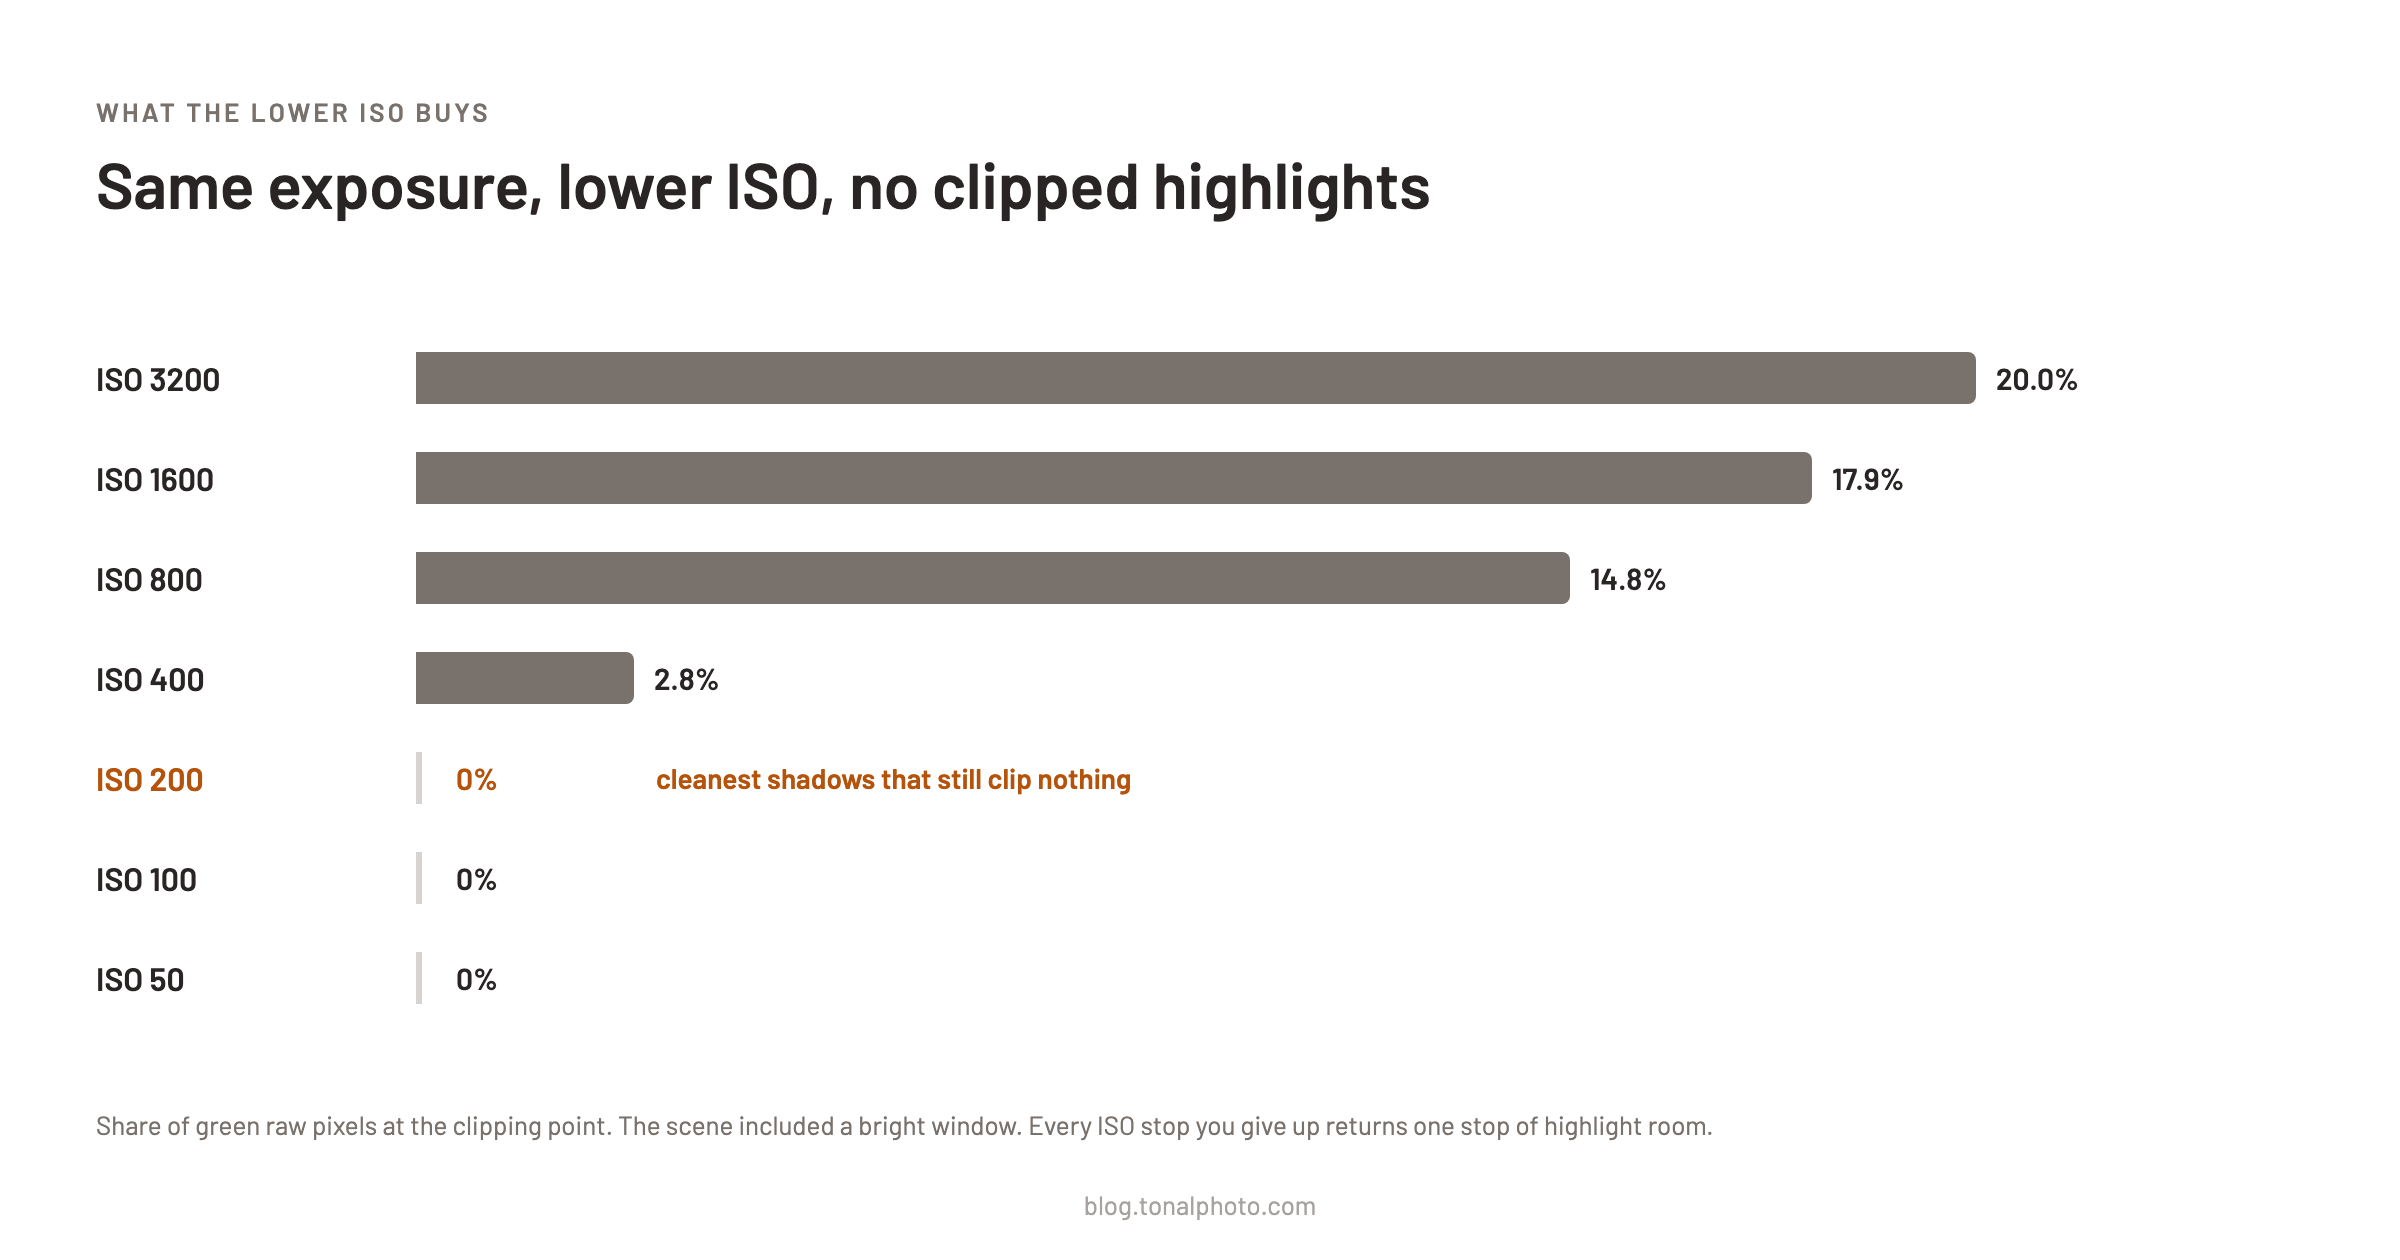
In the ISO 3200 frame, 20 percent of the green raw pixels were clipped: the window and everything near it, gone. At ISO 800 it was 14.8 percent, at ISO 400 it was 2.8 percent, and at ISO 200 and below nothing clipped at all. Same light, same shadows, and the window is still in the file.
Recovering it takes two moves in the converter. Raising exposure four stops to fix the shadows pushes that window straight back over white, so the highlights then have to be pulled down again with the highlight or whites control. The difference is that at ISO 200 there is something to pull down. At ISO 3200 the raw data is a flat ceiling and no slider brings it back.
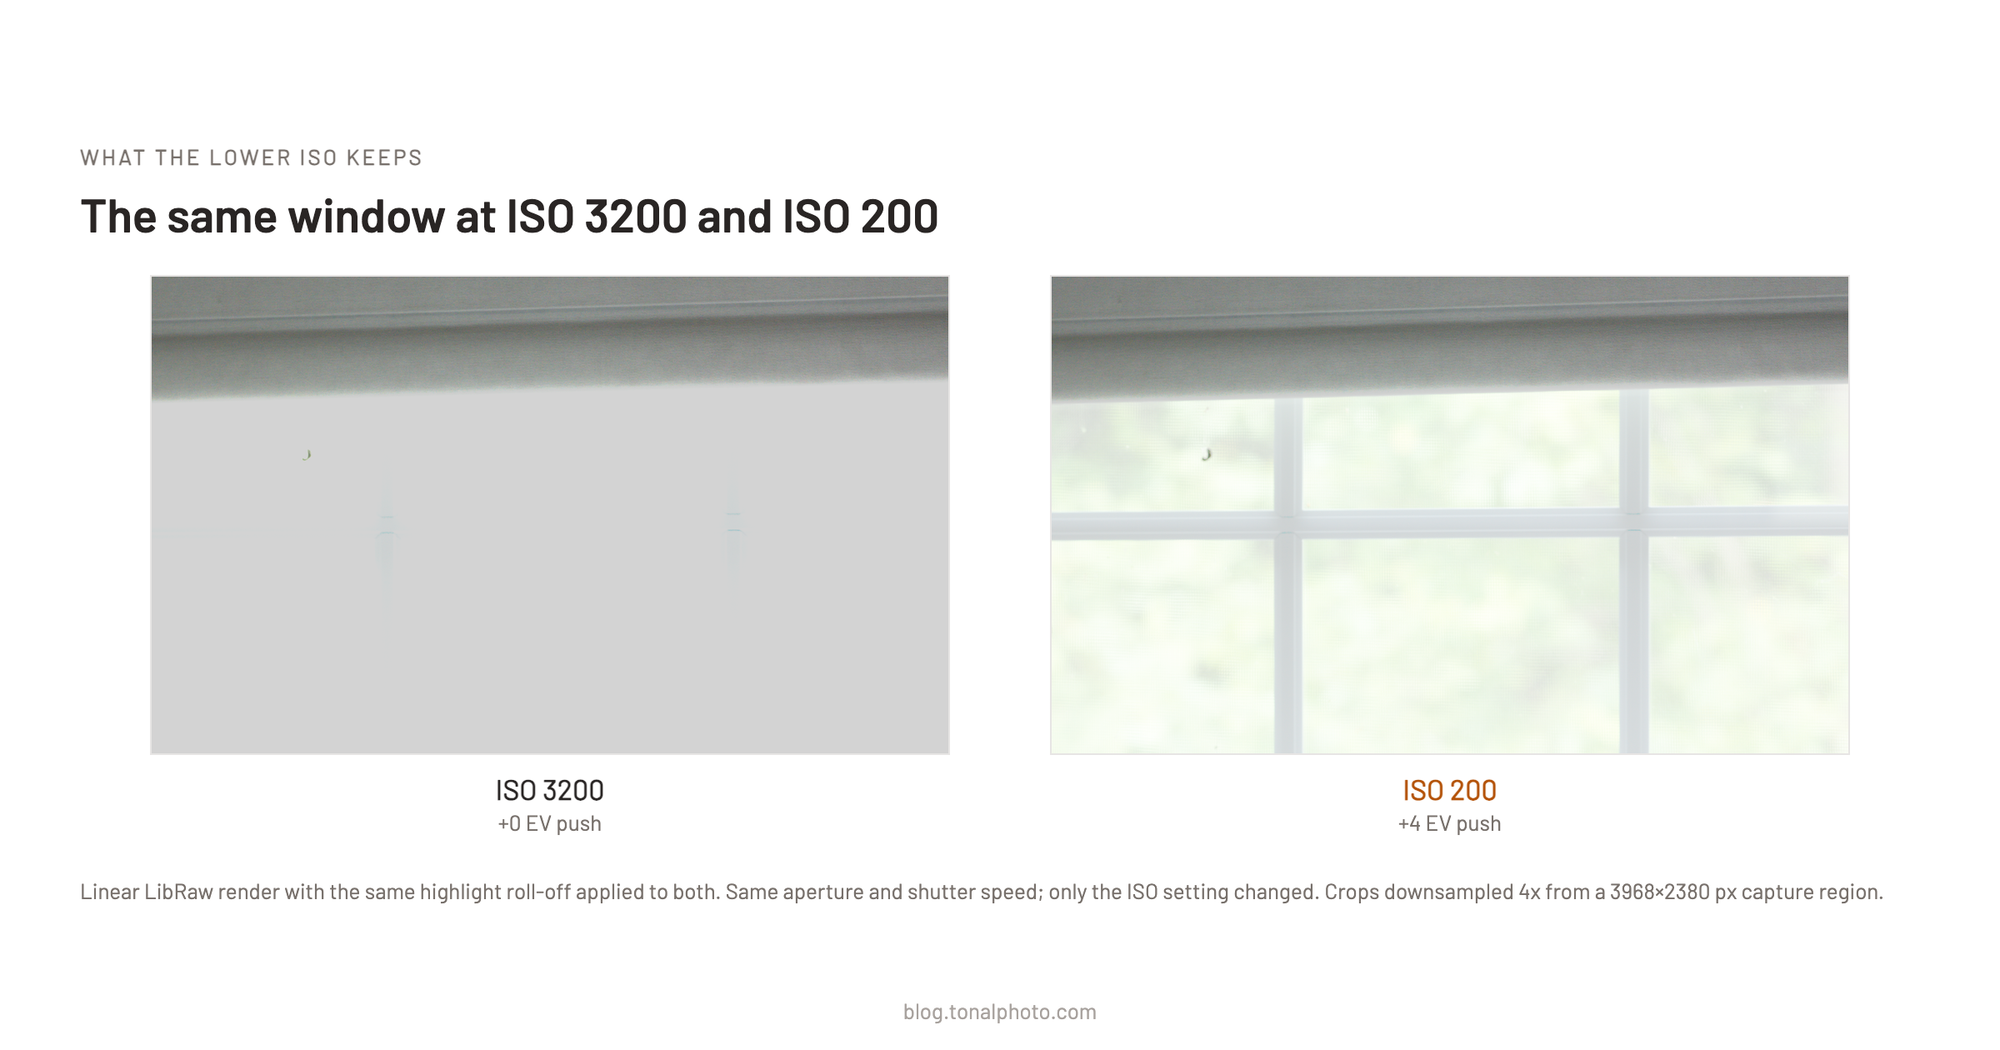
Both crops had the same four-stop match and the same highlight roll-off applied. At ISO 3200 three quarters of this region is at the clipping point in the raw file, and what is left is a grey panel. At ISO 200 almost none of it clipped (0.04 percent), and the window frame and the greenery outside are all there.
It is also why I now think of ISO 100 as the odd one out on this camera. It sits below the switch, so its read noise is the same as ISO 50, but it has one stop less highlight room than ISO 50. If I have the light, ISO 50 is better. If I don't, ISO 200 is cleaner. I can't construct the scene where 100 wins, unless you simply want a brighter review image.
Which ISO should you use on the Hasselblad X2D II?
ISO 50 when there is enough light. When there isn't: ISO 200, or three stops under what the meter asks for, whichever is higher, with the shutter speed and aperture left exactly where you set them.
Those two come first, and they are artistic decisions before they are technical ones. Kasson's order is f-stop for depth of field, shutter speed for motion, then ISO.² In the field my first question is what I want the frame to look like. A tripod does not stop wind. If I want the foreground leaves frozen, the shutter speed that does it may leave me at an aperture too wide for the depth of field I had in mind, and that can be fine if shallow is what the picture wants. If the scene calls for front-to-back sharpness, I set the aperture first and let the leaves blur as part of the image. If I want both, frozen leaves and deep focus, the answer is a focus stack. Whichever way that goes, ISO is what is left over.
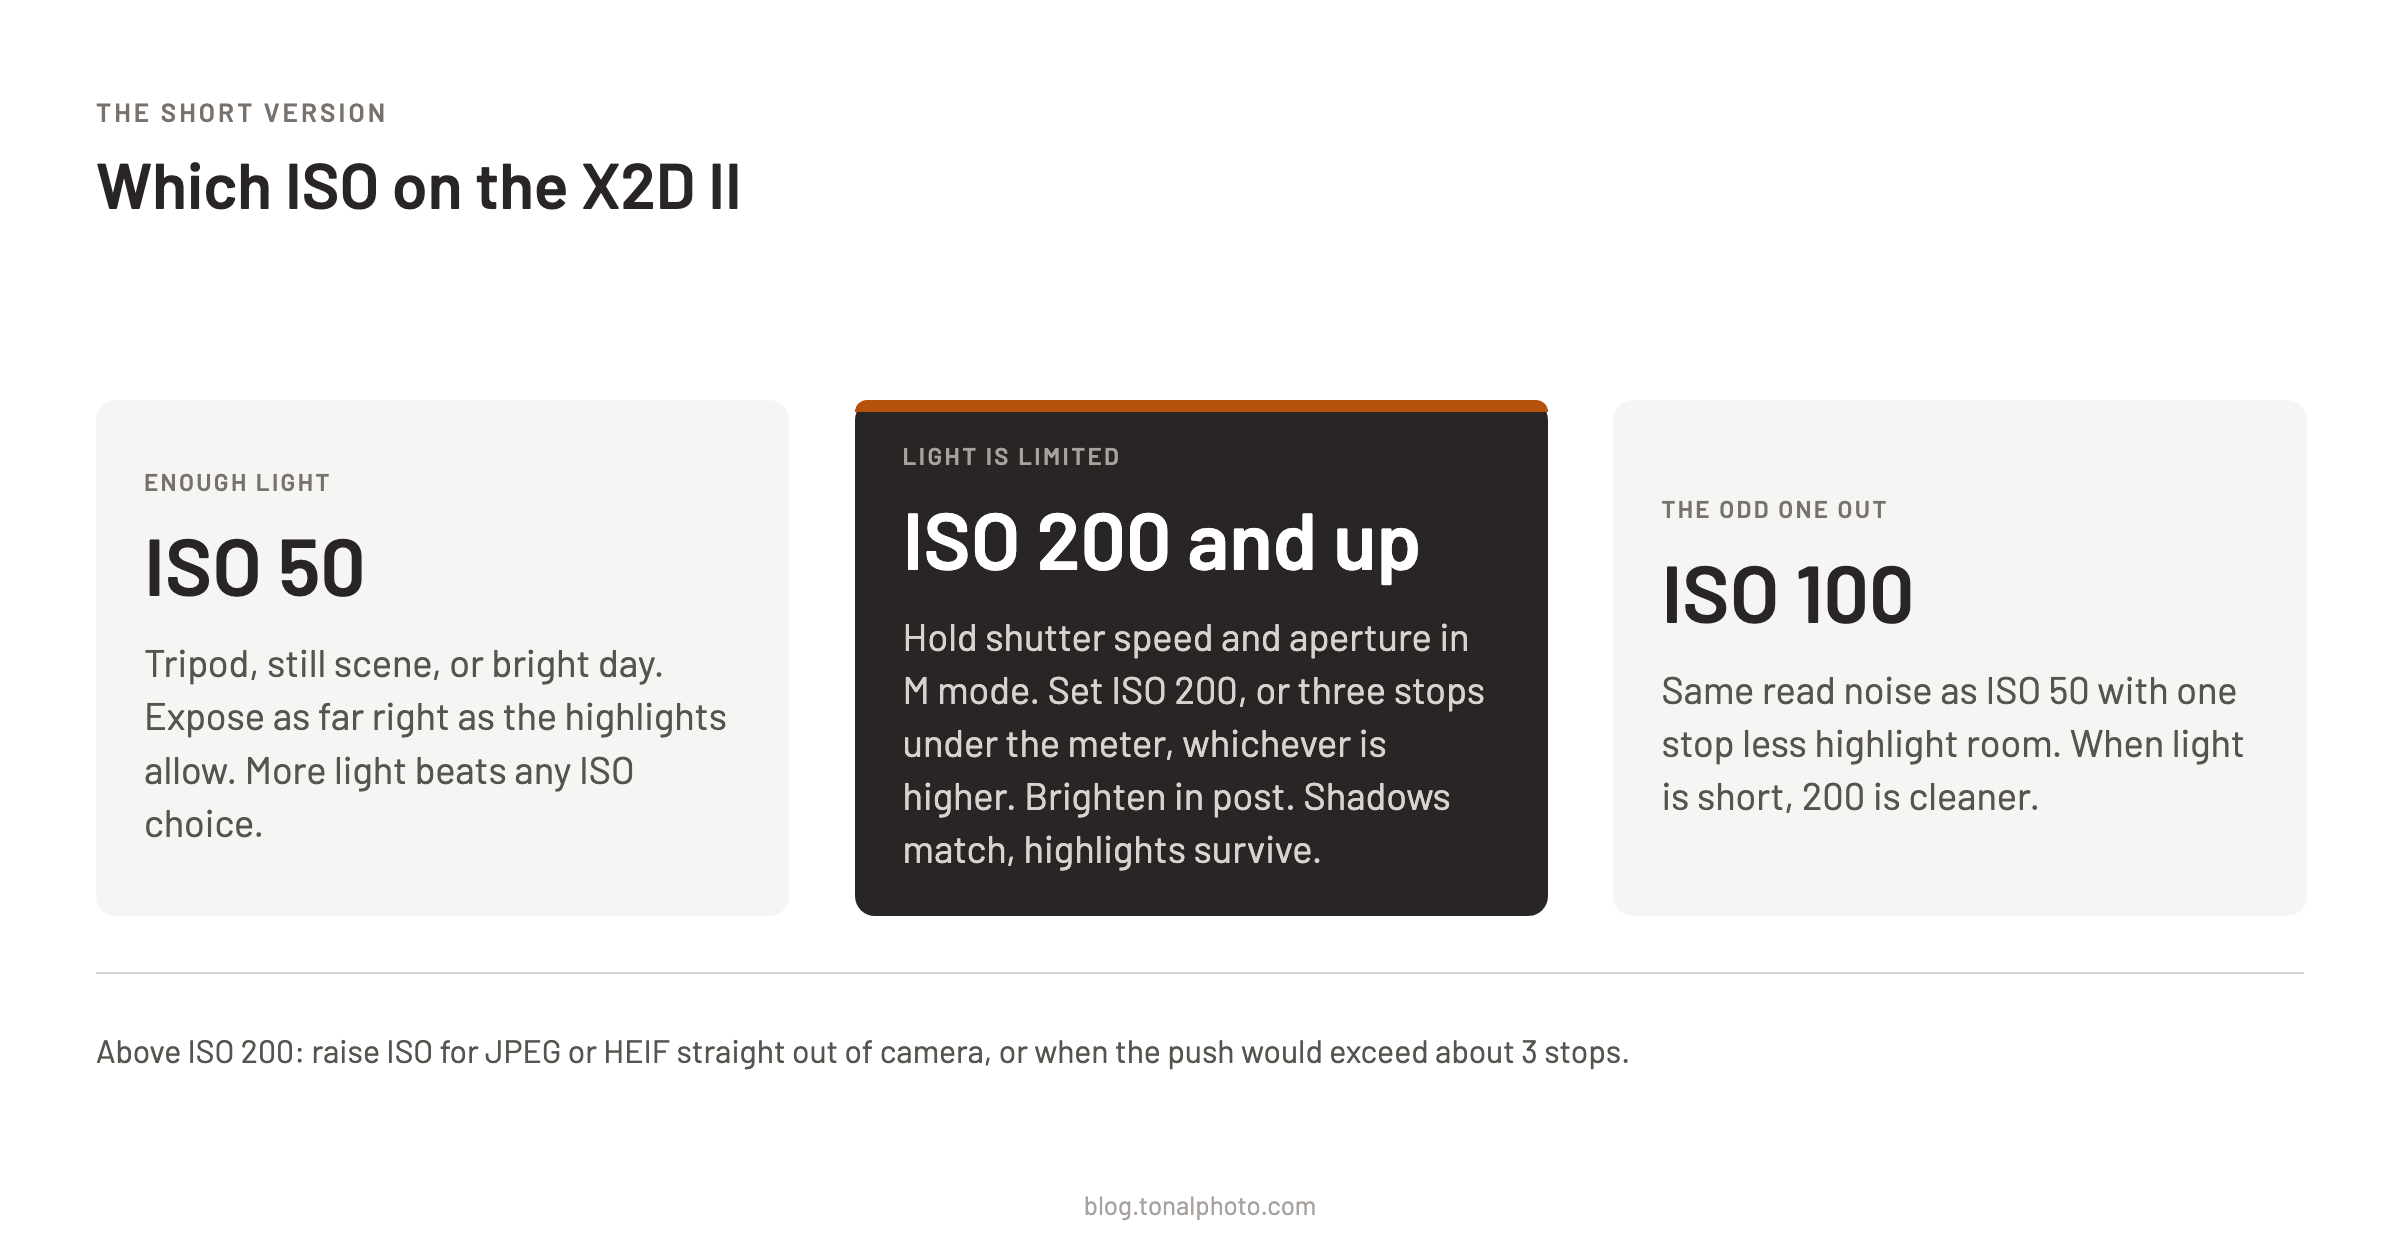
If what is left over is a full histogram at ISO 50, I shoot ISO 50 and expose as far right as the highlights allow. That is still the best file the camera can make, and it is why base ISO on a tripod works so well for night skies and for any scene where nothing in the frame is moving. When the light runs short, the table takes over:
| The meter wants | I set | Push in post |
|---|---|---|
| ISO 400 | 200 | 1 stop |
| ISO 800 | 200 | 2 stops |
| ISO 1600 | 200 | 3 stops |
| ISO 3200 | 400 | 3 stops |
| ISO 6400 | 800 | 3 stops |
| ISO 12,800 | 1600 | 3 stops |
| ISO 25,600 | 3200 | 3 stops |
The aperture-priority trap
This does not work in aperture priority, and it took me a minute to see why. Say the camera is at f/5.6 and has chosen 1/100 s and ISO 12,800. If I dial the ISO down to 200 in A mode, the camera puts the brightness back the only way it can, by lengthening the shutter six stops to about 0.6 s. That is more light, a different exposure, and a blurred photograph.
The light has to stay the same. So: M mode, 1/100 s, f/5.6, ISO 1600. The file comes out three stops dark, I brighten it in post, and the highlights have three more stops of room than the camera's own choice would have left them. ISO is a gain setting, applied to a signal that has already been captured. All I have done is decline some of the gain. My scene test stops at ISO 3200, so above that I am relying on Kasson's curves, which stay flat to the top of the range.¹
M mode is close to mandatory for another reason. Exposure Simulation cannot be switched off in A, S or P. Dial in heavy negative compensation, half-press the shutter, and the viewfinder goes dark enough that it is hard to tell where you are pointing. The setting lives under Main Menu > Exposure, and its A/S/P/Auto option leaves Manual mode out, so in M the Live View stays viewable while the file stays dark. Playback still shows the dark capture, so the histogram is a better guide than how the review image looks.
Why three stops
The three-stop cap is borrowed caution. Kasson warns that very large pushes can shift color,² and Voss saw it on a four-stop push in one converter.³ In my own test the four-stop push from ISO 200 was clean. The red-magenta cast only appeared in the ISO 100 and ISO 50 frames, which were pushed five and six stops and also sit below the gain switch, so I can't say which of the two caused it. Three stops costs nothing in noise and leaves a margin.
I've been in the habit of often shooting at up to ISO 25,600 in low light, the top of the range, and noise reduction handles those files well. By this rule the same frame at ISO 3200 should clean up just as well and keep three more stops of highlights. I have not tested that yet.
If you deliver JPEG or HEIF straight from the camera, none of this applies: expose for the brightness you want. And everything here is measured on the raw data. I have not yet compared how Phocus, Lightroom and Capture One render these pushed files, which is a separate post.
One correction closer to home. My own Phocus guide told readers to treat ISO 100 through 1600 as a single tier. That advice came from a coarser measure of usable bit depth that cannot see a read-noise step, and for ISO 100 it was wrong. I have corrected the source, and the next guide release carries the rule above.