Color Calibration and the Reproduction Tool in Phocus
Phocus is built around defaults that handle scene photography without intervention, and for landscapes, portraits, or street work you never need to look past them. Reproduction is the exception. It is a panel that ships hidden in every Phocus layout, so most Hasselblad photographers never open it, and it holds four controls: Working Space, Color Calibration, Input Profile, and Response. The moment you put a camera on a copy stand, photograph artwork, digitize cultural heritage material, or shoot any flat original where the color and tone of the original matter more than a pleasing render, those four controls become the workflow.
This page covers both halves of that workflow. The first half is how to build a custom Color Calibration from a reference target, which teaches Phocus how your specific camera, lens, and lighting setup reproduces known reference colors. The second half is the Reproduction tool itself, with a reference for all four controls and how they interact. The audience is photographers doing studio product work, copy stand or repro work, museum or archival digitization, or any context where consistent color across a shoot matters more than scene-by-scene look.
What This Workflow Solves
Hasselblad ships every camera with a Factory input profile that characterizes the sensor's response under generic conditions. For scene photography under variable lighting this is the right tradeoff. The HNCS rendering pipeline applies the Factory profile, then the standard photographic curve, and produces colors that look pleasing across a wide range of scenes without intervention.
Reproduction work breaks this. When you photograph a flat original under fixed lighting, the goal is not pleasing rendering. The goal is to make the captured image match the original as closely as the print and the screen allow. The Factory profile generalizes across lighting situations rather than targeting the specific one in front of the camera, and the standard photographic curve compresses highlights toward a roll-off that pulls captured white values down by 15-20 L* units before the file is saved.
A custom Color Calibration replaces "generic enough" with "characterized for your exact setup." The Reproduction tool's Response and Working Space controls replace "pleasing roll-off" with "preserve the captured tone." Used together, the calibration and the tool give you a render pipeline tuned for color and tonal fidelity, not for scene aesthetics. Used in isolation, each is incomplete.
One caveat before going further: all four controls of the Reproduction tool revert to their defaults for general scene photography. The defaults (Hasselblad RGB, no Color Calibration, Factory, Standard) are correct for everything that isn't a copy stand or controlled-lighting shoot. None of what follows applies if you're shooting outside, doing portraits, or working with mixed daylight.
Have you seen the guide? I've published Essential Phocus 4.x for Mac - 83 topics across 8 sections and 220 pages covering everything from HNCS color science to HDR workflows. It's the reference manual Hasselblad hasn't updated since 3.8. Pay-what-you-want starting at $24.
Build a Custom Color Calibration
The calibration math characterizes your camera + lens + lighting against a reference target with known Lab values. Phocus computes a transform that maps the sensor's measurements of the patches to the target's reference values, and applies that transform to subsequent captures under the same setup.
What you need. A photograph of a recognized reference target shot in the lighting you want to calibrate to. Supported targets are the 24-patch ColorChecker Classic (pre-November 2014 or November 2014+), the 240-patch ColorChecker DC (discontinued), or the 140-patch ColorChecker Digital SG (pre-November 2014 or November 2014+). The capture must be properly exposed, in focus, and the target should fill a substantial portion of the frame with all four corner registration marks visible.
Steps
- Open the reference target capture in the Phocus viewer. Reset any adjustments to defaults first. The calibration math characterizes the sensor's response, not an already-adjusted preview.
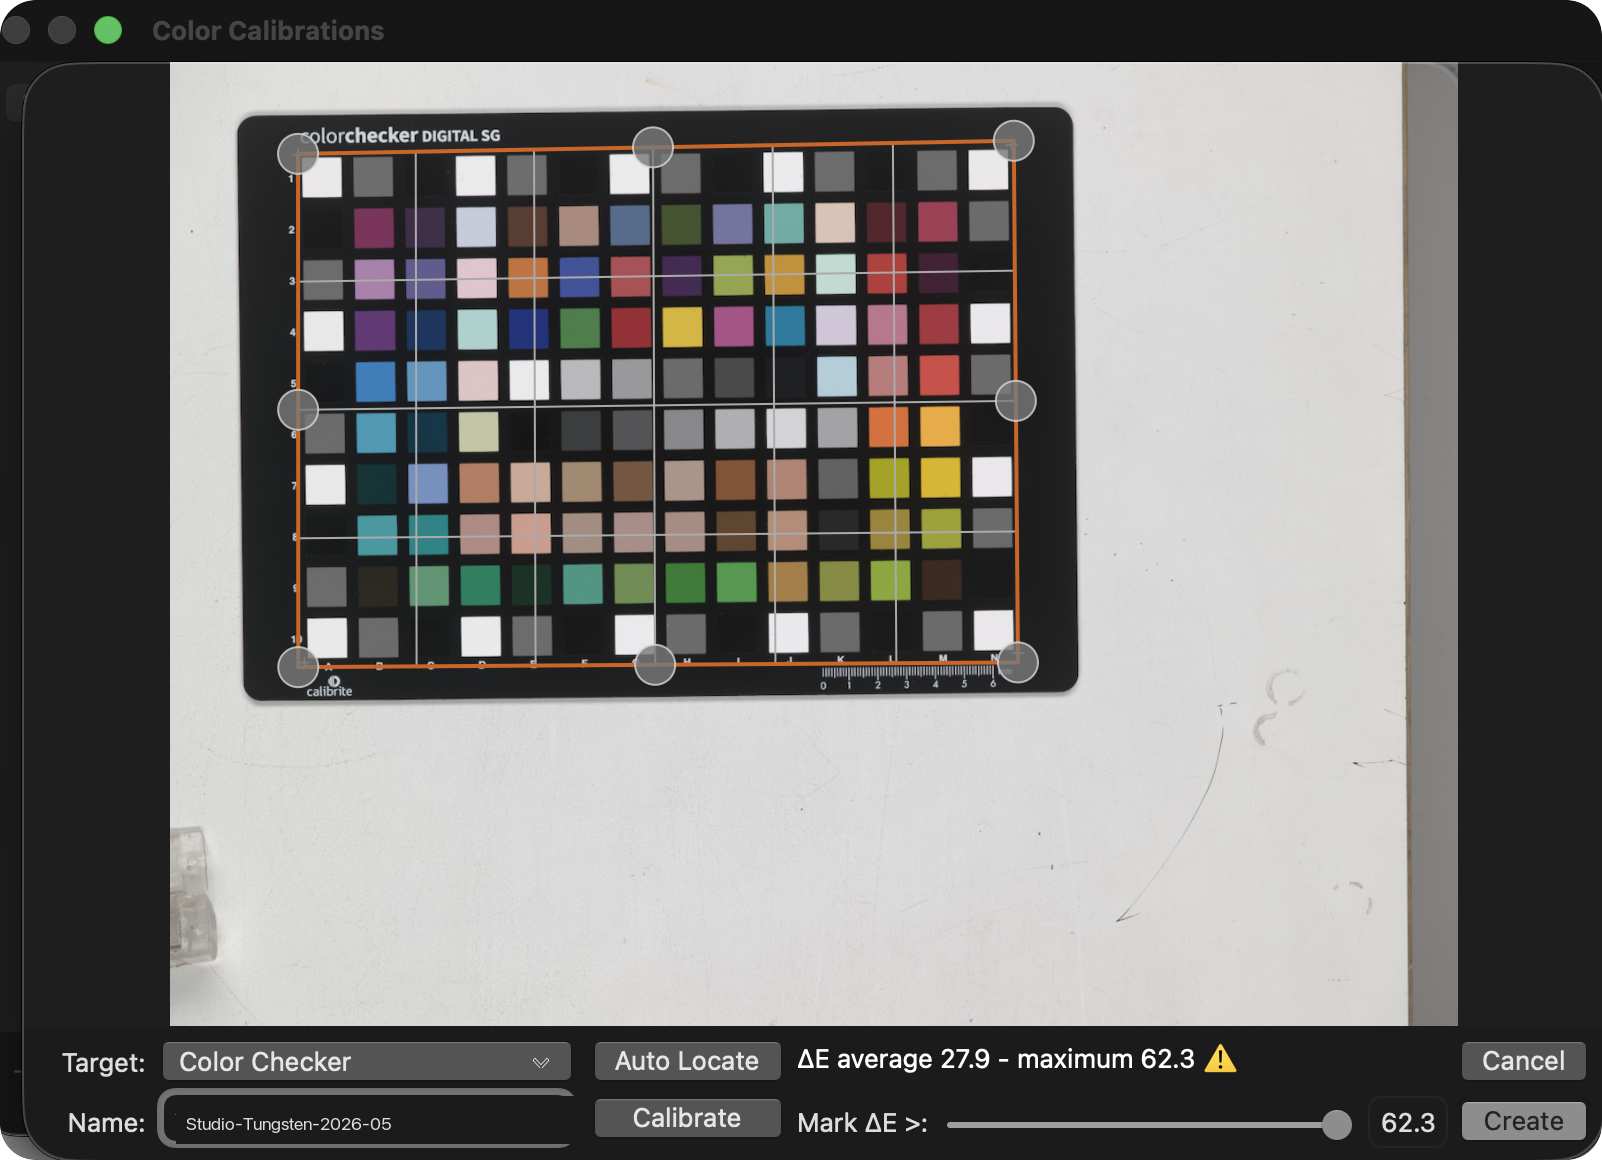
- Open the Color Calibrations window. The window title is "Color Calibrations" and contains a list of saved calibrations plus the controls to build a new one.
- Click + below the calibrations list. A dialog appears with a Target dropdown, Description field, Auto Locate / Calibrate buttons, and a Mark ΔE threshold slider.
- Select the matching Target for the card you photographed. The options are:
- Color Checker for the 24-patch ColorChecker Classic with pre-November 2014 pigments
- Color Checker - Nov 2014 and newer for the 24-patch Classic with updated reference values
- Color Checker DC for the discontinued 240-patch DC
- Color Checker SG for the 140-patch Digital SG with pre-November 2014 pigments
- Color Checker SG - Nov 2014 and newer for the 140-patch SG with updated reference values
The production date is printed on the back of newer cards. If you bought the card recently, choose the "Nov 2014 and newer" variant. This single dropdown choice is the most consequential step in the whole workflow. Picking the wrong variant gives you ΔE 20+ on every patch, and the resulting calibration does not generalize.
- Type a descriptive Name for the calibration. Something traceable like
Studio-Tungsten-XCD90V-2026-05-15is more useful than the auto-generated date stamp, because the calibration list grows and the names are what you see in the Reproduction tool's dropdown later. - Click Auto Locate. Phocus overlays a patch grid on the image and attempts to align it with the visible target. With a well-framed capture and the correct Target selected, the grid lands on the patches automatically.
- Verify the grid placement. The grid corners should sit on the four corner registration marks of the card, and the cells should align with the printed patches. If the grid is misaligned or sized wrong, drag the corner markers to fit, or turn off Auto Locate and place the corners manually.
- Click Calibrate. Phocus computes the profile and displays the residual fit error as "ΔE average" and "ΔE maximum" at the bottom of the dialog.
- Click Done to save. The calibration now appears in the calibrations list and in the Reproduction tool's Color Calibration dropdown for any image.
What "Good" Looks Like
ΔE is the residual fit error, expressed in the perceptual color-difference units of the CIE Lab space. Lower is better.
| ΔE average | What it means |
|---|---|
| 1.5 to 3 | Well-fit calibration on a recent Calibrite card with a good capture |
| 3 to 5 | Marginal. Check the Target dropdown variant, check the grid placement, check the capture for motion blur or glare. |
| Above 5 | Something is wrong. Most often the Target dropdown doesn't match the actual card. |
Maximum ΔE typically lands below 5 on a well-built calibration. A few patches with higher individual ΔE (the deep blues, the saturated reds) are normal even on good builds. The average is the number that drives the calibration's usefulness.
If the average ΔE is high and the Target dropdown variant is correct, the most common visual signature of a Target mismatch is a small 6×4 grid sitting in the middle of an SG card. That's Phocus fitting the Classic 24-patch profile to whatever 24 patches happen to fall under those cells, which produces a calibration that doesn't generalize beyond those cells.
When to Rebuild
A calibration is specific to the lighting spectrum, camera body, lens, and target the build was made from. Rebuild it when any of these change: different bulbs or light sources, a moved or repositioned light, a different copy stand or studio setup, a different lens (especially a lens with different coatings or correction characteristics), a different camera body, or a different reference card. Software-side adjustments inside Phocus (white balance, contrast, scene calibration) do not require a new calibration. Those operate downstream of the input characterization the calibration provides.
Calibrations are stored in Phocus's application support directory and persist across sessions and across images. They are not tied to a specific FFF, but they do not travel with an FFF either. Moving an FFF to another machine and re-importing it will not carry the calibration along.
The Reproduction Tool: Four Controls
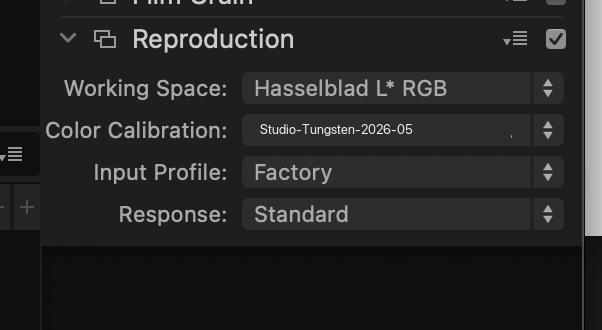
The Reproduction tool is the only place in Phocus where you can change Working Space, swap Color Calibration profiles, switch Input Profiles, or override the rendering Response curve. The panel is hidden by default in every layout that ships with Phocus, and must be manually added to the Adjust tab.
To activate it, click the menu button at the top right of the Adjust tab tool panel (the small icon next to the panel title), then check Reproduction in the popup. The panel appears in the Adjust tab, typically at the bottom. To make it stick across sessions, save your customization to a custom Layout. Otherwise Phocus reverts to the default tool list on restart and the panel disappears.
Working Space
Selects the internal rendering path Phocus uses for the current image.
- Hasselblad RGB is the default. This is the standard HNCS rendering path that Phocus uses for all normal photography work.
- Hasselblad L* RGB applies a perceptually uniform luminance encoding. Equal numeric steps correspond to equal perceived brightness changes, which is the right property for copy work where tonal fidelity matters more than aesthetic rendering.
For scene photography Hasselblad RGB is correct. For reproduction and copy stand work, pair L*RGB with the Reproduction Response option below.
The Working Space toggle is stored per-image in the .phos sidecar file. Changing it on one image does not affect any other image. There is no global preference for setting a default.
Color Calibration
Selects a saved Color Calibration profile to apply on top of the Input Profile. The dropdown lists every calibration you have built plus a no-calibration option. The Edit button next to the dropdown opens the Color Calibrations editor where calibrations are created, renamed, and deleted (the build flow above).
A custom calibration teaches Phocus how your specific camera, lens, and lighting setup reproduces a known reference target, and applying it produces tighter color accuracy under those conditions than the Factory profile alone.
Apply a calibration that was built under the same lighting and lens as the current image. Leave it on the no-calibration entry for general scene photography. A calibration encodes the color characteristics of the lights it was built under, and applying it to images shot under different lighting can introduce a color cast rather than correct one. When in doubt, leave it on no calibration.
Input Profile
Selects which sensor-to-working-space conversion profile Phocus applies before any other rendering. The only profile observed during testing on Phocus 4.1.1 is Factory. Other entries appear to be possible (the control is a dropdown rather than a fixed label), but their selection criteria and behavior are not documented by Hasselblad and were not empirically tested for this writeup.
Leave it on Factory unless you have a specific Hasselblad-supplied profile and instructions for it.
Response
Selects the tonal response curve applied during rendering. Four options:
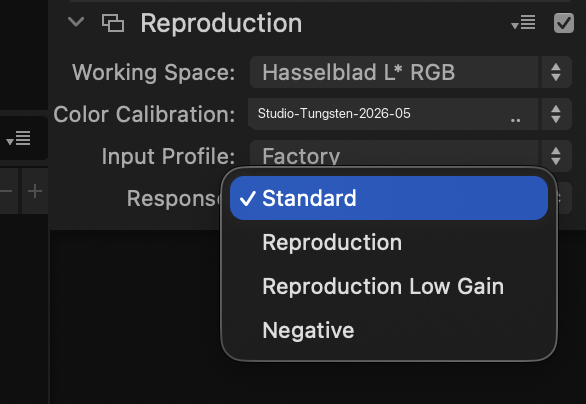
- Standard is the default. It inherits the HNCS photo-curve shaping that Phocus applies to scene photography, pulling highlights toward a pleasing roll-off rather than holding their captured L values. The magnitude depends on image content. On one test capture, a near-white reference patch rendered at L 73 under Standard and L 90 under Reproduction, a difference of roughly 17 L units.
- Reproduction preserves the captured L values without HNCS photo-curve shaping. Whites stay near their captured L rather than being pulled down toward a roll-off. Use this option with the Hasselblad L*RGB Working Space for copy and reproduction work where tonal fidelity to the original is the goal.
- Reproduction Low Gain appears in the dropdown alongside Reproduction. Based on the name, it appears to be a variant intended for high-key or specular targets where the standard Reproduction curve would clip. Rendering behavior was not empirically tested for this writeup.
- Negative appears in the dropdown. Based on the name, it appears to be intended for film negative inversion workflows. Rendering behavior was not empirically tested for this writeup.
For scene photography, Standard is correct. For reproduction work on flat originals where the captured L* must survive the render, switch to Reproduction.
When to Use What
The Reproduction tool gives you four independent dropdowns. In practice they fall into two coupled configurations.
Scene photography (the defaults):
- Working Space: Hasselblad RGB
- Color Calibration: no calibration
- Input Profile: Factory
- Response: Standard
This is what every image gets by default. The HNCS pipeline produces pleasing color for real-world scenes, and switching any of these undermines that. Leave the panel hidden if you only shoot scene photography.
Reproduction, copy stand, or studio work under controlled lighting:
- Working Space: Hasselblad L* RGB
- Color Calibration: a custom calibration built under the same lighting and lens as the current shoot
- Input Profile: Factory (leave it)
- Response: Reproduction
This is the matched pair. L*RGB gives perceptually uniform luminance encoding, Reproduction Response preserves captured tonal values, and the custom calibration handles the color side. Together these produce a render pipeline that targets fidelity to the original rather than aesthetic rendering.
One subtlety: the exposure algorithm interacts differently with each Working Space. Adjustments tuned under Hasselblad RGB will produce different results if you switch to L*RGB. Pick the Working Space first, then make your tonal adjustments. Don't toggle Working Space mid-edit and expect everything else to stay put.
The .phos sidecar stores all four settings per-image, so a copy stand session set up correctly stays set up across re-opens. There is no global default to change. Each new image starts from the Phocus defaults, and you apply the reproduction configuration per shoot or per image.
Known Issues
Phocus 4.1.2 default-render bug. The Hasselblad RGB rendering path is broken in Phocus 4.1.2. Every 3FR opens with a flat, desaturated preview that does not match the correct HNCS output. Toggling to Hasselblad L*RGB in this tool restores correct colors (this is how the bug was originally diagnosed), but doing so manually for every image is not a practical workflow, and toggling back to Hasselblad RGB has a state-persistence bug where the preview does not revert. The recommendation is to stay on Phocus 4.1.1 unless you specifically need 4.1.2's tethered capture features. See the Phocus Known Issues tracker for the full live list.
Exposure Tool V4 compatibility. Earlier Hasselblad documentation suggested the Reproduction tool does not work correctly with Exposure V4. Testing in Phocus 4.1.1 on macOS Tahoe found no such issue: the Working Space toggle produces the same magnitude of tonal shift under V4 as under V3, exports are correct in both cases, and no artifacts or unexpected behavior were observed. The V4 limitation may have applied to an earlier 4.0.x build.
Further Reading
For the color science context behind why HNCS renders the way it does, see the HNCS posts in the Phocus archive on this blog. For the live bug tracker covering Phocus 4.x, see Phocus Known Issues. For the deeper procedural reference covering every Phocus 4.x tool (not just these two), see the Essential Phocus 4.x for Mac User Guide.