
You Don’t Need to Be a Tech Person to Back Up Like One - Part I
Learn what you actually need to back up, why RAWs aren’t enough, and how to protect your photos without becoming an IT expert.
Table of Contents
Section 1: What Are You Actually Protecting?
When photographers think about backup, they often think about just one thing: the original photo files: the RAWs. The “digital negatives.” And yes, that’s important. But if you use Lightroom, Capture One, or anything similar, you’re not just saving your photos. You’re saving your work, the art you have created, the precious memories and moments in time you've captured.
All of this needs protection too.
So let’s break it down. There are actually three distinct things you’re backing up:
1. The Originals (RAWs)
These are your untouched image files, straight off the memory card. If you lose these, you lose your starting point. For most people, this is the easiest part to understand, and the only part many folks bother to protect.

2. Your Editing Work
This is where things get a bit more complex. Programs like Lightroom and Capture One don’t actually “open” or directly edit your RAW files. Instead, they keep track of what you did (exposure tweaks, cropping, color grading, etc.) in a separate structure.
In Capture One, it can be a Catalog or a Session.
It helps to think of it as being like a detailed notebook that records every adjustment you’ve made, as well as where the image lives on your drive. But - and this is key - if you move the original image files around outside of Lightroom or Capture One (like dragging them around in Finder or File Explorer), that notebook loses track of them. Your edits are still there, but they’re now disconnected from the original photo.
If you’re using a Catalog, always move or rename files within the app itself to avoid breaking that connection.
If you’re using a Session in Capture One, it’s a little more forgiving. Everything - your RAWs, previews, edits, and settings - lives inside one project folder. You can usually move that whole folder safely without anything breaking. It’s a nice option for location shoots or standalone projects.
Either way, the takeaway is this: your edits don’t live inside the RAW file, and so they need to be backed up too.
3. The Finished Versions (Exports)
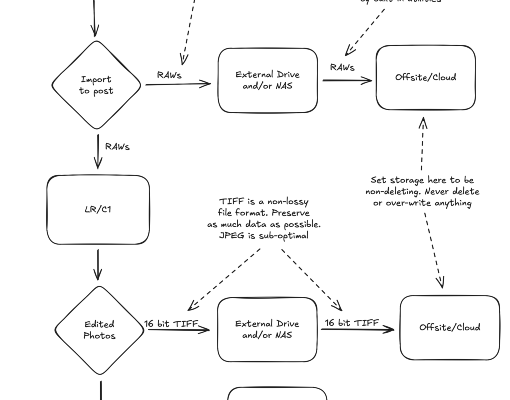
Lightroom and Capture One implement what is called non-destructive editing. This means all your changes are saved separately from your RAWs. That’s awesome for flexibility. But it also means that backing up just the RAW file does not preserve the version you spent hours editing. If you lose the catalog or session, you lose the work.
That’s why you also want to export your best edits - your “finished” photos - as TIFF files, ideally in 16-bit format. These exported files contain all your adjustments baked in and can be backed up like any other image.
JPEGs are great for sharing.
16-bit TIFFs are great for keeping.
In Plain English
If you’re serious about your photography - whether you shoot for yourself, for clients, or for print - there’s more than one thing to protect:
- The original image files (RAWs)
- The record of how you edited them (Catalogs or Sessions)
- The final versions you created (TIFFs)
Backing up just one of those isn’t enough. If it would hurt to lose, it’s worth protecting.
Check the Glossary for Photographer-Friendly Tech Terms I’ve put together: it’ll keep growing as the series continues.
Section 2: What Does a Simple, Solid Backup Actually Look Like?
So now that you know what you’re protecting - RAWs, edits, and exports - what does a reliable backup setup actually look like?
First, let’s get something out of the way: you don’t need a rack-mounted server in your garage or a wall covered in blinking lights although that is a pretty cool thing to have 😀. I mean, who doesn't love blinky lights, right?
Anyhow, the core ideas behind good backup are simple. They come from IT best practices, honed by the pain of many data losses, but we can translate them into real-world photographer workflows.
Let’s talk about the most commonly mentioned backup strategies - something called the 3-2-1 rule. And before you click away, don’t worry. I’m going to explain it like I’m talking to a photographer, not an IT person.

The 3-2-1 Rule, In Plain English
At its core, 3-2-1 means this:
It’s not a law. It’s not a religion. But it’s a time-tested way to make sure that one failure - or even two - doesn’t wipe out everything.
Let’s break that down:
3 Copies
- Your original files (RAWs, edits, TIFF exports) on your main working drive
- A second copy on a backup drive
- A third copy somewhere offsite (cloud, remote backup, even a drive stored with a friend)
This isn’t as complicated as it sounds. You can have your working drive (maybe even your laptop), an external SSD for a daily backup, and a cloud backup service running in the background. That’s your 3.
I will speak more about kinds of hard drives and remote backup and cloud services in another post.
2 Different Types of Media
This just means: don’t put all your trust in one kind of storage.
For example:
- Your computer’s internal SSD
- An external hard drive
- Cloud storage (which technically counts as “different” since it’s on someone else’s infrastructure)
Why? Because every kind of media can and will fail in different ways. It will fail in annoyingly innovative ways no one could ever foresee. SSDs are fast, but when they go, they often give no warning. HDDs can wear out or get dropped. Cloud services have their own risks (accidental deletion, sync errors, account problems).
Using at least two types helps cover your bases.
1 Offsite Copy
This is the one that saves your bacon in case of fire, theft, flood, lightning strike, or dog + USB cable = disaster.
Your offsite copy could be:
- A cloud backup system like Backblaze or iDrive
- A NAS in a second location (like a friend’s or studio)
- A physical drive you rotate offsite once a week
The offsite part is the one most people skip. But it’s also the one that matters most when things really go wrong.
“Do I Really Need All Three?”
The answer to that question depends on your risk tolerance.
- If you’re a casual hobbyist who shoots once a month and just wants to protect family photos, two copies (one local, one cloud) might be fine.
- If you’re a working photographer delivering to clients, not having 3-2-1 puts your business at risk.
- If you’re doing long-term work for print, fine art, or portfolio use - stuff that lives beyond Instagram - it’s worth being more careful.
The point isn’t to hit some checklist. The point is to build a system that you can trust. Because when something breaks - and it eventually will - you want the backups of your photos to be exactly where you expect them to be.
Wrap-Up: Backing Up Isn't About Being a Tech Person. It's About Respecting Your Work.
So far, we’ve talked about what you're actually trying to protect - your RAWs, your editing work, and your final exports - and how a 3-2-1 strategy gives you a simple, structured way to do it without becoming an IT expert.
And now you might be wondering: Do I really need all that? What if I just shoot for fun? What if I’m on the road half the time? What if I don’t want to spend a fortune on hard drives and cloud accounts?
That’s exactly what we’ll get into in the next post.
Next up: Pick Your Risk Level
You’ll get flowcharts, examples, and real-world setups you can copy or adapt. No scare tactics. Just clear, practical help to build a backup system you can actually stick with.
Want to keep following along as the series unfolds? Subscribe here to get the next post straight to your inbox.
Want to keep following along as the series unfolds? Subscribe here to get the next post straight to your inbox.
Want help setting up your own backup workflow? I offer one-on-one consulting for photographers who’d rather not spend a weekend Googling file structures and cloud services. It’s practical, friendly, and totally tailored to your gear and goals.

The Tech Behind the Frame Newsletter
Join the newsletter to receive the latest updates in your inbox.


