
Phocus Histogram vs Capture One Levels: What Hasselblad Shooters Need to Know
How Phocus's Histogram tool compares to Capture One Levels. Key differences and workflow tips for Hasselblad shooters.
Table of Contents
If you're coming to Phocus from Capture One, your first question is probably: "Where's Levels?" The answer is the Histogram tool, and while it does the same job, the workflow is different enough to trip you up.
Both tools let you set black points, white points, and midtones to optimize tonal range. But Phocus takes a more manual approach: no Auto Levels button, no eyedroppers for sampling directly from the image. It prioritizes precise control over workflow automation.
For Hasselblad shooters, that tradeoff is worth understanding. Phocus was designed specifically for Hasselblad raw files and integrates tightly with the Hasselblad Natural Color Solution (HNCS), making it the optimal choice for initial tonal adjustments. The Histogram tool has been refined through version 3.7, with enhanced shadow and highlight recovery algorithms introduced in version 3.4.
Note: This post covers SDR (Standard Dynamic Range) behavior. When HDR mode is enabled in Phocus 4.x, the Histogram gains additional functionality for HDR luminance space. See "Hasselblad X2D II HDR Explained" for HDR-specific coverage.
Disclaimer: This article is an independent project and is not affiliated with or endorsed by Victor Hasselblad AB. All observations are based on my own testing with Phocus 4.x on macOS. If you encounter technical issues, contact Hasselblad directly at hasselblad.com/support.
Locating and using the Histogram tool in Phocus
You'll find the Histogram tool in the Tool Area under the Adjust tab. The interface has three main controls:
- Shadow slider (left) - sets your black point
- Highlight slider (right) - sets your white point
- Gamma slider (center) - adjusts midtone brightness
All controls operate on the standard 0-255 scale, identical to Capture One's Levels.
Two ways to adjust:
- Drag the sliders beneath the histogram graph. Move the left slider to where the histogram begins (black point), the right slider to where it ends (white point), and the gamma slider to adjust midtones without affecting endpoints.
- Type values directly in the number fields for precise, repeatable results.
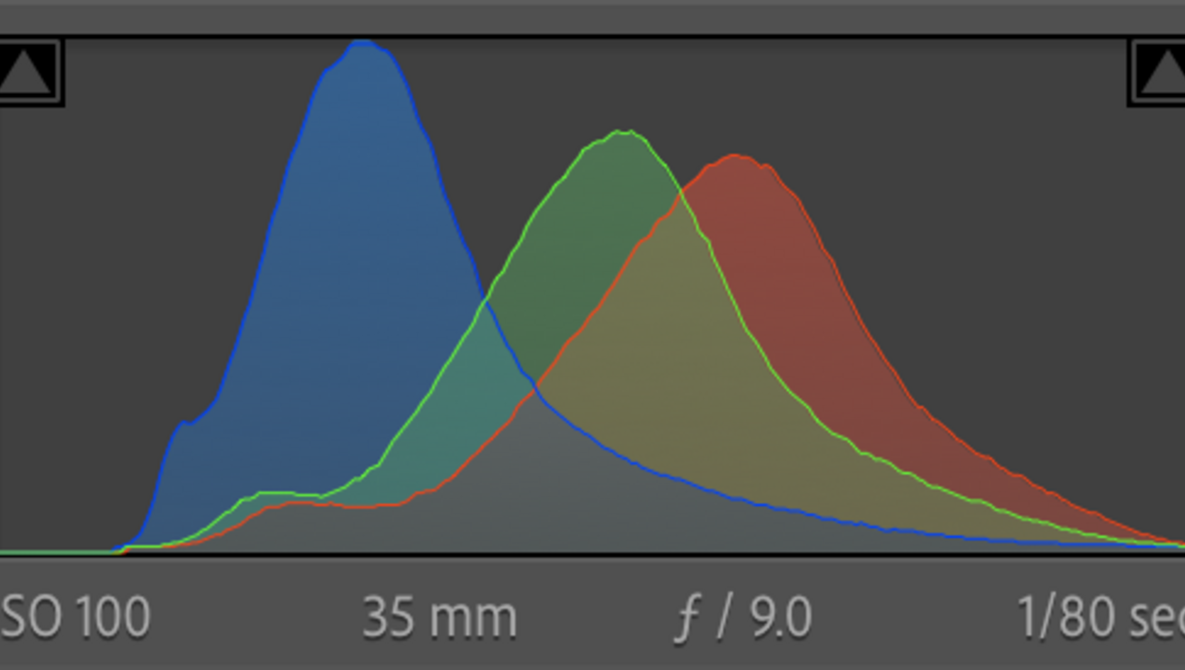
The tool also includes checkboxes for "Endpoints" (reveals output level sliders) and "Output Values" (shows the histogram with all adjustments applied). You can work in combined RGB mode or switch to individual color channels for targeted correction. In input mode, the histogram displays f-stop marks to help visualize exposure range.
How Phocus handles black point, white point, and midtone adjustments
Setting the black point involves dragging the left shadow slider to where the histogram graph begins rising, typically somewhere between 0-20 on the scale. For the white point, drag the right highlight slider to where the histogram ends on the right side, usually between 235-255. The gamma control in the middle adjusts overall brightness: dragging left (positive values) lightens midtones while compressing shadows, and dragging right (negative values) darkens midtones while compressing highlights.
The Phocus workflow philosophy differs from Capture One's approach. The official manual recommends setting exposure-related tools first before using the Histogram tool, since these have major impact on the histogram. The recommended order is: Exposure slider, High Dynamic Range (HDR) adjustments, Clarity, Vignetting, then finally the Histogram tool for black/white point refinement. This reflects Phocus's emphasis on building adjustments systematically rather than using aggressive automated corrections.
Phocus also offers complementary tonal control through the Curves tool (which gained Luma Mode in version 3.5 for luminosity control with minimal color shift) and the Exposure tool featuring Highlight Recovery and Shadow Fill algorithms that were significantly improved in version 3.4. These work in concert with the Histogram tool for comprehensive tonal control.
Key differences from Capture One's Levels tool
The most significant functional difference is Phocus's lack of an Auto Levels button. Capture One offers one-click automatic black and white point optimization with configurable clipping thresholds, while Phocus requires manual adjustment.
In practice, this means more fiddling than you might expect. Moving any slider shifts the histogram curve, which often requires re-adjusting the other sliders. Setting highlights, then adjusting gamma, then realizing your highlight point has shifted, then going back to highlights... what Capture One does in one click becomes an iterative back-and-forth in Phocus.
Phocus also omits built-in eyedropper tools. Capture One's Levels tool includes "Pick Shadow Level" and "Pick Highlight Level" eyedroppers that let you click directly on the image to set black and white points, accessible via the 'L' keyboard shortcut. In Phocus, you must set these values by dragging sliders or entering numbers, without the ability to sample directly from the image within the Histogram tool itself.
Visual feedback differs significantly. Capture One provides permanent exposure warning overlays activated with Cmd/Ctrl-E that remain visible during editing. Phocus lacks an equivalent persistent clipping preview in the Histogram tool, making it harder to monitor clipping while adjusting. You'll need to rely on the separate Exposure Warning tool or watch the histogram shape carefully.
The interface design reflects different priorities: Phocus uses a more compact, minimalist interface with checkbox activation for preview and resizable tool windows, while Capture One dedicates prominent tab space to the Levels tool with more visible controls. For Hasselblad users, however, Phocus's tight integration with HNCS color science and optimized processing for Hasselblad sensor data provides advantages that outweigh the workflow conveniences Capture One offers.

Advantages and limitations of each approach
Phocus's Histogram tool excels in precise manual control with a cleaner interface free from automation clutter. It's optimized specifically for Hasselblad raw files and works seamlessly with Hasselblad Natural Color Solution, producing what many users describe as more natural, film-like tonal transitions. The software is also free for Hasselblad camera owners, and the numerical value fields enable exact, repeatable adjustments across images.
The limitations center on workflow efficiency. Without Auto Levels or eyedroppers, manual adjustment takes more time, particularly problematic for high-volume professional work. No persistent clipping preview means you're watching the histogram shape rather than seeing overlays on the image. The sliders themselves are small (a minor but persistent annoyance), and batch application via the Modify feature works but has a counter-intuitive workflow. The smaller Phocus user community also means fewer tutorials and third-party resources compared to Capture One's extensive ecosystem.
Capture One's Levels tool prioritizes speed and convenience with its Auto button and integrated eyedroppers, making it superior for rapid processing of large image volumes. Its extensive catalog and session workflows handle professional volume better, and broader camera support means the same tool works across multiple brands. However, it requires a paid license, cannot access HNCS for Hasselblad files (losing some color rendering quality), and some users report the default processing can be overly aggressive with sharpening and contrast.

Warning: Phocus-to-Capture One TIFF Workflow
If you're using Phocus to create TIFFs for further editing in Capture One, be careful with Histogram adjustments.
In my testing, adjusting levels in Phocus and then exporting that TIFF leads to odd behavior if you touch anything related to levels in C1. Instead of the usual gradual changes, you get wild luminance and saturation swings that make fine-tuning nearly impossible.
My recommendation for hybrid workflows:
- Don't adjust levels in Phocus if you plan to do the bulk of your editing in C1. Export a clean TIFF to get HNCS color science baked in, then handle tonal adjustments entirely in C1.
- Do use HNNR before exporting high ISO images. Hasselblad Natural Noise Reduction is orders of magnitude better than Capture One's noise reduction. Apply HNNR in Phocus, export the TIFF, then continue editing in C1.
This gives you the best of both worlds: HNCS color rendering and superior noise reduction from Phocus, with C1's more efficient editing tools for everything else.
Conclusion
For Hasselblad users, the Histogram tool in Phocus should be the primary choice for setting tonal foundations, despite lacking Capture One's workflow conveniences. The tool provides professional-level control over the complete tonal range through its Shadow, Highlight, and Gamma sliders, working on the same 0-255 scale as Capture One. The key insight is that these tools serve identical purposes but reflect different design philosophies: Phocus prioritizes manual precision and natural rendering optimized for Hasselblad sensors, while Capture One emphasizes automation and speed for high-volume workflows. Understanding these differences helps photographers choose the right tool for their specific needs, or implement hybrid workflows that export from Phocus after using the Histogram tool for optimal tonal foundation with HNCS color science intact.

The Tech Behind the Frame Newsletter
Join the newsletter to receive the latest updates in your inbox.

