Hasselblad HDR Demystified, Part 3 of 5: The Complete Phocus 4.x Workflow
Hasselblad's HDR histogram is secretly an interactive Levels tool. Learn the complete Phocus 4.x HDR workflow from RAW to Ultra HDR export.
Table of Contents
This is Part 3 of a five-part series exploring Hasselblad's HDR implementation for RAW shooters. Part 1 covered what HNCS HDR is, and Part 2 explored output formats and the Trilemma. If you're joining mid-series, you might want to start at the beginning for it all to make more sense 😀.
Parts 1 and 2 established the conceptual foundation: what HNCS HDR is, how it differs from traditional HDR, what output formats are available, and the trade-offs involved in choosing between HNCS color science, external editing tools, and HDR output. Now it's time to get practical.
This post walks through the actual workflow for processing RAW files with HDR in Phocus 4.x. We'll cover what changes (spoiler: not much at capture time), how to use the HDR-specific controls in the Exposure Tool, and - most significantly - some powerful but almost entirely undocumented features hidden in the HDR histogram.
A note on support: This post represents my personal exploration and does not constitute official technical support or guidance from Hasselblad. If you need assistance with your Hasselblad camera, Phocus, or any other Hasselblad product, please contact Hasselblad directly: customersupport@hasselblad.com for global support, support.us@hasselblad.com for the Americas, or visit hasselblad.com/support for your regional contact options.
The RAW Shooter's Workflow
What Changes (And What Doesn't)
The most important thing to understand: if you're a RAW shooter, nothing about your capture workflow needs to change. Continue shooting RAW-only, exposing as you always have, using whatever metering mode suits your subject. HDR features don't require enabling anything in-camera if you're capturing RAW files.
What changes is what happens after capture. Phocus 4.x introduces new processing options that let you decide, image by image, whether to export as a standard SDR file or as an Ultra HDR JPEG with extended luminance range. That decision happens at your computer, not in the field - which means you can revisit any RAW file months or years later and create an HDR version if you decide the image would benefit from it.
This workflow is notably different from how other camera systems approach HDR for display. Canon and Sony cameras can capture HDR PQ HEIF files directly, but this requires enabling HDR PQ mode before shooting.¹ On Sony's A7R V, enabling HDR HLG actually prevents simultaneous RAW capture - you must choose between RAW or HDR output at the moment of capture.² Canon's Digital Photo Professional can convert RAW files to HDR PQ HEIF, but these files lack the gain map that provides SDR fallback; they require an HDR display to view correctly and don't display properly in most applications.³
Lightroom Classic 13+ and Adobe Camera RAW 16+ can export any RAW file with HDR gain maps, which does provide a software-based "HDR as output choice" workflow.⁴ However, this means processing your images with Adobe's color science rather than the manufacturer's. For Hasselblad shooters, that means losing HNCS - the very color rendering that distinguishes Hasselblad's output from other systems.
What makes Phocus 4.x distinctive is the combination: you can process Hasselblad RAW files with Hasselblad's own color science AND export them as Ultra HDR JPEGs with gain maps for universal compatibility - all without any special capture-time decisions. As far as I can determine from my research, no other camera manufacturer currently offers this complete workflow in their first-party software.
One Capture-Side Consideration: Protect Your Highlights
While the workflow changes happen in post rather than at capture, there's one shooting consideration that becomes more important when HDR output is your goal: never overexpose your highlights.
This might seem obvious, but the stakes are higher with HDR. As photographer Florian Thess explains: "Clipped highlights are extremely distracting in HDR and often cannot be salvaged in post; the larger dynamic range reduces the ability to push exposure without revealing noise and lens flare. While blown highlights can appear 'dreamy' in SDR, they stand out like glaring holes on an HDR display, completely ruining the viewing experience."¹⁰
The physics here are straightforward: HDR displays can render genuine brightness differences that SDR displays compress together. A specular highlight that's "acceptably blown" in SDR - where it just becomes white like everything else near the ceiling - becomes a glaringly obvious hole in HDR, surrounded by detail that should have been there. The display is capable of showing that detail; your capture just didn't provide it.
For X2D II shooters, this reinforces the value of shooting RAW with conservative highlight exposure. The sensor's 15.3 stops of dynamic range give you substantial shadow recovery headroom, but clipped highlights are gone forever. Better to protect the highlights at capture and lift shadows in Phocus than to blow the highlights and lose the HDR impact entirely.
Processing RAW Files with HDR in Phocus 4.x
When you're ready to process a RAW file with HDR output in mind, Phocus 4.x provides a dedicated set of controls within the Exposure Tool. The workflow is straightforward, though there are some nuances worth understanding.
First, ensure you're using Exposure Tool V4 - this is required for HDR processing. Earlier algorithm versions (V1-V3) remain available for compatibility with images edited in older Phocus versions, but V4 is where the improved highlight recovery and dynamic range handling live.⁵ Once you've confirmed V4 is selected, enable HDR by checking the HDR checkbox in the Exposure tool.
The Recovery slider behaves differently in HDR mode than in SDR. Because HDR allows highlights to extend beyond the SDR ceiling, the optimal recovery level for HDR output may differ from what looks best on an SDR display. Phocus handles this by maintaining separate recovery settings for each mode. A "ghost marker" appears on the slider showing the recovery level for whichever mode you're not currently viewing - so if you're previewing in HDR, you'll see a ghost marker indicating where the SDR recovery is set, and vice versa.⁵ This lets you optimise the appearance for both output types without constantly switching preview modes.
Processing Order: Why SDR-First Matters for Ultra HDR Export
The ghost marker system reveals something important about how Phocus handles dual-output workflows: the SDR and HDR versions of your image are genuinely different renders, not automatic derivations of each other. When you export an Ultra HDR JPEG, Phocus embeds an SDR base image alongside the HDR gain map. That SDR base comes from your SDR settings - and if you've never touched those settings, you get whatever the defaults produced.
This has real implications for your audience. As discussed in Part 2's display section, HDR viewing conditions vary dramatically. Many viewers on technically "HDR-capable" phones will see a blend of your SDR base and HDR gain map, weighted toward SDR. Viewers on older devices, SDR monitors, or any platform that strips gain map metadata will see only the SDR base. If that base layer looks flat or underdeveloped because you only ever worked with HDR enabled, a significant portion of your audience gets a subpar version of your image.
The recommended workflow, based on how Phocus's UI is designed, appears to be:
- Start with HDR unchecked. Do your initial processing - exposure, white balance, recovery, shadow fill, basic toning - while viewing and optimizing the SDR render.
- Then enable HDR. Fine-tune the HDR-specific aspects: use the Limit control if needed, adjust the Recovery slider for HDR (note its position relative to the ghost marker), and work with the HDR histogram's extended range.
- Toggle between modes to verify both versions. The ghost markers help, but actually switching the checkbox and evaluating each render ensures neither version is neglected.
- Export as Ultra HDR JPEG once both SDR and HDR versions meet your standards.
This isn't explicitly documented by Hasselblad, but the existence of separate SDR/HDR settings with ghost markers strongly suggests this dual-render architecture. The UI design only makes sense if Phocus expects you to care about both versions - otherwise, why provide tools to optimize each independently?
For photographers who only intend SDR output (print workflows, platforms without HDR support), this consideration doesn't apply - work with HDR unchecked throughout and export as standard TIFF or JPEG. But if Ultra HDR JPEG is your target format, treating the SDR version as an afterthought risks disappointing the majority of your viewers.
The Limit dropdown in the Exposure tool controls the maximum highlight output level. This serves two purposes: matching your monitor's actual HDR capability (not all HDR displays can hit the same peak brightness), and taming highlights that might be technically accurate but visually distracting. If a specular reflection is rendering at 1600 nits and pulling attention away from your subject, the Limit control lets you cap it at a more reasonable level without affecting the rest of the tonal range.⁵
Understanding the HDR Histogram: Display Brightness and the Hidden Levels Tool
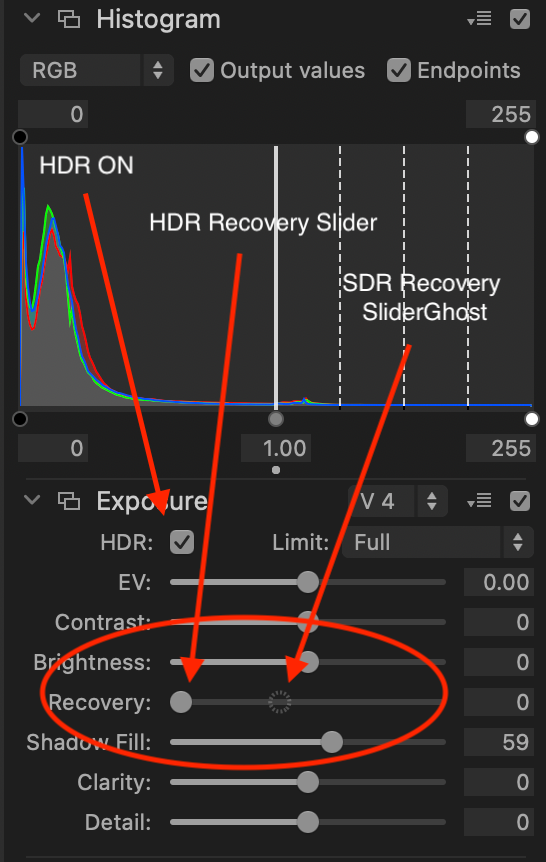
Hasselblad's documentation mentions that "the Histogram will mark the monitor's highlight capability" when working in HDR mode, but provides no further detail.⁵ Through hands-on testing, I've discovered that the HDR histogram is considerably more powerful than this brief mention suggests - it's actually a fully interactive Levels tool that operates in HDR luminance space.
The HDR Histogram Interface Elements
When HDR mode is enabled, the Histogram tool displays several new visual elements that don't appear in SDR mode:
- The bright white vertical line (labeled "1.00") marks SDR white, also known as "graphics white." This is the boundary between standard and high dynamic range - everything to the left is SDR territory, everything to the right is HDR.
- Dashed vertical lines to the right of 1.00 indicate stop increments beyond SDR - likely +1, +2, +3, and +4 stops of HDR headroom, matching the 4-stop ceiling used in Adobe's HDR implementation.
- A gray zone extending right from the 1.00 line represents your monitor's current HDR capability - the range of HDR luminance values your display can actually reproduce at its current brightness setting.
- The darker area beyond the gray zone indicates HDR values your monitor cannot display. If your image has data in this region, it will be clipped on your screen (though it may display correctly on a more capable HDR monitor).
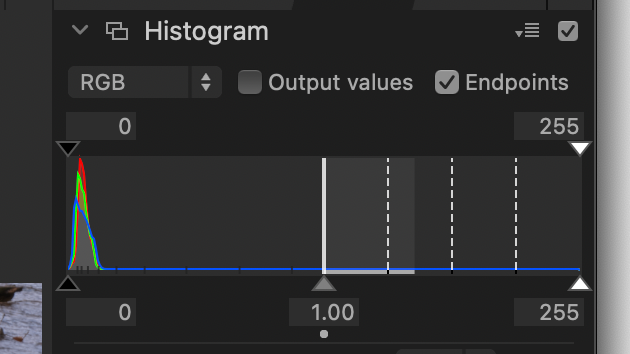
The Display Brightness Relationship
Here's something Hasselblad doesn't document at all: the gray capability zone changes dynamically based on your display brightness setting.
When you lower your monitor brightness, you're reducing the luminance level of SDR "paper white." This leaves more of your display's peak brightness available for HDR highlights - so the gray capability zone expands rightward. As you continue lowering brightness, the zone keeps expanding until it reaches your display's maximum sustainable HDR headroom.
Conversely, if you increase brightness, the gray zone shrinks because more of your display's output is being consumed by SDR content, leaving less headroom for HDR peaks.
Based on my testing, there appears to be a practical sweet spot: the point where the gray zone stops expanding as you lower brightness. Beyond this, you're just making SDR content harder to see without gaining additional HDR headroom. This seems to be what Hasselblad means when they recommend "lowering the monitor brightness to ensure highlights are displayed correctly" - they're suggesting you find this optimal point where you can see the full HDR range your display is capable of showing.
The Hidden Levels Tool
Perhaps the most significant undocumented discovery: the three arrow sliders beneath the HDR histogram function as a complete Levels tool - not just passive markers, but interactive controls that dramatically affect the image.
- Left arrow = Black point (shadows)
- Middle arrow = Gamma/midpoint (midtones)
- Right arrow = White point (highlights)
The two arrows at the top corners of the histogram are the output level controls:
- Top left arrow = Output black level (default 0) - sets the minimum brightness value in your output. Raising this above 0 means your darkest shadows will map to a lighter value, creating a faded or matte look where blacks never go truly black.
- Top right arrow = Output white level (default 255) - sets the maximum brightness value in your output. Lowering this below 255 caps your highlights, reducing maximum brightness.
While the bottom sliders expand contrast by remapping input values, the top sliders compress the output range - useful for stylistic effects or matching specific output requirements.
These work exactly like the Levels controls in Capture One or Photoshop, but they operate across the extended HDR luminance range. Moving the middle (gamma) slider toward the white point, for example, compresses the upper tonal range while expanding the lower-to-mid range - lifting midtones toward the highlights and adding significant punch to flat RAW files.
In my testing, sliding the gamma marker toward the SDR white line produced dramatic improvements in tonal separation, color saturation, and overall image presence - all without touching the EV, Contrast, or Brightness sliders in the Exposure tool. The effect was particularly striking on images with reflections and subtle tonal gradations.
This means Phocus 4.x gives you two complementary ways to adjust tonality: the traditional Exposure tool sliders (EV, Contrast, Brightness, Recovery, Shadow Fill) and the interactive Histogram sliders operating in HDR space. Understanding both - and how they interact - opens up considerably more creative control than Hasselblad's documentation would suggest.
A Suggested HDR Editing Workflow
Based on my experiments, here's a workflow that seems to produce good results:
- Lower your display brightness while watching the HDR histogram until the gray capability zone stops expanding - this is your optimal HDR preview brightness.
- Use the Histogram's bottom right arrow (white point) to set where you want highlights to map, potentially even aligning it with the right edge of the gray capability zone if you want to use your display's full HDR range.
- Experiment with the middle arrow (gamma) - moving it toward the SDR white line can add significant presence and tonal separation to images that feel flat.
- Fine-tune with the Exposure tool sliders as needed.
This is still an area I'm actively exploring, and I'd welcome feedback from other users on what they discover. The lack of documentation makes this largely a matter of experimentation.
Exporting Ultra HDR JPEG

Once you've processed your image with HDR enabled, exporting is straightforward: choose Ultra HDR JPEG as your output format. Phocus will bake in the SDR base image and compute the gain map automatically.
The question of when to use HDR export versus standard SDR export depends on several factors - your target display, the image content, and your workflow constraints. These considerations are covered in detail in the Practical Recommendations section below.
Getting HDR to Social Media: The Encoding Problem
If Instagram is your target, there's a significant complication worth understanding before you upload: Instagram doesn't accept all valid HDR encodings.
The good news: in my December 2025 testing, Phocus Ultra HDR JPEGs uploaded successfully to Instagram with HDR intact - the "HDR" badge appeared during upload, and the posted image displayed with proper HDR rendering. However, it's worth understanding that Instagram doesn't accept all valid HDR encodings. Some workflows (not Phocus, based on my testing) can produce technically valid Ultra HDR JPEGs that Instagram silently converts to SDR. If you're using third-party tools to create gain maps, test before committing to a workflow.⁶
A common misconception about HDR uploads:
Some photographers believe that iPhone upload settings like "all photo data" control whether HDR is preserved. This conflates two unrelated things. The gain map that enables HDR display isn't EXIF metadata that can be toggled on or off - it's baked into the JPEG file structure itself, stored as a secondary image in the MPF (Multi-Picture Format) container. When you upload an Ultra HDR JPEG, the entire file goes up, gain map included, regardless of any metadata privacy settings. What determines whether your image displays as HDR is entirely on the platform side: does their processing pipeline recognize the gain map structure? Do they re-encode in a way that preserves it? Do they serve HDR content to capable devices? The "all photo data" toggle controls EXIF metadata like GPS coordinates and camera settings - completely separate from HDR encoding.
Upload method considerations:
- ✅ Upload from a computer browser (Chrome, Edge), the Android app, or iPhone (see Part 4 for our December 2025 testing results)
- Must select "original ratio" in the upload dialog - any cropping breaks HDR
- Don't mix image sizes in carousel posts - only images matching the first image's dimensions retain HDR
The SDR base image matters more than you'd expect:
Even on "HDR-capable" phones, actual HDR headroom varies dramatically - typically only 1.5-3 stops depending on device, brightness setting, and ambient light.⁶ Instagram blends your SDR base image and HDR gain map based on each viewer's capabilities. If the SDR base is poor quality, roughly two-thirds of your audience may see degraded results.
The open question for Phocus users:
Greg Benz, whose research on HDR photography is extensive, notes that his Web Sharp Pro plugin exists specifically because "there are many valid HDR encodings which will not show as HDR on IG."⁶ He's examined Hasselblad X2D II exports and notes the gain maps are "encoded with full color, which is ideal" - but he hasn't explicitly confirmed whether Phocus Ultra HDR JPEG exports use Instagram-compatible encoding.⁷
Without definitive testing, I can't confirm that Phocus exports will display as HDR on Instagram. If you find your exports aren't showing HDR on Instagram despite correct upload procedure, the issue is likely encoding incompatibility rather than anything wrong with your file. The file will still work correctly on other HDR-capable platforms and devices.
Potential solutions if Phocus exports don't work on Instagram:
- Web Sharp Pro ($40 Photoshop plugin) — specifically designed for Instagram-compatible HDR encoding, with control over the SDR base image⁶
- Test first — upload a clearly HDR-dependent image (bright highlights, reflections) and verify it displays as HDR before committing to a workflow
- Accept SDR for Instagram — your Ultra HDR JPEG's SDR base layer will still display as a normal, high-quality image
This is an evolving situation — Instagram's HDR support only launched in early 2024, and encoding compatibility may improve over time.
Update (December 2025): iPhone Uploads Now Work
Earlier guidance from Greg Benz (March 2024) recommended against uploading HDR from iPhone due to quality loss. My December 2025 testing found that Phocus Ultra HDR JPEGs uploaded from iPhone to Instagram were recognized as HDR - an "HDR" badge appeared during upload, and the posted image displayed with proper HDR rendering. This likely reflects platform improvements over the past year. See Part 4 for full details on myInstagram and Threads testing.
Backward Compatibility: Older Hasselblad Files
One of the more compelling aspects of Phocus 4.x's HDR implementation is its broad compatibility. Hasselblad states that "all Hasselblad RAW images" can take advantage of HNCS HDR processing⁸ - not just files from the X2D II. The FAQ specifically confirms support for the X2D 100C, CFV 100C, X1D II 50C, and CFV II 50C, all of which can be processed with HDR effects and exported as Ultra HDR JPEGs.⁹
This means your existing library of Hasselblad RAW files has gained new capabilities without any change to the original captures. Images you shot years ago on an X1D II can now be exported with gain maps that will display properly on modern HDR screens. It's a retroactive upgrade to your archive - the sensor data was always there, and now you have tools to deliver it in a format that takes advantage of current display technology.
The practical implication is that if you're considering whether to upgrade to the X2D II specifically for HDR capabilities, it's worth first experimenting with your existing files in Phocus 4.x. The HDR output option alone may deliver much of what you're looking for without new hardware.
Coming Up in Part 4
You've now got the workflow down: enable HDR, use the Exposure Tool and hidden Levels controls to craft your image, export as Ultra HDR JPEG. But where will people actually see your HDR work? And what happens when they try to print it?
Part 4 tackles the realities of HDR display - which devices support it, what in-camera limitations exist, and the current platform constraints. Part 5 then covers print considerations, archival strategies, and practical recommendations for when HDR export makes sense versus when SDR is the better choice.
I'd love your feedback on this post, or any of my other posts. I'd also love to hear any ideas for topics I haven't yet covered that you'd like me to look into.
Or even other content about the topics I've written about which I haven't referenced. I am always open to learning more.
Series Navigation
This post is part of a five-part series on Hasselblad's HDR implementation:
- Part 1: What Is HNCS HDR and Why Should RAW Shooters Care?
- Part 2: Output Formats and the Trilemma Every Shooter Faces
- Part 3: The Complete Phocus 4.x Workflow
- Part 4: Displays, In-Camera Limitations, and Platform Support
- Part 5: Print, Archival, and Practical Recommendations
References
- Canon Asia, "HDR Mode vs. Creative Filter HDR Modes: How Are They Different?" July 2023. "While the bracketed shots can be recorded in RAW, the final blended shot is recorded only in JPEG, or as a HEIF file if you have set your camera to record in HDR PQ HEIF format instead." https://snapshot.canon-asia.com/article/eng/hdr-mode-vs-creative-filter-hdr-modes-how-are-they-different
- DPReview Forums, "Create HEIF image with HDR PQ from any raw," December 2021. "The Sony A7RV cannot shoot RAW while HEIF HDR HLG is enabled. It can do only RAW + HEIF sRGB (SDR), or just HEIF HLG (HDR)." https://www.dpreview.com/forums/thread/4619292
- Canon Community, "Ultra HDR formatted JPEG workflow from RAW," August 2024. "I don't see a way to do it in DPP or in darktable. My R5 can save images as HEIF, however they're not compatible with Google Photos, and DPP has limited ability to edit it." https://community.usa.canon.com/t5/Camera-Software/Ultra-HDR-formatted-JPEG-workflow-from-RAW/td-p/493349
- Adobe Help Center, "Edit and Export in HDR - Lightroom Classic," October 2025. Lightroom Classic 13+ supports HDR editing and export with gain maps for any RAW file. https://helpx.adobe.com/lightroom-classic/help/hdr-output.html
- PhocusReadMeMac.pdf, "HDR Processing in Phocus 4.0" section.
- Greg Benz, "How to share HDR photos on Instagram or Threads," gregbenzphotography.com, December 2024. Benz documents Instagram's specific encoding requirements and the workflows needed for consistent HDR results.
- Greg Benz, "Photoshop," gregbenzphotography.com. Benz notes Hasselblad X2D II gain maps are "encoded with full color, which is ideal" but use 420 color sub-sampling which is "technically incorrect" for gain maps and may cause artifacts in some scenarios.
- Phocus 4.0 Mac ReadMe, August 26, 2025. "All Hasselblad RAW images can now take advantage of HNCS HDR processing in Phocus 4.0."
- Hasselblad X2D II 100C FAQ. "Images captured in HDR mode (HEIF/JPG/RAW) by Hasselblad X2D II 100C and RAW files from other Hasselblad cameras (including X2D 100C, CFV 100C, X1D II 50C, CFV II 50C) can all be viewed and edited with HDR effects in Phocus."
- Florian Thess, "High Dynamic Range Stills Photography: A Modern Guide." "The most important rule when shooting HDR images is to never over-expose your highlights. Clipped highlights are extremely distracting in HDR and often cannot be salvaged in post." https://www.florianthess.com/hdr-photography-guide

The Tech Behind the Frame Newsletter
Join the newsletter to receive the latest updates in your inbox.


