
Hasselblad HDR Demystified, Part 1 of 5: What Is HNCS HDR and Why Should RAW Shooters Care?
Hasselblad's HNCS HDR isn't traditional tone mapping. Learn what end-to-end HDR means for RAW shooters and why your workflow might change.
Table of Contents
If you've spent any time in the Hasselblad forums or Facebook groups since the X2D II launched, you've probably noticed a lot of discussion about HDR. Some of it is enthusiastic, some of it is confused, and a fair amount of it seems to be photographers trying to figure out what Hasselblad is actually offering here and whether it matters to them.
I'll admit I was in the confused camp at first - and may well still be. As an engineer, though, being confused about something only makes it more enticing. What follows is what I discovered as I dug into the topic.
As a RAW shooter who rarely touches dual-format capture, my initial reaction to all the HDR marketing was something like: "That's nice, but should I care?" The X2D II's HDR features seem aimed at people who wanted ready-to-share JPEGs straight out of camera, which isn't how I work.
But the more I dug into it, the more I realized I'd misunderstood what Hasselblad was doing. This isn't the garish, tone-mapped "HDR" that gave the technique a bad name a decade ago. It's not about bracketing multiple exposures or creating that oversaturated, halo-ridden look that screams "I discovered the HDR slider." What Hasselblad has built is something more subtle and, for RAW shooters, potentially more useful than I'd initially assumed.
The key insight that changed my thinking was this: even if you never enable HDR in-camera, even if you continue shooting RAW-only exactly as you always have, Phocus 4.x gives you a powerful new option at export time. According to Hasselblad,
"all Hasselblad RAW images can now take advantage of HNCS HDR processing in Phocus 4.0." ²⁹
That means any 3FR file - not just from the X2D II, but from older cameras like the X2D 100C, CFV 100C, X1D II 50C, or CFV II 50C - can be processed with HDR and exported as an Ultra HDR JPEG that will genuinely glow on HDR-capable displays while looking perfectly normal on standard screens.
Your capture workflow doesn't need to change. But your deliverables can be dramatically more impactful for anyone viewing them on an iPhone 13 Pro or later, a recent iPad Pro, a MacBook Pro with a Liquid Retina XDR display, or a Google Pixel 6 or newer.
This post is my attempt to untangle what Hasselblad means by "end-to-end HDR," explain the technology in practical terms, and work through what this actually means for photographers who, like me, primarily shoot RAW and had assumed the whole HDR thing wasn't really for them. Some of what follows is based on Hasselblad's official documentation, some is based on testing in Phocus 4.x, and I'll be clear about which is which. If you spot something I've got wrong, please reach out.
A note on support: This post represents my personal exploration and does not constitute official technical support or guidance from Hasselblad. If you need assistance with your Hasselblad camera, Phocus, or any other Hasselblad product, please contact Hasselblad directly: customersupport@hasselblad.com for global support, support.us@hasselblad.com for the Americas, or visit hasselblad.com/support for your regional contact options.
What Hasselblad Means by "End-to-End HDR"
The Marketing Claim
Hasselblad describes the X2D II as the
"first medium format camera with true end-to-end HDR." ¹
That's a pretty bold claim, and parsing what it actually means requires understanding what "end-to-end" refers to in this context.
The phrase describes a complete HDR pipeline: from capture (the sensor and in-camera processing), through editing (Phocus 4.x with its HDR-aware tools), to display (on HDR-capable screens like the camera's own 1400-nit OLED or your iPhone's XDR display). The implication is that HDR isn't bolted on as an afterthought or limited to a single stage - it's integrated throughout the entire imaging chain.
From my research, this is genuinely unique in medium format. What matters more for practical purposes is understanding what Hasselblad has actually built and whether it delivers meaningful benefits.
HNCS HDR vs Traditional HDR Tone Mapping

This is where Hasselblad's approach genuinely differs from what most photographers think of when they hear "HDR."
Traditional HDR processing - the kind that earned the technique its bad reputation - typically works by compressing dynamic range to fit within standard display capabilities. It brightens shadows and pulls down highlights, cramming everything into a narrower tonal band. The result often looks flat, with that characteristic "HDR mush" where nothing feels like it has real luminance anymore. Bright areas don't glow; they just become lighter shades of gray.
HNCS HDR takes a fundamentally different approach. Rather than compressing dynamic range, it extends the output gamut. Hasselblad's marketing describes it this way:
"Traditional HDR solutions focus solely on dynamic optimisation by brightening shadows and compressing highlights... Hasselblad HNCS HDR extends the colour gamut to the wider P3." ²
In practical terms, this means HNCS HDR preserves the contrast and tonal relationships in your image while expanding the range of colors and luminance values that can be displayed on HDR-capable screens. Highlights can actually be brighter than their surroundings - a specular reflection on chrome, sunlight through clouds, the glow of a candle flame - rather than being compressed down to match the rest of the image.
The claimed dynamic range gains are substantial: Hasselblad states the system offers
"an increase in dynamic range of 3 stops of exposure for in-camera output, with up to 4 stops of exposure when processing RAW files in Phocus." ³
Whether these numbers hold up in real-world testing is something users are still exploring, but the underlying approach - extending rather than compressing - is what distinguishes this from the HDR of a decade ago.
Have you seen the guide? I've published Essential Phocus 4.x for Mac - 72 topics across 156 pages covering everything from HNCS color science to HDR workflows. It's the reference manual Hasselblad hasn't updated since 3.8. Pay-what-you-want starting at $10.
The P3 Color Gamut
Understanding the P3 color gamut helps explain why Hasselblad chose this particular approach for HDR.
Most digital content has historically been created and displayed in the sRGB color space, which covers roughly 35% of the colors humans can perceive. sRGB was developed in the 1990s as a standard that virtually any display could reproduce, which made it excellent for compatibility but limited in terms of color richness.
DCI-P3 (and its consumer variant, Display P3) was developed by the digital cinema industry in 2005 and covers approximately 25% more colors than sRGB - about 45% of the visible spectrum ¹⁷. The gains are particularly notable in reds and greens, which is why P3 content often looks more vivid and saturated on capable displays. Apple adopted Display P3 for its devices starting with the 2015 iMac, and since the iPhone 7, every iPhone has captured images in the Display P3 color space ¹⁸.
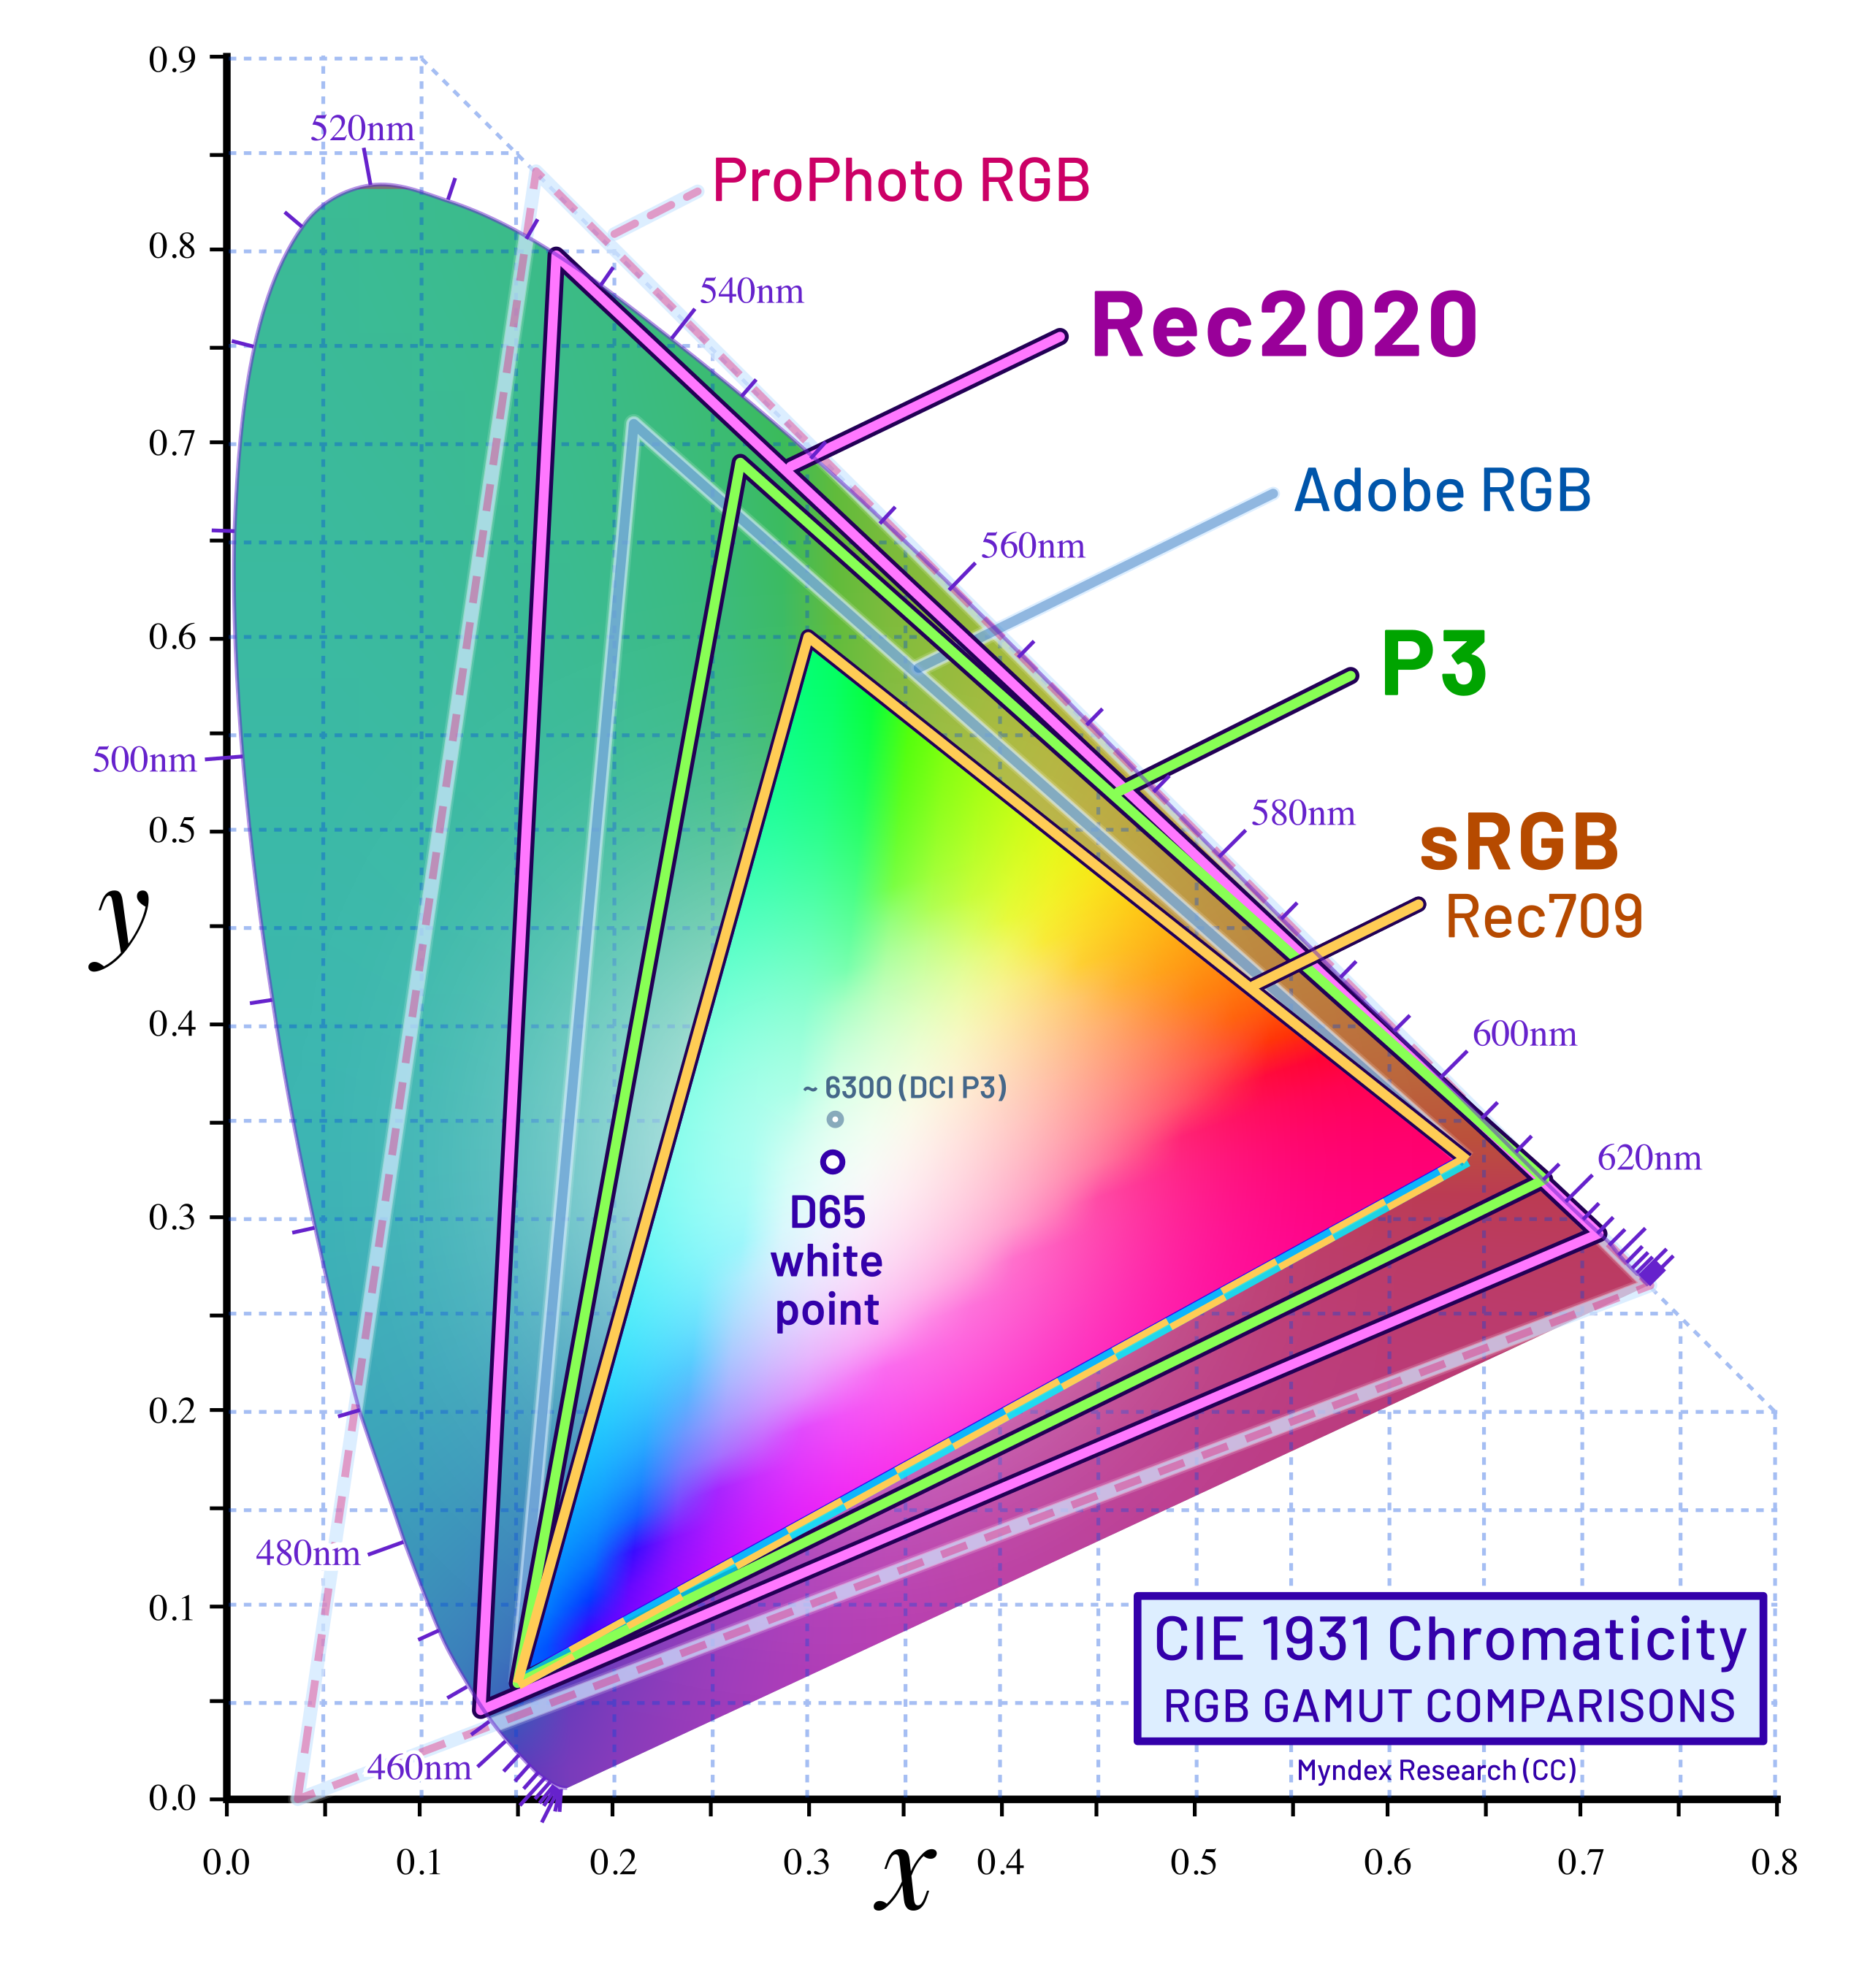
This matters for Hasselblad's HDR implementation because HNCS HDR isn't just about brightness - it's about the full color volume. When Hasselblad says they're "extending the colour gamut to the wider P3," they mean the HDR output can represent colors that simply don't exist in sRGB, displayed at luminance levels that SDR displays can't achieve.
The catch, of course, is that you need a P3-capable HDR display to see the difference. On an sRGB display, a P3 image will be gamut-mapped down to fit, losing some of that extended color range. And on an SDR display, the luminance gains won't be visible - you'll see the SDR fallback version of the image. This is why the "end-to-end" framing matters: the HDR benefits only materialize when the entire chain - capture, processing, and display - supports the wider gamut and dynamic range.

P3 Color Space vs HDR Luminance: A Critical Distinction
One of the things that I was initially confused by, and a reasonably common point of confusion I've encountered in discussions about HDR is the relationship between P3 color space and HDR luminance. They're often mentioned together, but they're not the same thing - and understanding the difference is important for making informed workflow decisions.
P3 color space describes which colors can be represented - it's a wider palette than sRGB, with richer reds and greens. HDR luminance describes how bright those colors can be displayed. You can have one without the other. A standard P3 JPEG exported from Capture One, for instance, has access to the wider P3 color gamut, but it's still limited to SDR luminance levels - typically around 200-400 nits on most displays. An Ultra HDR JPEG from Phocus, by contrast, has both: the wider P3 color palette plus the gain map that allows highlights to exceed 1000 nits on capable displays.

Think of it this way: P3 gives you a bigger box of crayons with more colors to choose from. HDR luminance means some of those crayons can actually glow, as if they were backlit from within. The wider color palette is nice, but the luminance extension is what makes highlights genuinely bright rather than just lighter shades of the same colors.
This distinction matters because your TIFF files contain all the luminance relationships from your capture - the sensor recorded that a chrome reflection was four stops brighter than the white shirt next to it. But without a gain map, the display doesn't know it's allowed to exceed SDR peak white. The data is there; the instructions for how to use it aren't.
Here's where the encoding difference becomes concrete. In a standard SDR file, the brightest possible value (255 in 8-bit, 65535 in 16-bit) represents "reference white" - the display interprets this as its SDR peak brightness. Everything in your image gets mapped to fit within that ceiling. If your scene contained a chrome reflection that was genuinely four stops brighter than a white shirt, both end up mapped near that maximum value. On an SDR display, they appear at essentially the same brightness - you've lost the luminance relationship between them.
HDR encoding works differently. The gain map tells the display exactly how much to boost specific pixels beyond the SDR reference. The white shirt might display at 400 nits (normal SDR reference white), while the chrome reflection gets boosted to 1200 nits, and sun breaking through clouds might hit 1600 nits. The display is literally emitting more photons for those highlight pixels - they're actually brighter, not just numerically higher values mapped to the same output.
I think of it like a speedometer analogy. SDR is a speedometer that maxes out at 100 mph: whether you're driving a Prius or a Ferrari, the needle stops at the same place. HDR is a speedometer that goes to 300 mph - now you can actually see the difference between the two cars. The underlying capability was always there; it's the measurement scale that changed.
To make this concrete, consider how the same scene elements might render on an HDR display versus SDR:
Scene Element | SDR Display (nits) | HDR Display (nits) |
Deep shadow | 0.5 | 0.5 |
Mid-gray | 80 | 80 |
White shirt | 200 | 400 |
Chrome reflection | 200 (clipped) | 1200 |
Sun through clouds | 200 (clipped) | 1600 |
Notice that the SDR display can't differentiate between the white shirt, the chrome reflection, and the sun - they all hit the same ceiling. The HDR display preserves those relationships, letting highlights actually glow the way they did in the original scene.
Why Still Photography Uses PQ Encoding, Not HLG
If you've encountered HDR in broadcast or streaming contexts, you may have heard of HLG (Hybrid Log-Gamma) as an alternative to PQ (Perceptual Quantizer) encoding. Both are valid HDR transfer functions, but they serve fundamentally different purposes - and understanding why gain map formats like Ultra HDR JPEG use PQ explains something important about what makes HDR photography work.
The key difference is how each handles display adaptation. HLG uses a relative, display-referred approach: the same code value means different absolute brightness levels on different displays. A 1000-nit TV and a 4000-nit TV both interpret "maximum" as their respective peaks. This makes HLG excellent for broadcast, where content must play on millions of unknown devices without metadata coordination.
But this adaptive behavior creates a problem for photography. As photographer Florian Thess explains in his HDR guide:
"HLG's system gamma changes with display peak brightness, meaning the same image has different mid-tone rendering on every screen. A portrait edited on a 1,000-nit display will have noticeably different contrast when viewed on a 4,000-nit display, not just in the highlights but throughout the tonal range."⁷
This variability is unacceptable for photography workflows where precise tonal relationships matter. When you adjust shadow detail or highlight rolloff in Phocus, you need predictable results across displays. PQ encoding provides that predictability: code values map to absolute luminance levels (a specific value always means 400 nits, regardless of the display), and displays either reproduce that level directly or apply tone mapping when they can't reach it.
The gain map architecture adds another layer of sophistication. Rather than encoding the entire image in PQ (which would require every viewing device to implement consistent tone mapping), Ultra HDR JPEGs use PQ-encoded gain maps to specify exactly how much to boost each pixel beyond the SDR base. This preserves tonal relationships while allowing graceful adaptation - the SDR base provides the fallback, and the PQ gain map extends into HDR with mathematical precision.
This is why Apple's Adaptive HDR, Google's Ultra HDR, and Adobe's gain map implementations all use PQ encoding. It provides the perceptually uniform, scene-referred foundation that photography demands - where your edits mean what you intend them to mean, regardless of which HDR display shows the final result.
Coming Up in Part 2
Now that we have a slightly better understanding of what HNCS HDR actually is and how it differs from traditional HDR tone mapping, the next question is: how do you actually get HDR output from your images? Part 2 explores the available output formats - Ultra HDR JPEG, HDR HEIF, and standard RAW - along with third-party options for creating gain maps.
We'll also confront an uncomfortable reality that Hasselblad's marketing conveniently glosses over: the HNCS/HDR/External Editing Trilemma. If you've built your workflow around exporting TIFFs to Capture One or Photoshop, you'll want to understand this trade-off before committing to an HDR workflow. sign up below to make sure you don't miss the next 3 parts.
Series Navigation
This post is part of a five-part series on Hasselblad's HDR implementation:
- Part 1: What Is HNCS HDR and Why Should RAW Shooters Care?
- Part 2: Output Formats and the Trilemma Every Shooter Faces
- Part 3: The Complete Phocus 4.x Workflow
- Part 4: Displays, In-Camera Limitations, and Platform Support
- Part 5: Print, Archival, and Practical Recommendations
References
- Phocus 4.0 Mac ReadMe, August 26, 2025. "All Hasselblad RAW images can now take advantage of HNCS HDR processing in Phocus 4.0."
- Hasselblad Press Release, "Hasselblad Introduces the X2D II 100C and XCD 35-100E," August 2025. https://www.hasselblad.com/press/press-releases/2025/hasselblad-introduces-the-x2d-ii-100c-and-xcd-35-100e/
- Hasselblad X2D II 100C Product Page. "Traditional HDR solutions focus solely on dynamic optimisation by brightening shadows and compressing highlights... Hasselblad HNCS HDR extends the colour gamut to the wider P3." https://store-na.hasselblad.com/products/x2d-ii-100c
- B&H Photo, Hasselblad X2D II 100C Product Description. "The new imaging system offers an increase in dynamic range of 3 stops of exposure for in-camera output, with up to 4 stops of exposure when processing RAW files in Phocus."
- Wikipedia, "DCI-P3." "DCI-P3 covers 53.6% of the CIE 1931 chromaticity diagram... Display P3's gamut is approximately 50% larger than sRGB in volume and 25% in surface." https://en.wikipedia.org/wiki/DCI-P3
- Wikipedia, "DCI-P3." "Since iPhone 7, the built in camera creates images tagged with the Display P3 ICC profile."
- Florian Thess, "High Dynamic Range Stills Photography: A Modern Guide." "HLG's system gamma changes with display peak brightness, meaning the same image has different mid-tone rendering on every screen." https://www.florianthess.com/hdr-photography-guide

The Tech Behind the Frame Newsletter
Join the newsletter to receive the latest updates in your inbox.


